 Adam and I had been in search for a drawer system for use in our office, and then there it was, the Ikea Alex. Everything was right. It was the perfect height. It had plenty of long thin drawers, perfect for tool organization. It even had wheels. We excitedly perused our color options; white, white, or white. Hmm….
Our office is mostly wood tones and black, so white was just not working for our color palette. At first we tried to find another option, but we just kept coming back to the Alex. It had the barebones of exactly what we needed. That’s when we decided to buy the Alex and give it a facelift. Our plan was to paint it black and customize the drawer fronts. This is how we did it.
Materials
- Ikea Alex (≈$130*)
- 2 Containers of Plaid Mod Podge Hard Coat 8 oz (≈$6 each, $12 total)
- Paintbrushes
- 3 Cans of Krylon Fusion for Plastic in Black Satin (≈$5 each, $15 total)
- Dropcloth (≈$1)
- Scrapbooking Paper of Your Choosing (≈$3)
- Scissors
- Razorblade Cutter
- Cutting Mat (Can be as simple as a piece of cardboard!)Drawer Liner (≈$10)
*Prices are shown only for items we purchased and include tax. We already owned the other items.
The cost for our Alex facelift = $41 + Alex itself = $171.
Color Change
The first step for this project was the color change. Although the Ikea Alex is mostly particleboard, it is coated with melamine, foil, and acrylic. This made it confusing for choosing the right type of paint. We wanted something that would be easy to apply, had even coverage, and would be durable enough to handle the wear and tear of being in our office. This isn’t your normal office. Mad science happens here.
After researching the many options, we decided to go with a spray paint made for plastic. The container also specified it could be used on Wood, Metal, Wicker, Wrought Iron, Plastic, Hard Vinyl, Glass, Plaster, Ceramic, Paper, and Paper Mache. We figured it would have the adhesive property to cover anything.
We opted to spray paint in our “back yard”. Yup, it’s just a porch. We laid down some plastic drop cloth that we picked up at a local dollar store (much cheaper drop cloth than at your local hardware store!).

It took about 3 cans of spray paint to cover all the necessary pieces. For time and material saving, we decided not to paint the inside parts.
We probably should have read all of the direction before starting. After painting all the pieces we learned that the brand of spray paint we used takes approximately 7 days to “cure”. We couldn’t keep the pieces outside for that long, so we knew would have to find some place in our house. Our half bath room was out of service for the following week. I wish we had a garage!

When choosing a paint option, here are some things to consider about spray paint.
Pros
- coverage was very even
- dried to touch in only 15 minutes
- painted entire surface quickly
- practical color choices (we chose satin black)
Cons
- takes 7-14 days to fully harden
- may chip
- fairly toxic as shown in the msds
- paint excess sticks if you reuse dropcloth (This was my fault. After painting twice already on the drop cloth, I laid more pieces over the excess paint. That excess paint ended up sticking to the drawer fronts I laid on top of it. It was an easy fix though. I just sanded and repainted.)
Customizing Drawer Fronts
While we were at Ikea, we had also picked up some damask designed wrapping paper. Our original idea was to use it to cover the drawer fronts. How sweet would it be to do an Ikea hack almost thoroughly with items from Ikea! Initially, we did go forward with this idea.
Upon using the wrapping paper for the drawer fronts, we realized two things:
One, it scratched easily.
Two, air bubbles in the glue were impossible to remove! Both of these were a result of the thinness of the paper.
Because of these reasons, we decided to use scrapbooking paper instead. It was a cheap option as we only needed seven 12” by 12” pieces that cost 30 cents each (on sale!).
The paper was easily applied to the drawer fronts using hard coat mod podge. We choose the hard coat variety because of the durability factor.
Steps to apply the paper to the drawer fronts:
- Cut paper roughly to size. It is easier to have extras hanging off almost all of the edges to cut off later. I say almost all of the edges because I started the paper on the left edge perfectly to help keep alignment of the design.
- Apply a very thin coat to the back of the paper using a brush. I had some paint brushes laying around for acrylic painting that I used. Just definitely remember to wash them completely after use. I did end up with one solidified brush victim.
- Using a plastic store discount card, push all the air bubbles out from under the paper. I imagine this is much like what car painters have to do when applying decals. One thing I learned the hard way: even if it doesn’t look like there are bubbles, there are! It is important to do this process immediately, or the paint will start to dry and the bubbles will be impossible to remove.
- Repeat steps 1-3 for all the drawer fronts.
- Cut off the extra paper from all the drawer fronts using a razor blade knife or something similar.

Cutting Excess Paper with a Razor Blade - Apply mod podge to the surface of all the drawer fronts. The container recommends using 5-10 coats. We applied about 8 coats.
Using Mod Podge Glue as a Top Coat


Reinforcing Color
To be on the safe side, we also applied about 5 coats of mod podge over the spray paint. We hadn’t planned on doing this in the beginning, but even after 7 days of “curing”, the paint chipped on one of the corners. After investing so much time and effort in the project, we didn’t want to take any chances.
When applying mod podge, it is important to coat the entire surface each time. This provides an even coverage. The mod podge will apply white but it dries clear. If you apply the mod podge haphazardly it will look splotchy.
Assembling the Alex
We only let the mod podge dry overnight since we were excited to see our completed project. Assembling the Ikea Alex was fairly easy. Some of the screws were tough to get started, but overall, we have no major complaints.
Adding the Final Touches
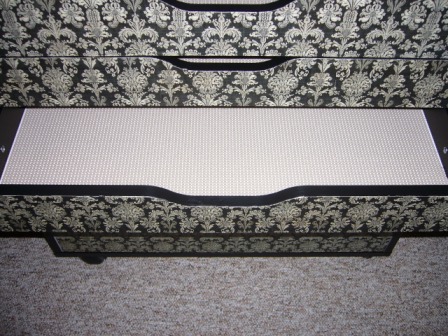
After assembling the Alex we put liners in each drawer in order to minimize slippage.

Then we organized our tools in their new home.

Now a finished project, we have an Ikea Alex customized to our tastes!

UPDATE: December 1,2 2009:
We found a similar project to ours via Scraponomy Blog (German to English translation here.) . This new project was done on June 26th, 2008. We were unaware of this project until now. Check it out over at the Painted Fish Studio website.
wow, good thing there are 2 of you to do this. looks great. I too only have a patio (second floor) and would love to do some floor cloths but… no flat space.
thanks for you step by step
Saw this on the Ikeahacker blog. Love love love! I’m totally inspired. Thank you!
never thought of putting the non slip liners in my craft drawers, fantastic idea!
Hi! I know it’s been a while since you made this DIY, and I was hoping I could ask a quick question.
I’m planning on buying the Ikea Alex 9 drawer but it only comes in white. I would most likely follow your tutorial to paint it black. I was wondering how has the paint held up? Has it chipped since you painted it?
Thanks!
Clarissa (:
Hi Clarissa,
It has actually held up really well. I think my excessive coats of modpodge is what did the trick! The Ikea Alex does now actually come in black in the smaller sizes – I wonder why it doesn’t in the larger size!?
Saw this great idea on the Instructables website. Thanks so much for posting, and I can’t wait to try it out!