 Recently, we noticed our stock of WASP and WASP Solderless kits were running a bit low. Just in time for the World Maker Faire (be sure to stop by and say “hello”), we thought you might be interested in seeing what goes into making a new swarm of WASPs. This article is complete with lots of pictures showing every step.
The first step is to gather materials. Here we have most of the materials required for making 20 WASP original and 20 WASPS Solderless kits.
The magical box of WASP boards.

New pack of motors. Mmm, still has that “new motors” smell…

One of our boxes with 2,000 phototransistors in it; I love ebay.

One of the first things to be done is to cut and bend the motor mounts. We cut ours from a large spool and bend them with pliers.

Wheels are then cut from glow in the dark glue sticks. I hand cut these with a razor blade to about 0.5 inches. I have to hand cut these because I haven’t found a better method to get consistently good results. I had built a melting wire device, but it left the edges of the wheels all messy and the resulting WASPs didn’t roll well. I’ve envisioned a simple metal guillotine that would cut an entire glue stick at once, but I don’t have a machine shop to play with, nor the real need to build such a device. For now I just roll the razor on the gluestick about half way through, then push the blade the rest of the way. This gives pretty good results and the wheels roll as expected on the final product.
Then the wires are all cut. I wish I had a wire cutting machine but again, I don’t really have the need for such a device. Each WASP needs a three-inch red and three-inch black wire for the power connectors. This is plenty for the WASP Solderless, but the WASP Original kits need an additional 2 three-inch black wires as well as 2 three-inch wires for the motor connectors. These wires are cut then placed in parts bags (pink antistatic bags shown in the pics) as the parts are collected.
The WASP original kits are basically a bag of parts. Once the motor mounts have been made and the wires cut to size, the only thing left to do is gather the other parts. All the tiny things in the kit such as glue stick wheels, chip, socket, phototransistors, wires, PCB and tape are put into pink antistatic bags. The chips and sockets go onto antistatic foam first, of course. These pink bags as well as the larger components such as the battery pack, the motors, zip ties, chenille stems and the motor mount are collected and placed in the final retail bags. The WASP Original is then finished. All that is left is a color manual and a box, and these guys are ready to fly.
*** Now for the hard part ***
The Solderless kits require a good amount of work before they can be bagged.
First, the 3” power leads are soldered onto the WASP boards using lead free solder. I use Kester lead free solder. Rarely, I’ll have to use flux on this part, just because the wires don’t take the solder well.
Next I solder on the chip socket, and then the “eye” holders which are actually LED plugs. Here you can see some of the finished boards.


The Motor connectors need to be cut to length. We buy these at 12 inches, but we cut them to 6 inches for the kits. In this case I had to cut 40 of them.

Once the motor connectors are cut to size, they are soldered onto the PCBs.


The wires of the motor connectors are removed to make the boards easier to handle, and the boards are soldered to the 9V battery holders. Again, flux is used here but only needed in certain cases.

All the soldering on the bodies is done. The bodies are washed in warm water and scrubbed with a toothbrush to remove all the flux.
Now we can focus on the motors themselves. The first step here is to cut the heatshrink and put it on the wires of the motor connectors. There have been quite a few times when I forgot this step, and was half way finished soldering the wires to the motors before I realized my mistake, and had to redo the whole batch.

Once the heatshrink is on the wires, they are stripped and tinned with lead free solder. Flux is used here more than in any other step.

Next, the motor leads are tinned. I lay out all 40 motors and tin the leads on the top side, then flip them and do the other side.

Then I realign the motors to make it easier to solder on the wires. Making sure the motor vent is facing up, I attach the black wire to the top lead then flip the motors and attach the red lead. When they are all finished, I use an old toothbrush to clean off the remaining flux the best I can.

Here are some cool artistic pics of the motors before the heatshrink is applied:

Then I slide the heatshrink over the motor leads and use a heat gun to shrink them to size.

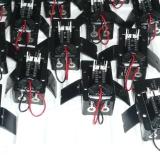
Once everything is built, each new candidate for the title of “WASP Solderless” must pass a system test. All the components are connected up and power is applied. The robot must respond to light by having only one motor on at a time, and changing which motor spins depending on which phototransistor gets more light.
Only once a robot passes the test will the brain be attached to the body using 2-sided thick foam tape.

Below are a bunch of newly passed bugs:

Now the motor mounts must be attached. Here you can see all the motor mounts with think foam 2-sided tape on them awaiting bodies.

Then the glue stick wheels are put on the motors. To accomplish this task, a little ingenuity was required. (And when I say “a little” I really mean it, haha.) Instead of using a candle to heat a paperclip to melt a hole in the glue stick for the motor shaft, I rigged up a simple device consisting of an old dollar store soldering iron, and a piece of steel coat hanger. Of course I attach this to my soldering stand to adjust the power settings.

I adjust the power so that the glue will melt, but not burn. I then use the tip to melt a hole about 0.25 inches deep in the end of the glue stick. Once the glue stick is melted to the proper depth, I stick it on the motor, and spin it to make sure it is as centered as possible. This ensures the final WASP will roll evenly on both sides.

Here are some artistic pictures of the motors with their new wheels:

Now a new swarm of WASP Solderless kits are about ready to take flight. Yup, I went there. Deal with it.


All the parts are collected in bags, and all the bags are heat sealed. We got the impulse sealer from ebay for fairly cheap. I expected it to be broken, but it was actually perfect.

The bags are then stored until a WASP is bought. At that point, a box is made up and the bag of parts, color manual, and sometimes a flashlight are packaged in the box, and the box is wrapped and shipped. We also take 5-10 of each kit to shows we do (like Bugfest and Geekfest).