 It has been bout a year now since I last had a chance to play with my CNC machine, so I figured I’d give an update on the progress so far and what I’ve learned.
Hardware:
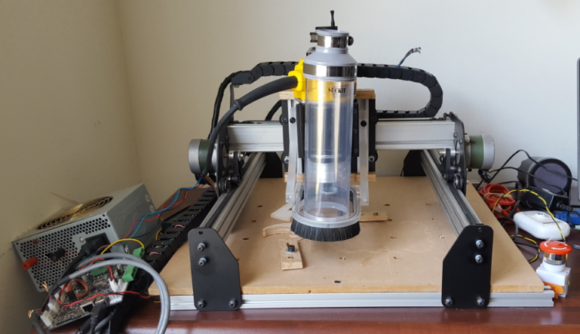
Firstly, I got the Dewalt 611 router and router mount. This is a huge upgrade from the no-name dremel knock-off I had. After test cutting just once with the old router, the brushes were shot. I sprung for a real tool instead of a toy. As a bonus, it makes the machine look nicer as well. In order to fit 1/8″ shank bits, I had to get a 1/8″ collet for the DW611. This wasn’t terribly expensive if you compare the cost to replacing all of my router bits with 1/4″ bits. I got all of this late summer 2015 and literally had only enough time to attach it all to my machine before life got crazy busy. I never even had a chance to test it until now.
I also recently got the Suck-It from kickstarter. This goes a LONG way into keeping dust to a minimum. A warning, however, I tightened the screw too tightly on my Suck-it and accidentally drove the bottom edge into one of my makerslide rails since I don’t have endstop switches. This promptly shattered the Suck-it acrylic into incredibly sharp shards. While you can purchase additional parts from the Suck-it website, I opted to make my own replacements from wood, which is a bit more forgiving.This also gave me a great chance to finally learn some CAD software.
While testing, I finally realized that the ACME screw inventables sent me last year as part of my upgrade kit is warped. It binds in a couple of places when I try to move the Z-axis up all the way. I thought that I could fix this by simply getting a stronger motor, so I ordered the NEMA 17 from inventables. This was stronger, but still couldn’t overcome the bend in the screw. The bend also causes the very tip of my bits to wobble ever so slightly. It is almost imperceptible, but makes a big difference when I mill multiple passes of the same shape or try to do PCBs.I contacted Inventables and Mo in customer service worked with me over a couple of weeks to get my Z working great. It turns out that Since I upgraded from Shapeoko1—> Shapeoko2–> Xcarve, I had the wrong spacers on my router mount. The ones I had were about 2mm too short. Mo helped me get the right length spacers (9.5mm long) and bolts(35mm). My short spacers and bolts were causing the ACME screw to bend back towards the gantry at a significant angle. When installing the new spacers, be sure not to use washers as this will also change the angle of the ACME screw. With the new spacers installed I can get all but 7mm of my Z axis working perfectly smoothly. Thanks Mo!
I also bought this clear tube for my suck-it vacuum mount. This was about 63mm in diameter, so I had to same the interior of the acrylic suck-it plate to fit the tube. I also cut it to about 9 or 10 inches in length. At this height, the tube is about the height of the router itself. This gives me more visibility to see what is going on with the business end of my router rather than the black coupling tube that the suck-it came with.
CAD/CAM:
I wanted to learn a real CAD package since my FabAcademy training in 2014. I only had experience with Sketchup which, while very good for beginners, it doesn’t really follow the same kind of workflow as professional engineering CAD/CAM packages. I wanted to learn something along those lines. I had played with Creo, Solidworks, Antimony, and was looking into Rhino/Grasshopper when I saw Fusion 360. Autodesk has been going crazy buying and building awesome CAD/CAM tools for the hobby market as well as for industry. Fusion 360 is a complete engineering tool that can start with a 2D sketch or a 3D body and allow a user to create objects, render them realistically, stress test them with finite state analysis, and export 3D print or CNC toolpaths. Oh, and did I mention that it is free and has a very active community online as well? So I downloaded it and gave it a try. I am quite pleased with it in all respects!
Having no formal training, I opted to take some free online courses from Udemy.com. Check out my other posts concerning that. Of course, as with anything, beginning is the toughest part. It took me a couple of days to get the hang of the Fusion 360 workflow, but with all the great tutorials and videos online, it is easy to find answers to your questions. If not, you can post to Autodesk’s forum for help.
Moving on, I played with Fusion 360 starting with the 3D sculpt method at first to get some awesome organic shapes, then moved to learning the 2D sketch workflow. I measured my machine and aluminum rails of the Suck-it. I made quite a few mistakes along the way, and had to start over several times, but I finally figured out how to get what I wanted out of the software. It is still a bit buggy from time to time and crashed a few times when I tried to do certain things, but I think it was partially due to a bad design. I watched a couple videos and fixed my design and was able to create the toolpaths without further issue.
Fusion 360 can do 2D and 3D milling jobs with ease. There are a lot of options, but videos mentioned in my previous post cover most of what you need to know. I’m running a smoothieBoard on my machine and Fusion 360 has a CAM processor script designed for my board, so I simply select “Smoothie” from the dropdown menu when I go to export my design and I’m good to go.
Sending the job to the machine:
The main software people are using to send jobs to the smoothieboard is Pronterface, which is typically used for 3D printing. It’s all Gcode, so it doesn’t really matter, but for some reason, I didn’t like using a 3D printing software for CNC. Last year I tried using Universal G-code Sender with the smoothie and even played with coding in this ability, but life got too busy for me to continue, so I stuck with using Pronterface. What I like about Pronterface is the ability to create custom buttons. For example, I made buttons to zero the axes, reset the smoothieBoard after I hit the killswitch, etc. These prevent me from having to manually type the Gcode in the command window. I can even send smoothie console commands using these buttons.

You can also run the smoothieboard over ethernet. You can do so through pronterface or by using one of several web interfaces (meaning you can control your 3dprinter or CNC machines over the web). This is useful in my FabLab at work where we have a lot of 3D printers running on a 3D print server. You can run the smoothieboard on this as well. It can host several different web interfaces which I hope to go into later, but one of them is basically a webpage that looks just like pronterface.
I feel like I finally have a good workflow here. You can see my results here. I made replacements of the broken acrylic pieces of my suck-it dust boot that I made in Fusion 360. I used scrap wood, so it had quite a few drill holes going all the way through it already. I also did conventional only, and no climb milling which would have given a nicer finish. I used a 2-flute straight 1/8″ but as well, no spiral which would have also given me a cleaner result. Due to my learning curve, I did have to do some manual touch ups to the dimensions of the pocket which explains the nastiness in there you see. 