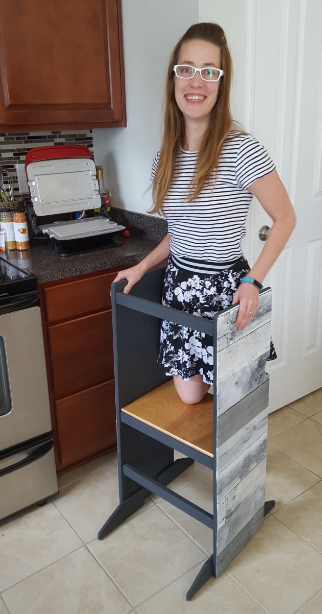
Having a toddler that always wants to help in the kitchen, there’s a need to have a safer alternative to having them just stand on a chair to reach the countertop. I had no idea, but this is already a thing called a learning tower. Kind of a overblown name for a stool with guard rails if you ask me, but whatever. As a note, this blog post if filled with affiliate links. I thought you might like to have the entire tools list.
After looking online at learning towers (and learning what they are) I was learning toward buying some IKEA parts and hacking them together like so many others online, however IKEA stopped selling one of the crucial components. This left me having to do some custom work. If you’re in for a penny you’re in for a pound so I started looking at custom designs for learning towers. After about an hour of research Jess just said “go see what scrap wood we have and we’ll cobble something together.”
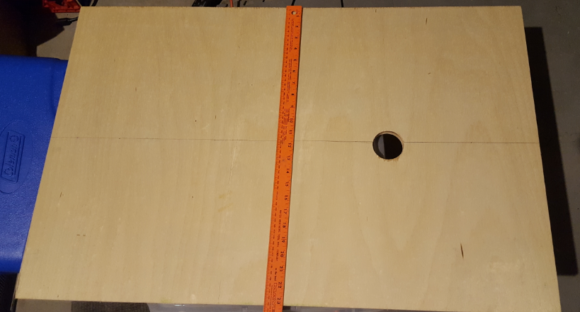
We happened to have a scrap piece of wood that used to be a leaf blower hovercraft… for… reasons. It was 33 inches by 36 inches. Of course with a hole in it for the leaf blower to mount. That’ll do. It’s just tall enough for our countertop and just wide enough that when split in half it can hold a toddler with a bit of wiggle room. Final dimensions of the sides were 36″tall by 16″ wide.
I sliced it up to be the sides of the learning tower. Then I got to (finally) use my router table and my 1″ diameter 1/2″ depth roundover bit for the first time. The trick is not to have the bit stick up too far on the router table, otherwise you’ll get a nice roundover on the edge, but it’ll cut deep enough to leave the face of the wood raised a bit proud. This would then need to be sanded down (unless you like the look and feel of it). Run this on both sides of each piece to get a nice smooth rounded edge. It makes it safer for tiny hands as well as making it look more professional. I got my router table from Craigslist that a guy had built from this plan on a woodworking website for $10. He was upgrading and it was taking up space so I got it for less than the wood costed him. It didn’t come with the router itself for that price. I had to get my own. It was the perfect excuse to get a beefier router for future projects than the Dewalt DW611 trim router I have in my Xcarve CNC machine. I stuck with Dewalt for the brand and got a DW616 model with the fixed base. I mounted it on the underside of my table and when I need to, I can unscrew it and use it manually.
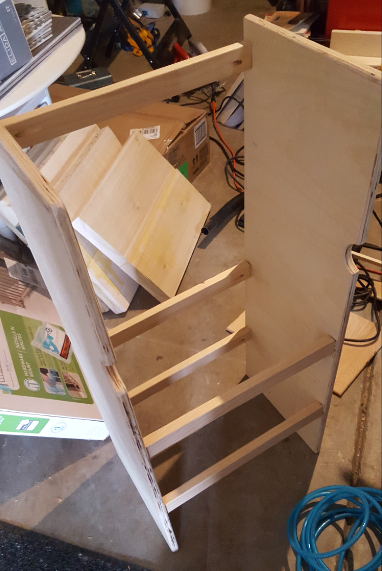
Now to attach the two side panels. In the old scrap pile, we had an 8 foot section of 1×2″ pine. I have no clue why it was magically there when we needed it, I don’t remember ever buying it. Regardless, it was good to be used. Jess threw out the number of 16″ for the space between the sides of the tower. That worked out to having 6 of these beams. Of course they were a bit shorter due to the kerf of the blade. I cut these using my pull saw and a plastic miter box. The draw saw is the best thing to ever slice bread. Especially for trim pieces, the cuts are very precise, the blade has minimal kerf, and it cuts very quickly. In fact I use this saw over a push saw on all my projects be it cutting 4x4s or moulding. At this point, stumbling our way through the design, we settled on something with ladder-like steps the kid could climb up, and that we could reposition the platform as they grow.
I knocked off the sharp 90 degree edges of the 1×2 pieces using a cornering tool kit. This tool looks like an old can opener and works kind of like a plane to scrape the edges into a smoother shape. I got a kit a couple years ago for a project and have wanted to use them on something else for a while now. I have to say, this is way better than trying to smooth the corners of these small pieces with sandpaper and much safer for your fingers than using a router table for these small pieces.
Normally, connecting pieces of wood in this way leaves much to be desired. If you drill directly into the side panel into the end of the 1×2 piece you’ll have a really weak joint and you’ll see the screw on the side of the panel. It isn’t strong because the wood fibers (visible by looking at the grain) are aligned along the long axis of the 1×2. Wood fibers are basically long tubes that the water gets drawn up into the tree through. When you screw directly into the end, imagine that you are screwing into the end of a stack of straws. The fibers spread around the screw and there’s not much for the screw to grip on. The best way to connect these pieces is with Pocket Holes. I got a great and versatile pocket hole jig made by Kreg recently and this was a great chance to try it out. Probably 10 years ago I got a knock off pocket hole jig made of aluminum to save some money, but it ended up working for barely one project before the guide holes got all wallowed out and useless. It also could only accept a certain size piece of wood as it was a piece of extruded aluminum. This kreg kit on the other hand can accept a wide range of pieces of wood. It also has guides for making the perfect depth hole based on the the wood thickness. The drill guide is completely removable to use on parts in situ as well. All in all, the Kreg kit is the best bet by far.
I messed up one of the beams by not setting the correct depth for the pocket hole, so that left me with 5 total. That works out to 4 on the bottom for the ladder step and platform holder and then one for the back at the top. I typically have found that 1-1/4″ drywall screws are just about the most useful type of screw to have laying around for just about any project, so I used a single screw on each end of the beams to attach them. (Now there are times when to buy different screws, but in most cases these will work fine). To keep the beams from spinning about the screws (even though the pocket holes helped with this by being slightly off axis) I tacked each beam through the side panels with 2 finishing nails from my brad gun.
I then cut a platform out of a piece of 1/2″ scrap plywood to fit between the side panels. To make sure this thing will stay in place, I attached a 1/2″ square dowel on the front and back edges just inside where the platform rests on the beams. I glued it and tacked it with brads.

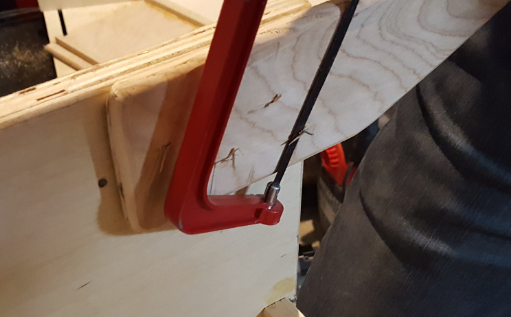
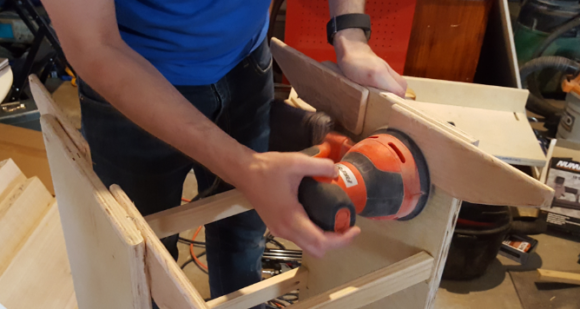
When we got to this point we realized the design was a little tippy front to back and didn’t sit squarely on the floor. Going back to the scrap pile, I cut out two sets of “feet” about 18″ long and 3″ tall. I then cut these in half so they’d stick out of the front and back more when I mounted them. Of course I rounded them off at the router table again with the same bit. I attached them to the bottom of the tower with wood glue and brad nails that I once again cut off the excess length with a hacksaw and sanded them smooth with an orbital sander. This added 5-6 inches to the footprint on the front and back making the whole thing much more stable.
A touch of wood putty here and there to fill in gaps in the edges of the plywood and cover the most visible pocket holes, a light sanding all over, and a couple cans of dark grey spray paint on the edges and interior did a majority of the finishing. Jess had some wood-flavored contact paper and added that to the exterior of the side panels.

A few coats of spray-on polyurethane on the platform finished that part off. Jess modge podged the edge of the contact paper to the rounded end of the sides and voila’ our learning tower was complete. –Though after use by the sink it was shown that it’s better to use the exterior modge podge instead. It is a little hardier when it gets wet that the regular stuff.