While working with Charlotte Latin FabLab students this year, we came across an issue. Alex was using a camera module for her Arduino project (ArduCam) that gave RGB565 formatted pixel data but she needed to convert it to RGB888. Though there are tons of posts on stackExchange about how to do it, I couldn’t find a simplified broken-down explanation of how it works to point her to, so I decided to write one.
RGB565 means there are 5-bits of data for the Red component of the pixel, 6-bits for green and 5-bits for the blue. It looks like this:
pixel value =
RED= R4, R3, R2, R1, R0,
GREEN= G5, G4, G3, G2, G1, G0,
BLUE= B4, B3, B2, B1, B0
But Remember RGB565 is stored as two separate values (VL and VH from the example code for the camera we used), with the low value on the left and high value on the right.
VL = G2, G1, G0, B4, B3, B2, B1, B0 VH = R4, R3, R2, R1, R0, G5, G4, G3
Some clever bitmasking can strip out each component color and place them into individual variables. We’ll AND the bits of the values we want from VL and VH with ‘1’ or ‘0’ depending on which we want at a given time.
Of course this has to be done for each and every pixel, and she had 320 x 240 in her original image.
This is a simple nested for loop that already used in the example code to read the data from the camera
for (int i=0; i<240; i++){


   for (int j=0; j<320; j++){

    //Convert the RGB 565 to RGB 888 of the pixel in the bitmap and store it as PIXEL data type in the new larger array.


    //Step A convert to the new PIXELS format


    ///Step B scale from 565 to 888


    }//end for j


 }//end for i
STEP A: Convert the color to a new pixel format.
Based on some example code, it’s best to create a structure to contain the R, G and B values:
typedef struct {
unsigned char blue;
unsigned char green;
unsigned char red;
} PIXELS;
Then we need a large array to store the pixels of the new image:
PIXELS bigPIXELS [12] [12]; //the resulting RGB888 picture pixels are stored here
Then you can convert each pixel by using logic operations and bit shifting.
/*Blue is the easiest to see how this works so we'll do it first.

 The values for Blue is stored in VL So for example if VL = 1011  0101( blue = 21 in decimal)
 to get the blue values all alone, we can AND them with 1s and AND the green bits with 0s
 leaving you with an 8-bit number with only the blue data in the right spot. The result
 is: 0001  0101  or 21 in decimal.
*/
  bigPIXELS [i][j].blue =    ( VL & 0b00011111 ) ; //0x1F


/*Red is only slightly more complicated. We first get bits for red alone, then shift them
 to the decimal point The 0b11111000 gives you only red data as before, but the digits
 aren't in the right place.

 There are place-holding 0s that make the value of red too big:
 For example is VH = 1101  0110  The value of red is 26 in decimal here. ANDing as before
 would give you only 1101  0000, but if we convert this number to decimal, it =208, which
 isn't right at all. Shifting to the right by 3 (>>3) moves the red value down to the
 decimal point and gives you 0001  1010 = 26 in decimal in 8-bits
*/

bigPIXELS [i][j].red =   ((VH & 0b11111000) >> 3); //0xF8


/*Green is the most complicated as it has components in each VL and VH so we'll AND the
 bits with 1s and then shift them to the right places, then we need to OR them to the correct spot

 VL = G2, G1, G0, B4, B3, B2, B1, B0  so to get only green values
 */

// since we don't use this variable for anything else, we can just dump the result of this operation back into VL
 VL&= 0b11100000 ;  // 0xE0

 // VH = R4, R3, R2, R1, R0, G5, G4, G3  so to get only green values
 VH &= 0b00000111; //0x07

 //Now shift the bits to the right places and OR them together to glue them into one number
bigPIXELS [i][j].green =  (uint8_t(VL) >> 5) | (VH << 3); //Shift lower 3 bits in VL to the decimal point, and shift the upper 3-bits in VH to their correct positions.
Great! Now we have our RGB values by themselves, now let’s let them stretch their arms to take up the full 8-bits that’s now available to them.
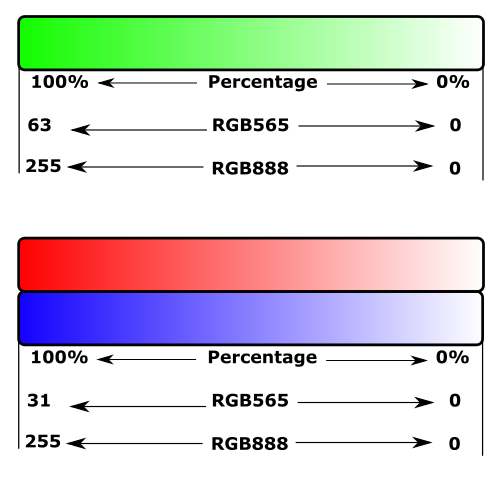
Step B: Converting from one colorspace to another is simply a function of scaling. You’ve already done this a lot actually. Any time you’ve read an analog input, then used that to control an analog output on arduino you’ve done it. Imagine a knob on the Arduino’s analog input. Analog inputs can read values from 0-1023 (10-bits) where 100% is = 1023. Imagine a single red pixel as an LED on an analog output. It can only take values between 0 and 255 (8-bits) where 255 is 100% brightness of the LED.
You can do the same thing here. In a 5-bit number system, 100% is when all bits are 1’s so it is 11111. This needs to be converted to an 8-bit system where 100% is = 1111 1111.
You use Arduino’s map() function to map the values from one scale(0-1023) to the other (the LED’s 0-255), however this is very inefficient and slow.
Since you know what the numbers are going to be for the scaling calculation, and they won’t ever change you can pre-calculate them for your code. You’re scaling from 5-bits to 8-bits for red and blue which is 0xFF / 0x1F = 255 / 31 = 8. For green you start with 6-bits and convert to 8 which is 0xFF / 0x03 = 255 / 63 = 4. You could multiply these hardcoded numbers to scale red *= 8; green *=4; blue*=8; however since these are powers of 2, there’s a trick to make this code faster. Simply bit shift left. For each bit you shift, it is equal to a power of two so the code would be red and blue << 3 and green << by 2.
//If you want to see the RGB 565 values print them here, or comment out if you don't need them
Serial.print(" RGB565 =");
Serial.write(bigPIXELS [i][j].red);
Serial.write(bigPIXELS [i][j].green);
Serial.write(bigPIXELS [i][j].blue);

bigPIXELS[i][j].blue = bigPIXELS[i][j].blue << 3;//blue and red were 5-bits

bigPIXELS[i][j].red=  bigPIXELS[i][j].red<<3;

bigPIXELS[i][j].green =  bigPIXELS[i][j].green <<2;//Remember that green has 6 pixels to begin with so it only shifts 2 places
Now you can do with these as you please. Add a BMP header and print them to the serial port to be able to view this BMP image on your computer.
Serial.print(" RGB888 R= ");
Serial.write(bigPIXELS [i][j].red);
Serial.write(bigPIXELS [i][j].green);
Serial.write(bigPIXELS [i][j].blue);
Hi Adam, thank you for this guide!
I was thinking, since each color is shifted two times, would it be easier to shift it only once or even no shifting?
For example, red is first shifted right by 3 in step A and then shifted left by 3 in step B, we can just leave its MSB aligned with the MSB of its own byte?
Good point! I didn’t think about that but you’re right. The way I wrote it will add a couple clock cycles for each pixel which can add really up. Your way would be faster.