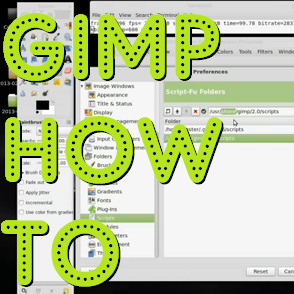
For archiving scanned images of family photographs, I modified some scripts to use with Gimp to speed the process along. This post will explain how to install these scripts to the correct folders in order for them to work.
First, You need to install Gimp photo manipulation software. This is similar to photoshop, but it is free and open source. Gimp is available for Windows, Linux and Mac. Since I run Linux on my computer, I can’t easily install photoshop, and Gimp does just as well once you learn to use it. Instructions for downloading and installing Gimp can be found on their downloads page.
If you want the script to automatically attempt to straighten your individual images automatically before saving them to file, you will need to install the ‘deSkew’ plug-in. You can find which folder to install it in GIMP in a similar fashion to above “Edit–> Preferences–> Folders–> Plug-ins.” Notethatthisisdifferentfromthescriptspath! For some reason the original host of this plug-in has disappeared, but the files are available in links in the comments of the ‘deSkew’ page of the GIMP Registry.
Linux:Download this projectby clicking the “Zip” button on the GITHub page. Unzip the folder and read the install instructions from the README file. You have to make the project, but it isn’t complicated. You will need to give the resulting program executable permissions, and then copy it to your /…/gimp-2.0/plug-ins folder.
UPDATE: As of 2023, The links I marked out above do not work. deskew is no longer maintained from what I can tell. I did find this github site with a copy of the plugin.
You can download the archiving scripts I modified from our GitHub Code site. You will need both of the scripts shown on the webpage. If there are multiple version, be sure to get the ones with the latest dates. Simply install these into the “scripts” folder in the gimp installation directory as shown in the video.
This video explains where and how to install all of these files:
I think we should campaign to get NASA listed on a great site called Pay.gov. Pay.gov allows everyday people to donate directly to United States government agencies. One example is to help pay down the national debt. <via NPR>
By making it easier for citizens to donate to NASA, we won’t raise enough funds for a mission to Mars, but even if a conservative estimate of 1% of working Americans (134.8 million people according to wolfram alpha) donate just 10 each, we would have we would have 134,800,000 * 1% * $10 = $13.48 million dollars. That’s not a lot compared to the cost of a space mission, but it is a small help to a struggling agency that should be the jewel in the crown of America. NASA has generated a good return for investment in the past and there is no question that investment in science and technology helps strengthen our nation’s economy and morale which is needed in this time of economic uncertainty.
Moreover, an investment in NASA is an investment in the future of our nation in terms of future engineers and scientists. NASA has achieved some of the greatest feats ever accomplished in the history of mankind. Landing men on the moon, as well as increasing our understanding of our place in the universe with missions like the Mars rovers, a multitude of space telescopes, and planetary probes have all served as inspiration for people who strive to be the best the world has to offer. They are inspired to pursue man’s long passion for exploration and curiosity.
NASA has helped develop technologies that improve and even save lives every day such as MRI machines, and many other fantastic technologies. This neat site lists a new innovation from NASA every time you refresh the page. NASA has a positive impact on the world as a whole. It should be funded as such.
Lets get NASA listed on Pay.gov, not because it is easy, but because it is worth the effort! The way to do it is to get this post seen by someone who knows someone in charge at NASA who can suggest it to them.
A few years ago, we got a deal on some low-end recreational (Old town Otter, now replaced by the Old town Heron model) kayaks. Instead of opting for the model with all the bells and whistles, we got the base models. For years we were fine with them paddling on flat water (lakes and such). We’ve been using the kayaks a lot lately, and getting more into small rapids (in which foot braces are incredibly helpful).
I researched online for the best foot braces out there. The Old Town foot brace kit is $50! That price is ridiculous. I settled on Harmony Slidelock foot braces. Everywhere I could find them online they were $33 per set. Just by chance, a friend of mine flew to Florida for work and happened into a great kayak outfitter store, Canoe Country. He was able to get me the exact same Harmony foot braces for $16 per set– half price! They have great prices on dry bags too. I had to buy some neoprene washers from the hardware store, but they were very cheap. Overall It was a great buy.
Once I got the foot brace kits, I had to figure out how to mount them in the kayaks. The first step was to sit in the kayak and hold the braces against my feet to see what felt comfortable. Remember to wear your water shoes and life-preserver during this step so the braces will be the correct distance. I neglected to do this. Mounting position isn’t critical since the braces are adjustable, but try to at least keep them even with one another.
I mounted the braces by looking at pics online of my kayak model with foot braces and tried to use a little math to figure out the distances from major features on the kayak. I measured where I wanted them to go, and drilled a 3/8” hole in the kayak. This was worrisome for me because I wanted to make sure everything was perfect. I don’t want to ugly up my boat with a bunch of holes in the wrong place, etc. Drilling was very easy. The Otters are made out of a single layerlinear polyethylenethat machines like butter, though it is very strong and generally deflects anything that might try to scratch it. I suggest using a knife to cut a small starting hole before using the drill bit to prevent it from wandering. I should have angled the drill to be perpendicular with the mounting hole on the foot brace, but I didn’t think about that until later. Once the first hole was drilled, I screwed in the first screw just until I could feel it penetrate the inside a little. On the inside, I placed the neoprene washer on the end of the screw before aligning the mounting hole of the foot brace. From the outside to the inside, it is mounted like the image below. This will keep the boat water tight.
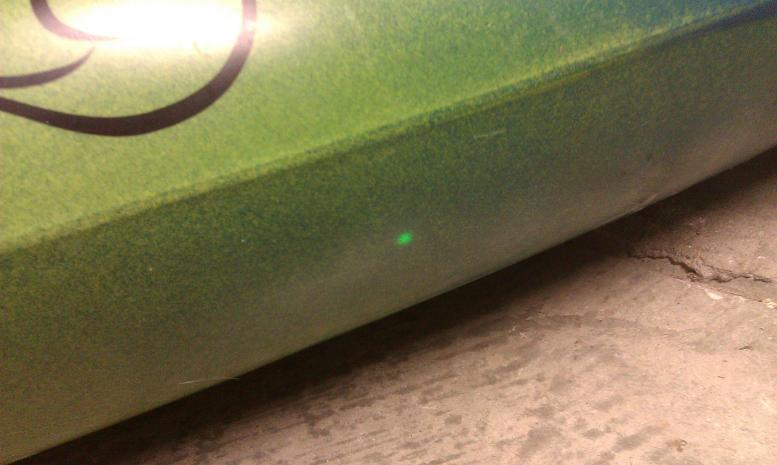
To align the second hole, I held the brace up inside the boat to the approximate place I wanted it to be, then used a bright laser pointer from the inside of the boat to help me find where to drill the second hole (this was my friend Daniel’s genius idea). It worked great! The foot brace needs to bend a bit to be able to screw tightly to the side of the boat, so don’t worry about that when installing them. After the first brace was installed, the second one went in much quicker. We just mirrored the measurements and it was a breeze.
After installing them on my boat, it was time to install the braces on Jessica’s boat. Now, this wasn’t visible on mine, but her kayak had some spots from the mold that shows where the standard foot braces should be mounted. These holes didn’t match up with the new braces I got, so I just centered my screw holes to be along a line that connected the visible dots on the boat. Once again, I drilled the lower hole and screwed that in (with the neoprene washer) and used the laser to help me find the correct spot for the second hole.
The next day, we went on a two-day kayaking/camping trip. We paddles 16 miles down the Uwharrie river! Those foot braces made navigating the rapids a breeze and increased the overall comfort of the overall trip. The next step will be to add a seat pad and maybe even some knee padding. Future plan also include kayak sails, and a keel of some type as well. Keep checking for updates on trips as well.
Dick’s Sporting goods has Coleman brand cockpit covers and spray skirts on clearence for what seems to be the Coleman Rebel. We picked up two cockpit covers for $5 each and two medium spray skirts for $5 and $15 from different locations. These don’t seem to be available anywhere online, and you can’t really call store to check for them but get them if you can! They fit our Old Town Otters perfectly. These Spray skirts feel a bit cheap and aren’t made for hardcore kayaking, but at the very least they keep the paddle drips out of the cockpit and when they start to fall apart we can make our own using them as a pattern. The cockpit covers seem to be of a slightly better quality and do the job of keeping creepy crawlies out of the kayaks while in storage.
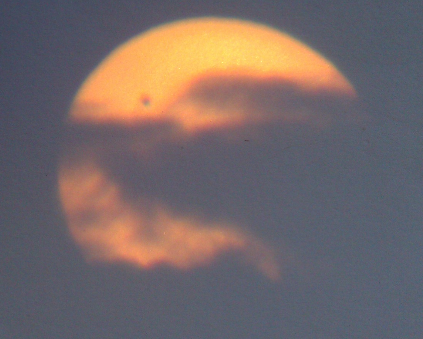
So what is a transit anyway? A transit is when an object like an interior planet (one closer to the sun than the Earth) crosses in front of the sun that is visible to the Earth. This is one of the ways we can spot planets around other stars too. If we can watch the star long enough, we might see a dip in the star’s intensity, which might mean a planet got between us and that star. In fact, by looking at the different wavelengths of light we receive during one of these dips of intensity, we can determine the components of the atmosphere of that planet! Science is amazing right!?
Anyway, back to the phenomena at hand; the transit of Venus…