 In summer, I went to Woodcraft and grabbed a bunch of blocks of wood to make x-mas presents for some friends. I already had an idea of what I was going to make from a project video I saw on Inventables’s site. I wanted to make Passive Amplifiers that would double as a desk nameplate. Rather than use the pre-made file from Easel, I wanted to do my own in Fusion360 to get more practice.
Machine Upgrades:
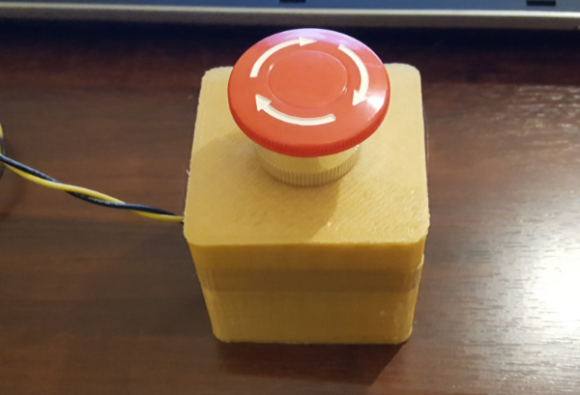
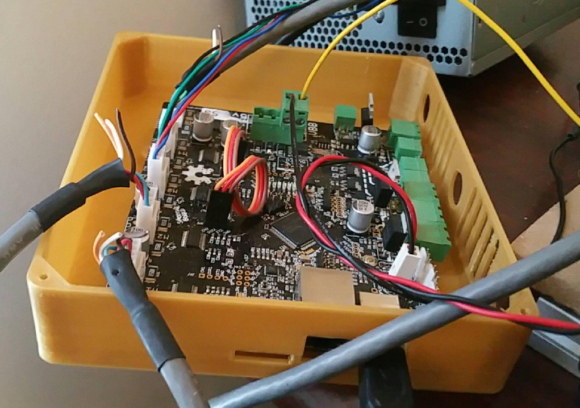
Before I had any time to work on this at all, I ended up buying the new beefier gantry makerslide. I also 3D printed an enclosure for my smoothieboard and an enclosure for my E-stop button, both from thingiverse.
Literally at this point, I’ve got enough extra makerslide, plates, belts, ACME screw and nut set and gears to build a Shapeoko 2 (missing bolts, nuts, washers, V wheels, bearings, or idler wheels). Leave a comment if you are interested in purchasing my extra parts.
I also had beefed up my gantry motor to a NEMA 23.
Processing the Blocks:
Once I had made the changes to my machine (a never-ending project in itself) I got to work on the passive speakers. I clamped my handheld belt sander upside down in my workmate bench (I do not condone this stupid behavior). I sanded down all the blocks until you could no longer see the bandsaw marks using 150 grit sand paper. I rolled the edges and ends to get nice rounded edges. This worked for the most part, but sometimes I got inconsistent results along the entire edge of the block which looked bad and wasn’t easy to fix.
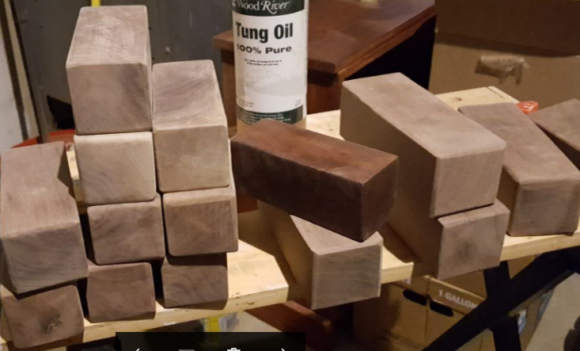
After rough sanding, I hand-sanded the corners to remove the sharp point using 150 paper by hand, then used 220 paper on my orbital sander to remove the traces of the rougher sanding and smoothed out the overall faces. Due to time constraints (I was so busy that I waited until the last minute to do these) I went ahead and hit the blocks with Tung Oil every other day for about a week. This soaks in and if I had done it more would really bring out the luster int he wood. It smells a bit funny so I left the blocks in the garage to air out. Tung oil is good because it won’t combust spontaneously like a lot of oil-based stains. Heck, the guy that sold it to me said he never even wears gloves and has been using it 20+years. I wore gloves anyway.
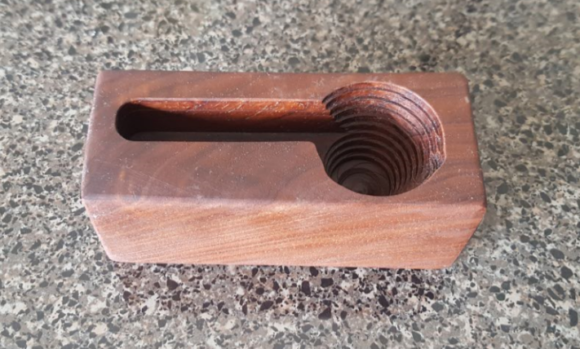
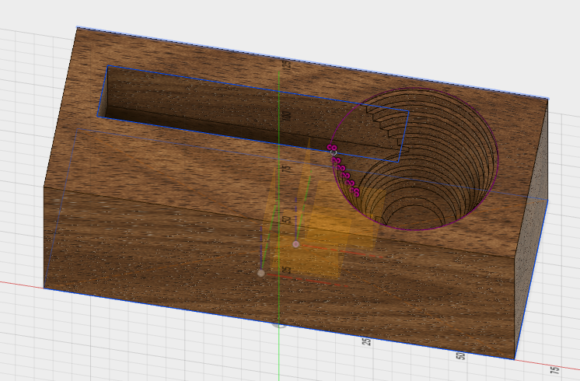
After the blocks were processed and thoroughly tunged, I went about using Fusion 360 to design the passive amplifier element. Unlike the inspiration project, I wanted a continuous spiral as my cone. I created a block approximately the size of these blocks, then I created a spring. It took a long time to figure out exactly how to get the spring to have the features and be be the size I wanted. I then had to merge this with a cone shape to create a single solid body that was a helical cone shape. I put it on the block and performed a difference operation to remove the helical cone shape from the block. Then I added the slot for the phone. I used my and Jess’s phones as tests using a block of scrap 2×4 to find a width that fit both of them.
CAM Processing
I can’t say this was intuitive. When I ran simulations of the cut, I kept having weird errors that would break an endmill in the real world. For instance, the bit would circle the perimeter of the helical cone step by step, leaving a huge plug of wood in the middle 40mm high to be cut from the side at the very end of the job. In order to remove this weirdness, I had to get creative with the cuts. Firstly I used a plunge cut to cut the very center of the cone out in several passes. As you can see in the image at the top of this article, there’s a bit of an error at the right side near the top of the helical cone. This is due to the lead-in of the plunge cut. In later iterations, I removed that stupid lead-in. I have no clue why it would generate paths that would defile the user’s design, but it does…
Then I used a contour cut to remove material for the slot and helical cone in multiple passes. The Fusion 360 simulator said it’d take about 5 minutes for the whole shebang, but it took about 3 times longer in reality. I’m not sure how to reconcile this. 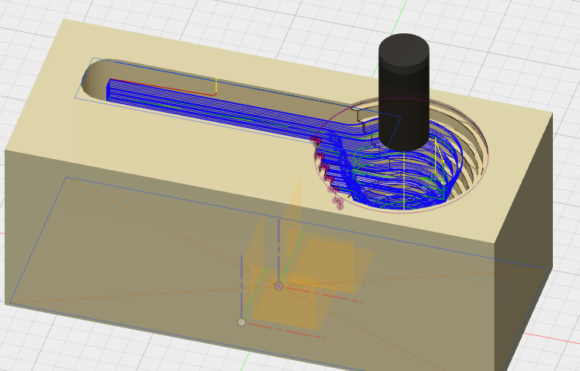
Milling:
So I intentionally went against my best judgment on this one. Looking for a cheap engraving bit, I ended up at Harbor Freight. I found a pack of 5 HSS router bits that included an engraver for $8. Since an engraver bit is usually taking a bit more light duty use than other bits, this was a good deal. Other bits were like $25 just for the engraver elsewhere! My mistake happened when I considered using the half-inch router bit as an endmill. I figured if I take off only 1.5mm at a time, then it couldn’t hurt to use this router bit slightly out of its specified application. So I went ahead.
Surprisingly, this worked beautifully for the first four blocks I milled. The last one had ragged edges though. Since I needed to make about 4 more, I went back and bought another Hazard Fraught bit set. This was enough to cut the bulk of the gifts I was making. I had another 2 blocks to mill, but I had a couple weeks to finish those while these first 8 were needed literally that night at a party.
After I milled them, I had Jess get one of her fancy fonts and make some SVGs of our friend’s names to engrave on the other face of the block so it could be used as a nameplate on their desks. This was easy to do in fusion in a new file. I simply created a block the size of the wood I was using, then imported the SVG onto the face of the block. The Z axis here is still setup so the tool comes from the top (ie. as if the block has been rotated so that the face is pointing upward). Simply go into CAM and do an engrave and it’s done. The results came out beautifully!
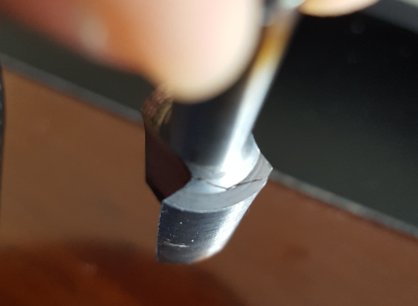
The problems started when I moved my CNC machine the garage form the office to avoid the dust. I used one of those half-inch bits and aligned everything and let ‘er rip. I was making a video when the failure happened…
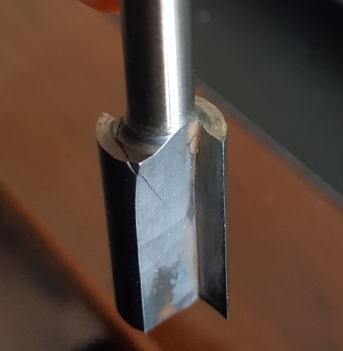
I hit the E-stop immediately but it still screwed up stuff. The bit came loose and slipped down as the router continued to spin (likely screwing up my quarter-inch collet) The CNC kept moving for a short time as well until I could hit the E-stop. This caused the bit itself to break. Luckily no chunks of it came loose or flew off at the 22,000RPM I was running at, but it came close as the pics below show.
After this error, I went ahead and redesigned the toolpaths to use a proper 0.25″ endmill and tried cutting another block. I didn’t get to see the final result, BUt I’m pretty sure the lead-in screwed me on the first plunge cuts I did. I didn’t finish the part because like a genius I stuck the vacuum cleaner hose in the way of the Z cart and ended usp causing my X axis motor to skip a bunch of steps as it wedged the vacuum hose into the block. I’ve yet to revisit this. even this short amount of exposure to the incredibly fine wood dust made my nose clog up again(even wearing a respirator). I had to go back to work after new years and haven’t had a chance to revisit (or document) and projects until now.
Lessons Learned:
- Never, ever, ever use tools the wrong way… especially if you get them from Harbor Freight. The half-inch router bit I used was intended only for routing (ie cutting sideways) and not designed for plunge cuts, even 1.5mm shallow ones.
- Fusion 360 can’t fix stupid part 1. If you delete a shape’s reference, it’ll cause you trouble in Fusion. I don’t know how I did it, but somewhere in my timeline I deleted the helical coil. I get errors all over the place if I try to modify it. Yellows are warnings, reds are errors.

- Fusion 360 can’t fix stupid part duex. If you don’t know what you are doing as far as feeds and speeds, making sure your lead ins and outs don’t screw up your part, and don’t try to cut off too much at once, then there’s nothing Fusion 360 can do to help you.
- Even with a respirator on during the sanding and milling, I still ingested a lot of dust through my nose (ended up with one hell of a sinus infection requiring a shot on Christmas Eve). It was a loud and dusty process. I need to build an enclosure. The never-ending project continues…