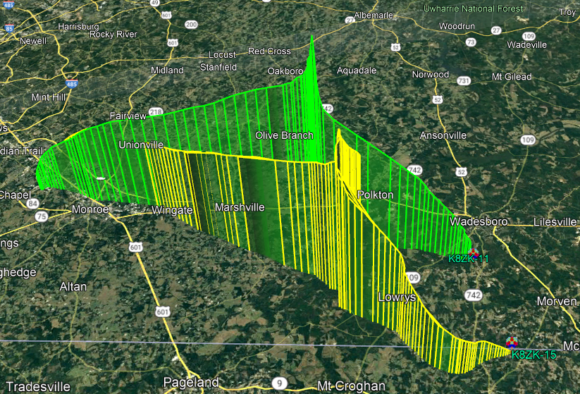
Back in 2010 I was part of a team that sent up a couple of weather balloons on a NC spacegrant. I posted about the first one (which flew straight into a thunderstorm) a long time ago, but with the recent weather balloons in the news, I decided to go back and look up my old photos from the second balloon. In the pic above the yellow balloon was the first one, the green plot is of this second balloon.
We launched from Monroe Airport in NC and the path of the balloon followed the path of HWY 74, which is the main road in the area. There are a couple of good pics of Wadesboro, NC and Lake Tillery as well.
This one went about 75k ft. in elevation. You can *just* make out the curvature of the earth in some of the photos. We launched on a beautiful clear day and we were able to visually track the balloon’s full ascent AND descent. Fun times! Luckily it didn’t freeze on the ascent so we got some better pics. We stocked this one with a bunch of candy like last time and it was fun eating space candy again!
We’re running out of space. With photos, astrophotography files, and music recordings and work and just life stuff; we are running low on hard drive space. Over the years we’ve bought a few external USB hard drives but even those aren’t manages well and being portable get moved around a lot. That’s not the safest way to handle hard drives. Unless they are SSDs, they can be damaged by moving them around and such. We needed a better solution. I prefer using GUIs to set things up but will for through the terminal if I have to… I just haven’t used my unix fileserver skills since I worked in IT and my linux is a bit rusty as well.
Googling around you’ll find a ton about setting up a NAS or RAID5 or somesuch, but that’s overkill. I’m not looking to spend any money with this, otherwise I’d just have bought yet another portable drive. I already have a bunch of hard drives full of stuff (and honestly, there are a LOT of duplicates of each file taking up tons of space from the crappy way I store my backups). I want to use those drives and be able to clean out the duplicates to gain space. The first step is to build a basic file server.
I had a linux machine (my workhorse during grad school) that wasn’t being used, and bunch of old hard drives that I wanted to use/access It was a variety of drives from old PCs (back to win XP actually, and even older). I had a few external drives that broke so I just plopped them into this machine as well. I didn’t want to format them for a RAID or anything as they were all different sizes and I had data like pics and projects and work stuff from ages ago on them I wanted to keep. The best solution for me was the JBOD (just a bunch of drives) style server. All the NAS examples looked annoying to setup and I’d easily forget what I had done to set them up so JBOD it was. I couldn’t find any single document explaining how to do all the steps I wanted so I spent a couple of weeks failing in my spare time… breaking and unbreaking my linux fileserver and documenting the working parts here for when I need to work on it again. I prefer doing things with GUI if possible, but I’ll do some things using the terminal because you just have to but I tried to keep it to a minimum.
Installing Linux:
If you don’t already have linux running on this computer, I suggest you install it. It sounds hard, but it is super easy to do actually. Just download any flavor of ubuntu you like (lubuntu, kubuntu, linux mint, cinnamon, etc.) I recommend the versions that say “LTS” as those are supported for 2 years or so. There’s a lot of options here.
Install linux without formatting hard drive or losing data:
Download Wubi. This will let you install linux without killing your windows files or messing anything up. you can always uninstall linux later if you want using this method.
Start clean on either blank hard drive or format an old drive:
Download ubuntu flavor you prefer
Format a USB flash drive that’s at least 2GB (lubutnu and xubtunu) or 4GB (all other flavors).
Use Balena Etcher to burn this ISO file to the USB drive.
Once finished, you can reboot your computer.
Enter the boot menu when you see your computer’s startup logo (before windows logo) by pressing either F10, F11, F12, or the delete key. Different manufacturers have different keys they choose for this.
Select to boot off the USB drive.
Doubleclick the icon on the desktop to install *buntu. Follow the menus or youtube videos on how to install it.
Remove the USB drive and reboot when done.
I was already running ubuntu so I just needed to put all the drives in the computer case. I could have 2 drives that were IDE on the same ribbon cable, and 4 SATA drives on the motherboard of my old linux box. Sadly, that’s all this mobo could accommodate. I see spots for 4 more SATA drive on the PCB but they aren’t populated. I filled all 6 spots with drives, making sure that all the drives were set up as slaves except the bootable one (see another post about how I set that up). I also had a TON of USB ports on this motherboard as well (literally 6 on the back, 2 on the front and I added 2 more to a breakout cable inside for a total of 10 USB ports). These can add more portable drives and other drives with some of these awesome USB to IDE/SATA drive cables I have to the server. As I loaded these drives in the bays I made a note as to their serial numbers and capacities. I wrote it on paper, but I also used a sharpie and wrote it on the chassis so I could keep track of what is what and where.
When I turned the machine on, I went into the BIOS and set up the boot order for the hard drives so that my /filesystem always boots first in order of hard drives. When booting the linux machine, hold the Delete key to enter BIOS. Then go to Advanced BIOS Features.
Next select “Hard Disk Priority”. Here’s what that looks like:
Finally, use the arrow keys to select a particular hard drive (the one you want to boot from) and then use the + key to increase its priority until it is number 1:
Once this is done, Hit F10 to save and exit BIOS. It will reboot the machine into linux as it usually did.
Accessing all the Hard Drives:
Open your ubuntu menu and search for the “disks” program. This should be part of gnome-system-tools, which is a standard program in ubuntu. If you don’t have it then open your package manager and search for it. Mark it for installation and click the “Apply” button. or open a terminal and enter the following:
sudo apt-get install gnome-system-tools
You can copy that line of text paste it into the terminal using ctrl+shift+v to paste in a terminal.
All your hard drives should be visible in the Disks app. It lays out all the gory details. Serial numbers, model numbers, etc. Click each drive in the left and note what the “mount point” is for them. I have my Filesystem (this is where I installed the linux operating system) and /home mount points on separate drives. /home is like the user folder in Windows with a folders for Desktop folder, Documents folder, etc. Separating this from the operating system installation file tree allows me to reinstall linux without breaking my user’s documents and settings and Desktop items, etc. I have another post on that and it has served me very well over the years.
For my other drives, they have mount points that start with /mnt and end in a weird code. That code is the UUID (hardware ID) for that hard drive and it isn’t very descriptive for humans. Let’s change that to something helpful. For instance I changed my 1TB drive’s mount point to /mnt/_old_1TB_MyBook
Once all the drives have normal names click the link to one of them and it’ll take you to the folder in your file browser. Go up one directory to see all the hard drives. You’ll note the old folders with the UUIDs in there as well as any old names you had mounted in the past, but they are empty. Only the mount points you named in Disks are connected to your hard drives. You can just delete the other empty old mount points. You have to be root to do so. I used the terminal and the command sudo rmdir <folder name> to delete the ones I was CERTAIN were empty old mount points.
All we’ve done here is essentially modify the /etc/fstab file which contains drive mount info. Lots of other tutorials out there can show you how to do this in the terminal if you want to know how.
Now we need to install all the other software we’ll need for the other steps of setting up the server. in your start menu, search for your package manager software. Mine is “Synaptic package manager” and install the following (make sure you check the box next to these entries, select “Mark for Installation” and when all are selected, click the “Apply” button.) Don’t be surprised if some of these are already selected, just ignore them then:
gnome-system-tools
samba
samba-common
python-glade2
system-config-samba
Or you could open a terminal and paste the following which will install them all for you automatically
Once these all install you will create your linux users who can access this machine. You need linux users to be able to create Samba users. Samba is the file server software. From your start menu button, search for the app “Users and Groups.” Add whoever needs users for the fileserver.
Now you can start fiddling with Samba, which is the actual fileserver software. Since there’s no icon to select to load this app, you need to open a terminal (hit ctrl+alt+t) type or paste:
sudo -H system-config-samba
You can copy that line of text paste it into the terminal using ctrl+shift+v to paste in a terminal.
You have to enter your password, but then a window should pop up. The very first time I did this I got the following error:
SystemError: could not open configuration file `/etc/libuser.conf': No such file or directory
ok, so the file doesn’t exist… I’ll simply make a blank file there and try again.
sudo touch /etc/libuser.conf #creates a blank file named libuser.conf in /etc folder
sudo -H system-config-samba
Success! It opened!
Now we need to figure out which folders we want to share and how they are set up in linux.
As we saw before, the internal hard drives all have mount points in the /mnt folder. So let’s create a share for that. Click the big plus sign button and make yours match mine below. Be sure to click the “Access” tab and make it open for everyone.
Do the same kind of thing for the /media folder. This is where any USB storage devices will mount to by default.
And finally, I have a TON of files on my old desktop and user folder, so I want to make the entire /home folder accessible as well. You have to be careful with this though because if you allow all users (and even guests) edit access to your home folder, they can delete stuff, and snoop to their hearts’ content. Any sensitive data should be locked so that users are required to log in and can only access their files. If for example you wanted each linux user we created earlier to access only their home folders, you’d set that up as /home/adam then you could set the access rights to only allow user “adam” to view it.
Once you’ve set this up, now you must create the Samba users. While in the same application, select Preferences –> Samba users. Here you will add a new user with the same name as each linux user. You will select each user from the “Unix user” dropdown box (this is why we had to create all the users before). You can have the same or different passwords than your linux login. Once you added everyone, close this app. The steps we just took replace the manual process of editing a configuration file for Samba. This is a plain text file stores in /etc/samba called smb.conf and this is usually what most tutorials will do, show you how to edit this file manually. I didn’t have luck with that. Also, you might see tutorials using a tool called gadmin-samba however when I used that it completely hosed up my system hardcore. I had to purge all samba stuff, delete all the files and start from scratch several times to fix the issues.
File/Folder Access Rights:
The final step here that is required is to set the access rights of each folder you want to share. This is important because unless we change these permissions, we will end up only being able to VIEW files and folders on the server but we can’t create new files, paste, move, or delete anything yet. To fix this we need to change the permissions on the folders we set up to share.
We need to open the folders as root or administrator. Depending on the file manager software you might have different ways to do this, but in mine you simple right click ANY folder and choose “open as Administrator” or “Open as root” then I can simply navigate to the filepath “/” If yours doesn’t offer this, then open a terminal and type in the name of your file manager but call it from sudo like one of the following lines:
sudo nautilus /
#or
sudo nemo /
#or
sudo caja /
Right click on the folder of interest, for example “/mnt” and view the Properties. Click the Permissions” tab and make sure that they all show the ability to “Create and delete files.”
Or you can give others the ability to look at files in your home user folder, but not create or delete like this:
sudo chmod 755 –R /home/adam
And you can block others from your folders and have them only viewable and editable by you like so:
sudo chmod 700 –R /home/adam
On the Windows machine:
Now your fileserver is set up you need to access it. Go on your windows machine and open a file browser window. Right-click on “This PC” and select “Add a Network Location” Click Next until it asks for the location. Click “Browse” and wait a minute for it to search your network. You should see your fileServer’s name pop up in the list. Click literally any folder under the fileServer and select Next.
Shorten the terribly long name it gives you (I just delete the highlighted part) and you’re done.
It’ll pull in the other accessible folders on that drive as well. Now you should be able to access and edit anything on those folders on the fileserver. To get to this again simply choose the fileserver option in the left-pane of the windows file explorer. If this doesn’t appear, then make sure your server is turned on and is on the same network as your windows machine and repeat the instruction in this section of the post.
The first time you visit something in here it might ask you for a username and password. Just enter one of the Samba username and password combos we created earlier. You can make it save these credentials and never ask you again if you’d like.
Cherry on top – Remote Shutdown of server:
If you don’t want to connect a keyboard, mouse and monitor to the screen just to shutdown the fileserver, you can do so remotely by installing and using SSH. SSH is a way to securely tunnel into the fileserver’s terminal remotely. That way you can send it the standard linux shutdown message from your windows PC when you are done with it for the day.
Open synaptic and you should select the following:
or run the following command:
sudo systemctl status ssh
This will install the needed files for SSH. Next, we need to let the firewall built into linux know you want to allow ssh. In a terminal window run the following:
sudo ufw allow ssh
Now you can go to the windows computer and use putty.
Enter your data here (keep the port as 22) and when you click “open” a black command window will pop up asking you who you want to login as. Type your linux username and hit enter and it’ll ask for a password. Now you’re commanding the terminal of the linux machine from windows. You can do literally anything the terminal can handle. You can’t do anything that requires GUIs though this way. That’s fine though because this is enough to send the reboot or shutdown signal. The shutdown takes about a minute before it actually shuts down, so don’ t think it isn’t doing anything, just give it some time.
sudo shutdown
#or
sudo reboot
Remote Desktop:
If you want a graphical environment for controlling your server, there’s 2 options. One is to simply remote Desktop into it. There are many ways to do this, but the easiest is to simply install and enable the xrdp app on the linux machine and use the built-in RDP app in windows to connect.
Open synaptic package manager and search for xrdp and xorgxrdp. Mark it for installation and click Apply.
Once this is done, go to the in the App search, look for “System Settings”
Go to Sharing and make sure Remote Login is ON.
Next, in system settings, click “Network” in the left column and then click the gear button next to your wired (or wireless) connection. This will give you your IP address. It should look similar to your router’s address. Mine’s 192.168.x.x. You’ll need this to connect in windows.
To do all this in the terminal on the linux machine (or through SSH) run the following:
This last command, ifconfig, will give you a screen showing you the local IP address of the machine. It should match closely to your router’s address. Mine is 192.168.x.x so I look for something that matches that. You’ll use this on the windows machine.
Now on the windows machine, click the start button and type “RDP” and hit enter. Type in the IP address of the linux machine.
I found an easier way. Simply right click on the fileserver in your explorer folder and select “Remote into this machine”
When you click connect, you’ll be able to login. I had a little trouble with this connecting. I tried all the selections in the dropdown menu a couple of times and on the 2nd or 3rd try it worked. Once I was logged in I got an error asking me to login to create a color device over and over. After entering my password 3 times I just canceled it and the window stopped popping up. I haven’t done this in like 15 years, but I don’t remember the experience being so crappy. I can access the desktop, but it is displaying a GNOME environment instead of the Mate environment I have installed on the linux machine. Nonetheless I can get do things graphically without issue.
Other Thoughts:
The way I’ve done it is quite insecure. I’m allowing Guests on the network access to create and destroy all the shared files which is kind of dumb… I’ll live with it though because I will only turn this fileserver on if I am immediately accessing the files on it, then immediately turning it off again. In that short time I hope I don’t get hacked…
Storing all your files in one location is not the best for preservation. You can make a personal cloud like Google Drive, Dropbox, Box, OneDrive, Apple Cloud, etc. by using the Unison program. It essentially synchronized two folders. These can be on the same computer, one on a portable USB drive, or even across the network. Anything added, modified, or deleted in one folder is automatically synched to the other in both directions.
Previously, I had some luck with using my file-brower’s “share” plugin. Nautilus, Nemo, and Caja all have their respective “share” app you can install in apt-get or synaptic eg “caja-share“. This will allow you to simply right-click on a folder and select “share settings” where you can set this up yourself. The problem with this is that this info is NOT stored in the basic /etc/samba/smb.conf configuration file. In fact, it is nowhere to be found anywhere in that folder. This is because this plugin stores this info in the following path:
/var/lib/samba/usershares
To create the Samba users and set up their SAMBA passwords (these can and maybe *should* be different than their linux user passwords)
sudo smbpasswd –a user1
sudo smbpasswd –a user2
Now enable the users
sudo smbpasswd –e user1
sudo smbpasswd –e user2
Check the status of the samba server. You should see “active” somewhere. If not, you hosed it somehow. Tips on how to fix this at the end…
sudo systemctl status smbd
Restarting samba (after every big change to users, folders, etc you should do this. Or you can reboot the machine, which is foolproof method of restarting the server the right way)
For some time now I’ve been interested in astrophotography, but my camera hanging off the back of my scope was too heavy for the clutch. The camera just weighted everything down. The solution is to add weights to the tube. You can buy a super expensive kit, but why do that when you can slap together a junky version yourself for much cheaper?
I ordered 24” of Mini T-track which can fit a 1/4” bolt head. When it arrived, I measured (by eye) the mini t-track against the side of my scope. I cut it leaving a short piece (which will be used later) and the actual weight section. I marked the two holes where the screws on the tube were. These are the screws that will hold the t-track to the tube. I actually drilled with two bits. One just the right size for the screws to pass through, and then I used another larger bit to remove the material from the top of the T-track and countersink the screws a bit. What isn’t shown below is a larger hole made in the top of the T-track so that I can easily add or remove weights without having to take the track off the tube.
I unscrewed the two bolts from my scope tube along the bottom. The whole time praying I don’t get any nasties in the tube during this escapade…
I honestly didn’t count or measure the weights out, I just made a couple larger stacks of washers and a couple shorter ones. I used standard 1/4″ nuts as lock nuts to hold them on, though I wish I would have sprung for a cheap T-track knob set like this one which would make them easier to move around with one hand while I’m aiming and wrestling with the scope..
That little left-over piece of T track was great for a top-mount for a camera. I drilled a hole in the middle for the tube screw and added a great little folding tilt mount for a camera.
I used a really short 1” long 1/4” bolt to mount it.
Now I can put a camera on top as well as having a camera at prime focus of the scope. This can be used as a guide camera with a tracking program like PHD2 or another DSLR to take some additional wider-angled and less zoomed pics.
Since I’m in no way able to afford a huge tricked out scope (we got a great deal on my 8″ LX10 on craigslist!) I’m sticking with what I have. Again, there’s a tracker on my scope but it is basically a barn door tracker. It is slightly more sophisticated though, it has a controller with “North, South, East, and West” buttons on it. As long as it is perfectly polar aligned (I’ll talk about this later) all I have to do is turn it on and it’ll automatically track whatever the scope is pointed at (this is typical barn door behavior) but if I want to drive the scope to look at something to the east, I hold down the “East” button on the controller, and it will DOUBLE the speed of the motor… making 1 revolution in 12 hours instead of 24. Wow right! Not so speedy. Well, it gets better. If I want to look at something West of my current object, holding the “West” button turns the motor off completely. The telescope then simply waits for the earth to spin until that object is within view. The North and South buttons work a little differently, the scope doesn’t move either of these directions unless a button is pushed. When it is, it turns on a motor that moves **Just as slow as the tracker motor.** It can also only move in a particular North/South direction until a screw on the mount bottoms out. This limits the number of degrees of rotation I can do North to South. Typically, I set it up so that when I start viewing, I’m in the middle of the screw, which gives me just as much leeway North as South, but halves the total amount I can move the scope in any one particular direction.
All this means that there’s no way I can whip this thing around to look at whatever I want automatically like GoTo systems do. I’ll have to unlock the clutches on each axis, then swing it manually to point at an object of interest, then lock the clutches down again and let the motors take over. I’m fine with that, but how do I know where things are in the sky? I’m not great at memorizing locations of stars and DSOs. My solution is to use a PushTo setup. A PushTo is for dumb telescopes. Basically, you attach it to your scope and it tracks where you are manually moving it to point. The best solution I’ve found for this is an app called Skeye. It is like google sky map, except it was designed so you can mount your tablet or phone to your OTA (Optical Tube Assembly… or Tube where your mirrors and lenses are). I’ll do a tutorial on how to setup and use this as well. For now, check out this guy’s setup.
So I can find objects in the sky, how do I take good photos of them? Due to budget (none really) I have to work with what I have, I first need to make sure that:
1. I am relatively well alighed with true North. (Not perfectly aligned, but close enough and I can do this quick and dirty).
2. I manually move the scope to point at what I want to look at. (This is easy enough).
3. Use a computer to automatically control the direction of the scope for long periods of time.
That last one is a doosey. And so that’s where my adventure began a few years back. I joined the yahoo support group for LX10 owners. Luckily, some of those guys have figured out different ways to hack together store-bought systems with their LX10s. Many of them were a bit too advanced for me (I don’t own a machine shop nor and I spending several hundred dollars on buying another telescope brand’s trackers and rigging it to my system in the hopes that I don’t fry it…) A guy named gt_keys had already been looking at a simple solution to connect an LX10 to computer-based guidance systems via an arduino connection. I like this idea because it can be used with multiple kinds of computer software.
He has also developed a RaspberryPi version as well that seems to be more capable. Seeing as how the LX-10 is limited in the Dec and Right Ascension speeds, this arduino implementation will work fine for most things though you need to be connected to a computer of some type.
This requires a number of software packages to be installed:
Arduino IDE… so you can download the firmware
PHD Guidance 2 which tracks video of a star then send commands to a scope
ASCOM platform which are a middle-man layer between PHD2 and whatever telescope driver you are using
Meade Classic and Autostar 1 drivers (See below)
Should you want to control your actual camera DSLR or astronomy webcam, some software for this. It will vary based on your particular camera, but FireCapture is one I’ve heard of for astronomy cameras like the ZWO brand or Celestion NexImage5 which I hear is good. As for a Canon, Nikon, or other brand, you can google around and find something to drive them. I’m testing out DSLRDashboard which supports many Canon and Nikon cameras.
So the hardware flow looks like this: You’ll have a USB webcam attached to your sighting scope which will feed data to a program called PHD Guider 2. See my post for how to attach a USB camera to your sighting scope. This must also have the ASCOM drivers installed which know how to talk to different telescope systems. Specifically we will need the “Meade Classic and Autostar 1” driver. (I can’t remember exactly which driver it is on the ASCOM site, but it is either this one or this one). This can be found in the settings menu of PHD2. I went through the “new equipment wizard” in PHD2 to create a group of settings for my equipment. Again, since the LX-10’s hardware is so limited, there isn’t much to enter really. There is no focus knob (though if you add one, gt_key’s arduino code seems to be able to handle it).
PHD2 will take the image from the webcam attached to your site scope and allow you to specify a particular star in the field. Once you begin tracking, PHD2 looks at how many pixels the star in your image has moved, then send the appropriate commands to move to the ASCOM drivers. These translate that command into whatever command your scope hardware requires. For instance, you might have an autoguiding Orion scope. There’s drivers for all of that stuff. In our case, the Meade LX10 doesn’t have a computer language, so gt_keys chose to use the classic Meade and Autostar 1 command set.
The ASCOM drivers send the message over your USB serial port to the arduino. gt_keys’s code reads in those commands and basically pushes the buttons on the LX-10’s hand controller electrically. The motors on the LX10 move very slow. It is literally a barn door contraption, moving a full 360 degrees in 24 hours, and if you want to drive the telescope the other direction, it just turns the motor off and waits for the earth to spin to the point you want to move to. This means that for you to get good long exposures or to track planets well enough, you have to get a relatively close polar alignment on your scope before you start. More on this in another post. Hardware Setup:
Firstly, build the schematic as shown. I used a green relay board from Seeed studios.
Secondly, before you flash the firmware to the arduino, you have to change a value to make the hand-held controller to work. This is on line 56. You must change “const int hcontrol = 0;” to “const int hcontrol = 1;” Otherwise you cannot test this thing unless you have it all connected up to the computer, getting ASCOM commands which are generated from the PHD2 program. Other software and options: How to guide mount PHD:
As an alternative to PHD Guider 2, (PHD2) you can try AstroTortilla. Though I’ve never tried it, here’s a tutorial for how to use it.
I have not tried these out, however I’ve seen them recommended several times. Comment and let me know if you love or hate any of these: AstroImageJ is ImageJ for astronomy. ImageJ is a image processing program for scientific use that’s open sourced, Java-based and encourages lots of plugins, extensions, and macros to be built.
Astronomy.net can help calibrate your images through a web app. Really awesome to see other peoples’ shots as well. You can also have it pick out and name stars in images you upload. It is really cool. There’s a bot on reddit’s astro subreddits that automatically does this and posts the results if you submit images to that reddit. Here’s the bot’s feed and here’s an “Ask Me anything” AMA with the author. Oh, and the source code is completely open course too so you can hack on it if you want.
This is a quick list of Equipment I have and what I want. I have yet to have the time to get any spectacular images yet, but I think I could get some good ones given some practice. This is mainly a list for myself, but in case anyone else is interested in what to get for starting out in astrophotography, here’s a reference point. My next post on this topic will likely be a description of how I plan to use this to take wicked pics of planets, nebulae, and hopefully some galaxies.
Meade LX-10 telescope with declination motor kit (no longer sold new, but check craigslist)
Green laser pointer for pointing at stars and such to make show people what I’m talking about (pointing into the sky with your finger is useless…) Make sure there are NO aircraft in your entire field of view before using this! While they don’t make the exact one I have anymore, this one seems to be the closest I can find.
I have a set of spirit (bubble) levels. I like using the T-type level to level my tripod and the top of my tube when polar aligning, and I use a torpedo level to level my forks. I got all of mine at a discount hardware store and all together they costs like $8, and this included a line set level.
My Red head lamp is priceless out in the field! I love the ability to flip it up and down when I’m using it. Be aware though because it turns the white LED on first, the second time you push the button it turns on the red LEDs so hold your hand over it until the red LEDs come on to save your nightvision.
A must-have is this wireless shutter-release for my Nikon. It uses radio, not IR so I can literally be inside my car or house and set the thing to take an image. This is great for winter nights. It has other modes on it as well.
You can also use an android or iOS app called DSLRDashboard which controls your DSLR via a tablet or phone. It gives you control of pretty much all the camera settings (except manual settings such as the autofocus switches on the lenses) from a tablet or cell phone. With this, you’ll simply need a USB “On The Go” OTG cable and your camera’s USB cable. The OTG cable allows you to plug devices such as cameras, keyboards, mice, flash drives, etc. into your tablet or phone. I prefer using the 90-degree cables to keep all the cables clean and out of the way.
Though, I’ve really been considering getting this wireless adapter for my Nikon because it will replace the wired setup mentioned above. This will be mainly for if it is too cold for comfort.
When I’m roughing it, and my wife won’t let me use the Nikon, I use my old Fuji DSLR. I have my manual cable release for it so I can do long exposures the old-fashioned way.
My low-cost DIY Dew Sheild.
An 8″ dewsheild Honestly, I think that since I’m in the humidity of the southeastern US, a heated dewshield might be better, but they are a hassle trying to get a battery to run them all night, especially if it is cold out. They also cost more like $80 as opposed to my dollar store windsheild reflectors.