Turn an old Computer into a Local Fileserver (Mostly Graphical Setup)

We’re running out of space. With photos, astrophotography files, and music recordings and work and just life stuff; we are running low on hard drive space. Over the years we’ve bought a few external USB hard drives but even those aren’t manages well and being portable get moved around a lot. That’s not the safest way to handle hard drives. Unless they are SSDs, they can be damaged by moving them around and such. We needed a better solution. I prefer using GUIs to set things up but will for through the terminal if I have to… I just haven’t used my unix fileserver skills since I worked in IT and my linux is a bit rusty as well.

Googling around you’ll find a ton about setting up a NAS or RAID5 or somesuch, but that’s overkill. I’m not looking to spend any money with this, otherwise I’d just have bought yet another portable drive. I already have a bunch of hard drives full of stuff (and honestly, there are a LOT of duplicates of each file taking up tons of space from the crappy way I store my backups). I want to use those drives and be able to clean out the duplicates to gain space. The first step is to build a basic file server.

I had a linux machine (my workhorse during grad school) that wasn’t being used, and  bunch of old hard drives that I wanted to use/access  It was a variety of drives from old PCs (back to win XP actually, and even older). I had a few external drives that broke so I just plopped them into this machine as well. I didn’t want to format them for a RAID or anything as they were all different sizes and I had data like pics and projects and work stuff from ages ago on them I wanted to keep. The best solution for me was the JBOD (just a bunch of drives) style server. All the NAS examples looked annoying to setup and I’d easily forget what I had done to set them up so JBOD it was.  I couldn’t find any single document explaining how to do all the steps I wanted so I spent a couple of weeks failing in my spare time… breaking and unbreaking my linux fileserver and documenting the working parts here for when I need to work on it again. I prefer doing things with GUI if possible, but I’ll do some things using the terminal because you just have to but I tried to keep it to a minimum.

Installing Linux:

If you don’t already have linux running on this computer, I suggest you install it. It sounds hard, but it is super easy to do actually. Just download any flavor of ubuntu you like (lubuntu, kubuntu, linux mint, cinnamon, etc.) I recommend the versions that say “LTS” as those are supported for 2 years or so. There’s a lot of options here.

Install linux without formatting hard drive or losing data:

  1. Download Wubi. This will let you install linux without killing your windows files or messing anything up. you can always uninstall linux later if you want using this method.

Start clean on either blank hard drive or format an old drive:

  1. Download ubuntu flavor you prefer
  2. Format a USB flash drive that’s at least 2GB (lubutnu and xubtunu) or 4GB (all other flavors).
  3. Use Balena Etcher to burn this ISO file to the USB drive.
  4. Once finished, you can reboot your computer.
  5. Enter the boot menu when you see your computer’s startup logo (before windows logo) by pressing either F10, F11, F12, or the delete key. Different manufacturers have different keys they choose for this.
  6. Select to boot off the USB drive.
  7. Doubleclick the icon on the desktop to install *buntu. Follow the menus or youtube videos on how to install it.
  8. Remove the USB drive and reboot when done.

I was already running ubuntu so I just needed to put all the drives in the computer case. I could have 2 drives that were IDE on the same ribbon cable, and 4 SATA drives on the motherboard of my old linux box. Sadly, that’s all this mobo could accommodate. I see spots for 4 more SATA drive on the PCB but they aren’t populated. I filled all 6 spots with drives, making sure that all the drives were set up as slaves except the bootable one (see another post about how I set that up).  I also had a TON of USB ports on this motherboard as well (literally 6 on the back, 2 on the front and I added 2 more to a breakout cable inside for a total of 10 USB ports). These can add more portable drives and other drives with some of  these awesome USB to IDE/SATA drive cables I have to the server. As I loaded these drives in the bays I made a note as to their serial numbers and capacities. I wrote it on paper, but I also used a sharpie and wrote it on the chassis so I could keep track of what is what and where.

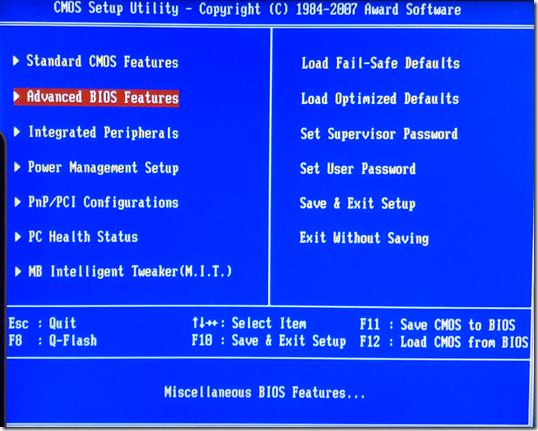
When I turned the machine on, I went into the BIOS and set up the boot order for the hard drives so that my /filesystem always boots first in order of hard drives.  When booting the linux machine, hold the Delete key to enter BIOS. Then go to Advanced BIOS Features.

bios1

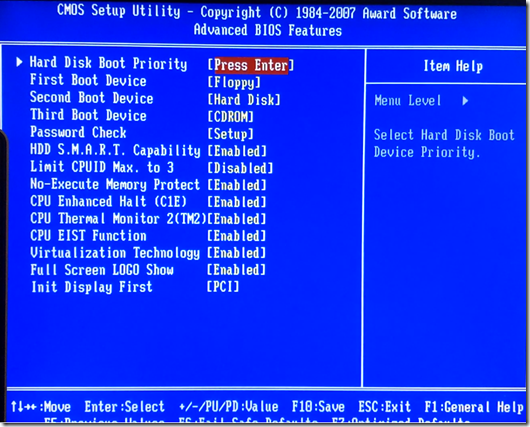
Next select “Hard Disk Priority”. Here’s what that looks like:

bios2

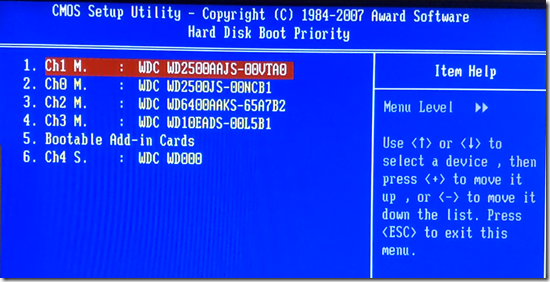
Finally, use the arrow keys to select a particular hard drive (the one you want to boot from) and then use the + key to increase its priority until it is number 1:

bios3

Once this is done, Hit F10 to save and exit BIOS. It will reboot the machine into linux as it usually did.

Accessing all the Hard Drives:
Open your ubuntu menu and search for the “disks”  program. This should be part of gnome-system-tools, which is a standard program in ubuntu. If you don’t have it then open your package manager and search for it. Mark it for installation and click the “Apply” button. or open a terminal and enter the following:

sudo apt-get install gnome-system-tools

You can copy that line of text paste it into the terminal using ctrl+shift+v to paste in a terminal.

All your hard drives should be visible in the Disks app. It lays out all the gory details. Serial numbers, model numbers, etc. Click each drive in the left and note what the “mount point” is for them. I have my Filesystem (this is where I installed the linux operating system)  and /home mount points on separate drives. /home is like the user folder in Windows with a folders for Desktop folder, Documents folder, etc. Separating this from the operating system installation file tree allows me to reinstall linux without breaking my user’s documents and settings and Desktop items, etc. I have another post on that and it has served me very well over the years.

For my other drives, they have mount points that start with /mnt  and end in a weird code.  That code is the UUID (hardware ID) for that hard drive and it isn’t very descriptive for humans.  Let’s change that to something helpful. For instance I changed my 1TB drive’s mount point to /mnt/_old_1TB_MyBook

image

Once all the drives have normal names click the link to one of them and it’ll take you to the folder in your file browser. Go up one directory to see all the hard drives. You’ll note the old folders with the UUIDs in there as well as any old names you had mounted in the past, but they are empty. Only the mount points you named in Disks are connected to your hard drives. You can just delete the other empty old mount points. You have to be root to do so. I used the terminal and the command sudo rmdir <folder name> to delete the ones I was CERTAIN were empty old mount points.

All we’ve done here is essentially modify the /etc/fstab file which contains drive mount info. Lots of other tutorials out there can show you how to do this in the terminal if you want to know how.

Now we need to install all the other software we’ll need for the other steps of setting up the server. in your start menu, search for your package manager software. Mine is “Synaptic package manager” and install the following (make sure you check the box next to these entries, select “Mark for Installation” and when all are selected, click the “Apply” button.) Don’t be surprised if some of these are already selected, just ignore them then:

gnome-system-tools

samba

samba-common

python-glade2

system-config-samba

Or you could open a terminal and paste the following which will install them all for you automatically

sudo apt-get install gnome-system-tools samba samba-common python-glade2  system-config-samba

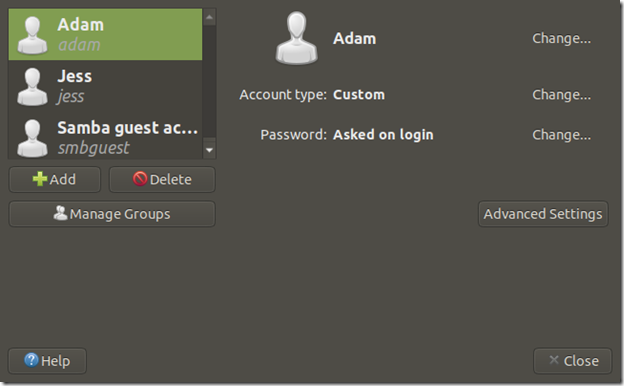
Once these all install you will create your linux users who can access this machine. You need linux users to be able to create Samba users. Samba is the file server software. From your start menu button, search for the app “Users and Groups.” Add whoever needs users for the fileserver.

linuxUsers

Now you can start fiddling with Samba, which is the actual fileserver software. Since there’s no icon to select to load this app, you need to open a terminal (hit ctrl+alt+t) type or paste:

sudo -H system-config-samba

You can copy that line of text paste it into the terminal using ctrl+shift+v to paste in a terminal.

You have to enter your password, but then a window should pop up. The very first time I did this I got the following error:

SystemError: could not open configuration file `/etc/libuser.conf': No such file or directory

ok, so the file doesn’t exist… I’ll simply make a blank file there and try again.

sudo touch /etc/libuser.conf #creates a blank file named libuser.conf in /etc folder
sudo -H system-config-samba

Success! It opened!

samba server config

Now we need to figure out which folders we want to share and how they are set up in linux.

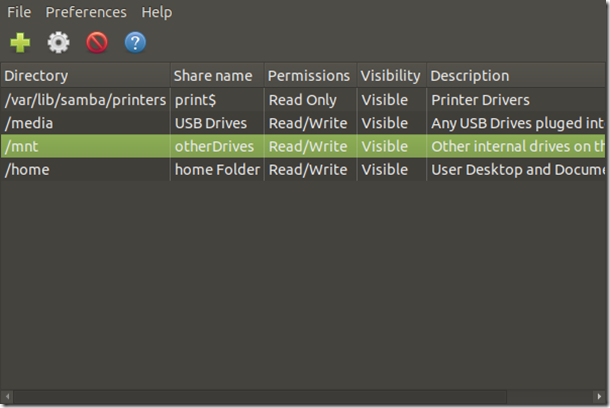
As we saw before, the internal hard drives all have mount points in the /mnt folder. So let’s create a share for that. Click the big plus sign button and make yours match mine below. Be sure to click the “Access” tab and make it open for everyone.

image

Do the same kind of thing for the /media folder. This is where any USB storage devices will mount to by default.

And finally, I have a TON of files on my old desktop and user folder, so I want to make the entire /home folder accessible as well. You have to be careful with this though because if you allow all users (and even guests) edit access to your home folder, they can delete stuff, and snoop to their hearts’ content. Any sensitive data should be locked so that users are required to log in and can only access their files. If for example you wanted each linux user we created earlier to access only their home folders, you’d set that up as /home/adam then you could set the access rights to only allow user “adam” to view it.

Once you’ve set this up, now you must create the Samba users. While in the same application, select Preferences –> Samba users. Here you will add a new user with the same name as each linux user. You will select each user from the “Unix user” dropdown box (this is why we had to create all the users before). You can have the same or different passwords than your linux login. Once you added everyone, close this app. The steps we just took replace the manual process of editing a configuration file for Samba. This is a plain text file stores in /etc/samba called smb.conf and this is usually what most tutorials will do, show you how to edit this file manually. I didn’t have luck with that. Also, you might see tutorials using a tool called gadmin-samba however when I used that it completely hosed up my system hardcore. I had to purge all samba stuff, delete all the files and start from scratch several times to fix the issues.

File/Folder Access Rights:

The final step here that is required is to set the access rights of each folder you want to share. This is important because unless we change these permissions, we will end up only being able to VIEW files and folders on the server but we can’t create new files, paste, move, or delete anything yet. To fix this we need to change the permissions on the folders we set up to share.

We need to open the folders as root or administrator. Depending on the file manager software you might have different ways to do this, but in mine you simple right click ANY folder and choose “open as Administrator” or “Open as root” then I can simply navigate to the filepath “/” If yours doesn’t offer this, then open a terminal and type in the name of your file manager but call it from sudo like one of the following lines:

sudo nautilus /
#or
sudo nemo /
#or
sudo caja /

Right click on the folder of interest, for example “/mnt” and view the Properties. Click the Permissions” tab and make sure that they all show the ability to “Create and delete files.”

But if you’re using the terminal anyway, you can simply use the chmod commands. Here’s the best explanation of how to use it I’ve ever seen. You can make /mnt and /media fully writable like this:

sudo chmod 777 –R /mnt
sudo chmod 777 –R /media

Or you can give others the ability to look at files in your home user folder, but not create or delete like this:

sudo chmod 755 –R /home/adam

And you can block others from your folders and have them only viewable and editable by you like so:

sudo chmod 700 –R /home/adam

On the Windows machine:

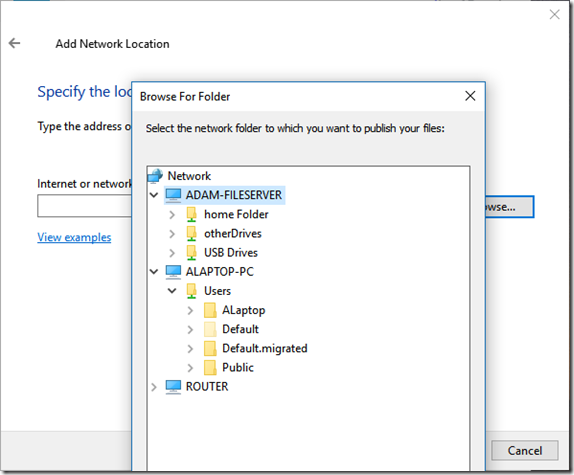
Now your fileserver is set up you need to access it. Go on your windows machine and open a file browser window. Right-click on “This PC” and select “Add a Network Location”  Click Next until it asks for the location. Click “Browse” and wait a minute for it to search your network. You should see your fileServer’s name pop up in the list. Click literally any folder under the fileServer and select Next.

fileserver List

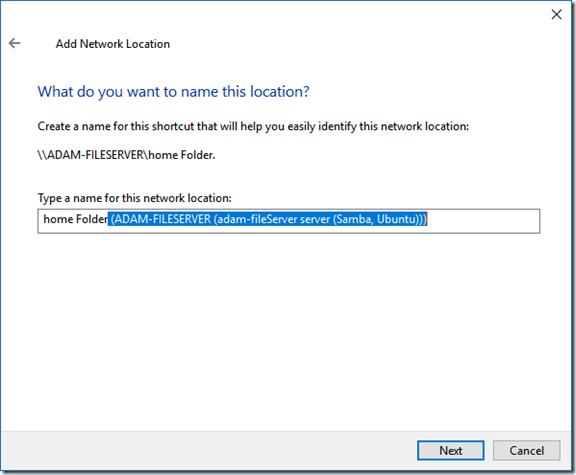
Shorten the terribly long name it gives you (I just delete the highlighted part) and you’re done.

name1

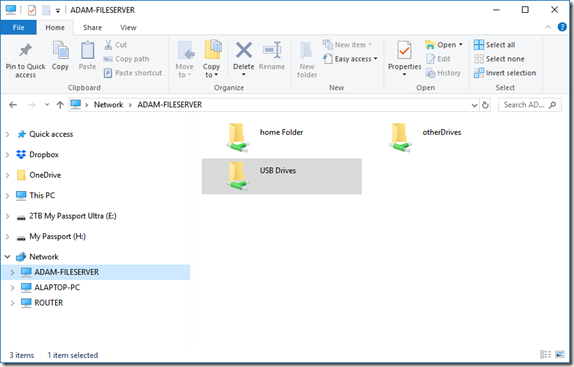
It’ll pull in the other accessible folders on that drive as well. Now you should be able to access and edit anything on those folders on the fileserver. To get to this again simply choose the fileserver option in the left-pane of the windows file explorer. If this doesn’t appear, then make sure your server is turned on and is on the same network as your windows machine and repeat the instruction in this section of the post.

remote

The first time you visit something in here it might ask you for a username and password. Just enter one of the Samba username and password combos we created earlier. You can make it save these credentials and never ask you again if you’d like.

Cherry on top – Remote Shutdown of server:

If you don’t want to connect a keyboard, mouse and monitor to the screen just to shutdown the fileserver, you can do so remotely by installing and using SSH. SSH is a way to securely tunnel into the fileserver’s terminal remotely. That way you can send it the standard linux shutdown message from your windows PC when you are done with it for the day.

Open synaptic and you should select the following:

or run the following command:

sudo systemctl status ssh

This will install the needed files for SSH. Next, we need to let the firewall built into linux know you want to allow ssh. In a terminal window run the following:

sudo ufw allow ssh

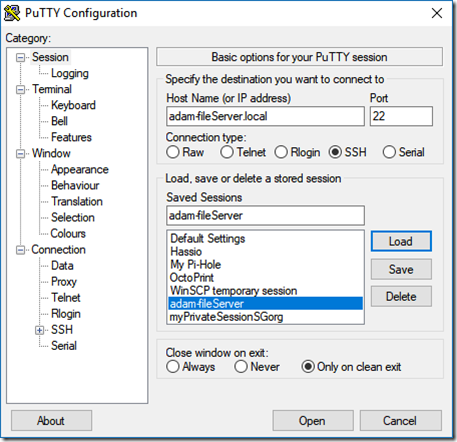
Now you can go to the windows computer and use putty.

Putty1

Enter your data here (keep the port as 22) and when you click “open” a black command window will pop up asking you who you want to login as. Type your linux username and hit enter and it’ll ask for a password. Now you’re commanding the terminal of the linux machine from windows. You can do literally anything the terminal can handle. You can’t do anything that requires GUIs though this way. That’s fine though because this is enough to send the reboot or shutdown signal. The shutdown takes about a minute before it actually shuts down, so don’ t think it isn’t doing anything, just give it some time.

sudo shutdown
#or
sudo reboot

Remote Desktop:

If you want a graphical environment for controlling your server, there’s 2 options. One is to simply remote Desktop into it.  There are many ways to do this, but the easiest is to simply install and enable the xrdp app on the linux machine and use the built-in RDP app in windows to connect.

Open synaptic package manager and search for xrdp and xorgxrdp.  Mark it for installation and click Apply.

Once this is done, go to the in the App search, look for “System Settings

Go to Sharing and make sure Remote Login is ON.

image

Next, in system settings, click “Network” in the left column and then click the gear button next to your wired (or wireless) connection. This will give you your IP address. It should look similar to your router’s address. Mine’s 192.168.x.x. You’ll need this to connect in windows.

To do all this in the terminal on the linux machine (or through SSH) run the following:

sudo apt install xrdp
sudo systemctl enable xrdp
ifconfig

This last command, ifconfig, will give you a screen showing you the local IP address of the machine. It should match closely to your router’s address. Mine is 192.168.x.x so I look for something that matches that. You’ll use this on the windows machine.

Now on the windows machine, click the start button and type “RDP” and hit enter. Type in the IP address of the linux machine.

I found an easier way. Simply right click on the fileserver in your explorer folder and select “Remote into this machine”

image

When you click connect, you’ll be able to login. I had a little trouble with this connecting. I tried all the selections in the dropdown menu a couple of times and on the 2nd or 3rd try it worked. Once I was logged in I got an error asking me to login to create a color device over and over. After entering my password 3 times I just canceled it and the window stopped popping up. I haven’t done this in like 15 years, but I don’t remember the experience being so crappy. I can access the desktop, but it is displaying a GNOME environment instead of the Mate environment I have installed on the linux machine. Nonetheless I can get do things graphically without issue.

Other Thoughts:

The way I’ve done it is quite insecure. I’m allowing Guests on the network access to create and destroy all the shared files which is kind of dumb… I’ll live with it though because I will only turn this fileserver on if I am immediately accessing the files on it, then immediately turning it off again.  In that short time I hope I don’t get hacked…

Storing all your files in one location is not the best for preservation. You can make a personal cloud like Google Drive, Dropbox, Box, OneDrive, Apple Cloud, etc. by using the Unison program.  It essentially synchronized two folders. These can be on the same computer, one on a portable USB drive, or even across the network. Anything added, modified, or deleted in one folder is automatically synched to the other in both directions.

Windows Networks Issues:

If the network disappeared from the “Networks” thing in Windows 10 but still somehow appears in the sidebar and is still accessible, no prob. Follow these instructions: https://www.wintips.org/fix-windows-10-network-computers-not-showing/#method-5

File Manager Share plugins:

Previously, I had some luck with using my file-brower’s “share” plugin. Nautilus, Nemo, and Caja all have their respective “share” app you can install in apt-get or synaptic eg “caja-share“.  This will allow you to simply right-click on a folder and select “share settings” where you can set this up yourself. The problem with this is that this info is NOT stored in the basic /etc/samba/smb.conf configuration file. In fact, it is nowhere to be found anywhere in that folder.  This is because this plugin stores this info in the following path:

  /var/lib/samba/usershares

To create the Samba users and set up their SAMBA passwords (these can and maybe *should* be different than their linux user passwords)

sudo smbpasswd –a user1
sudo smbpasswd –a user2

Now enable the users

sudo smbpasswd –e user1
sudo smbpasswd –e user2

Check the status of the samba server. You should see “active” somewhere. If not, you hosed it somehow. Tips on how to fix this at the end…

sudo systemctl status smbd

Restarting samba (after every big change to users, folders, etc you should do this. Or you can reboot the machine, which is foolproof method of restarting the server the right way)

sudo systemctl restart smbd
sudo systemctl restart nmbd

or do it directly for smbd and nbmd

sudo smbd stop
sudo nmbd stop
sudo smbd start
sudo nmbd start

Ikea Sniglar Crib Hack

image

Ikea is no slob when it comes to designing great affordable furniture. We chose the Sniglar Crib when our daughter was born because it was solid wood, with no weird finishes or chemicals on it that converted to a bed for about $100.  (It looks great too BTW). There’s no end to the hacks for these online, but we hadn’t seen any producing exactly what we wanted so we made our own. I mean, people convert these things into clothes drying racks, porch swings, benches, desks for both adults or children, magazine racks, a baby cage (playpen), you name it. Our hack is much simpler than these.

When our daughter outgrew the crib, we converted it to a daybed as the instructions show, however our daughter kept falling out. Lots of folks online recommended buying a wider piece of wood to replace the bottom support beam which would come up past the mattress.  We didn’t like this for several reasons. Firstly, it doesn’t match the aesthetic of the crib. Secondly, we’d have to buy something extra. Thirdly, it is a solid piece of wood, which if your kid rolls over with their face toward the board could restrict breathing a bit.

Our solution was to take the extra side of the crib which the support beam replaced (when it was converted to a daybed) and cut the dowels shorter. I only found one other person who did this, but even that seemed like too much work.

My way is very simple and uses only 4 dowels (you might have to get these, or use cut up parts of a pencil).

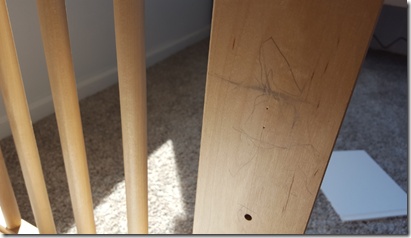
First, mark the height you want the new 4th wall to go on the crib and measure to the bottom of the bed support. for us, we likes 11 inches high. You can see that our little helper got ahold of the pencil and tried to help us out by tracing the mark for us.

marking

Measuring from the top edge of the piece we wanted to cut, I wrapped masking tape around each dowel at about 11 inches to prevent tear-out when I saw them. I then marked each dowel at 11 inches and cut each of them using my favorite pull saw for a fast and clean cut. There’s about 20 dowels but it took only about 10 minutes to cut them all by hand.

We then loosened the sides of the crib to give ourselves some working room by turning the bolts and prying the sides slightly apart. The top rail  of the crib has two holes for 5/16” dowels on either end. To transfer the position of these holes to the edge supports of the crib, we put our new short side in place. We didn’t attach the bottoms of the dowels to the crib, we just sat them on the bed support frame.  This is fine because the top of the crib has two small dowel holes to attach to the crib’s side supports. If there was only one dowel there, it could spin and move but since there are two used it locks the new side into place.

drillstop

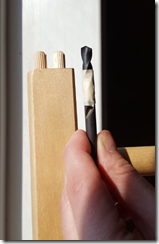
To attach this new shorter side, we made sure it was level and used the dowel centers from a dowel kit I had purchased years ago for some random project (who remembers…) to mark the position of the holes onto the edge support beams of the crib. I was careful not to drill these holes all the way through when I drilled the holes for the new dowels. The doweling kit comes with a drill stop, but I find that tape works better and is quicker to apply. This was done on each side to finish the project.

image

When finished, we pressed in the new dowels into the holes and turned the bolts on the base to lock all the sides in position.

I’d like to say that this solved the problem of finding my daughter on the ground when I check on her 30 minutes after putting her to bed, but as it turns out, she can no longer fall out of the bed; rather she is now crawling out and bringing her cover and pillow to sleep on the floor next to the bed.  Some battles you just can’t win.

How to Listen to Free “Audiobooks” in your Car

Imagine this: Instead of wasting time in traffic to and from work listening to 50% ads, why not “read” books and learn stuff? ( I despise ads with a passion and if you advertise to me , I’ll go out of my way to NOT purchase your product…)

I recently got fed up with my car’s incredibly sub-par infotainment system after 5 years. I bought my car just before they made Android Auto stock on all the models. I had played with Android Auto when I bought it, but it was pretty much useless at that time. It has improved since and Jess was tired of hearing me complain about it, so she installed it again on my phone to see if it had gotten any better. Luckily it had! I connect it up to my car’s bluetooth and things are (somewhat) working.

Of course, everyone knows about Audible.com, However if you are willing to make some sacrifices, there are several free options for audiobooks you can check out.

The most straightforward way to listen to free audiobooks is to get audiobooks from your local library. If you don’t like visiting the library, you can use Overdrive.com which allows you to get audiobooks for free from your library and listen to them on your phone or computer. Now the Overdrive.com site has terrible navigation, so I use the North Carolina portal for Overdrive which is much better.

You can download the Overdrive app, or better yet, their new app named “Libby.” You can search and request audiobooks through the apps or through the overdrive website, then play them on your phone. Android Auto treats these apps as if they were music players and all will work seamlessly.

If the book you want isn’t available on Overdrive and you’re an Amazon Prime member (click here for a free 30-day trial here if you want to check it out), you can try to look at Amazon Prime Reading’s list of about 1,000 free books. They don’t have to be audiobooks either, I’ve got a workaround for any eBook.

Any ebook from that list should work. In fact, any eBook that kindle can load should work as long as the text is selectable (not a PDF with images of text). The trick with this is that we’ll get Amazon’s Alexa to read the kindle books for us. Since you won’t have WiFi in your car, however, an actual Alexa device isn’t the best solution. Instead, we’ll use the Alexa App on your phone and the Reverb for Alexa App. The Alexa app will let you send kindle eBooks to your Alexa device so she can read them to you, and the Reverb app will allow you to host an Alexa on your phone itself.

First open the Reverb app. Then open the Alexa app. You can click on “play” and select eBook of your choice from your kindle library. When you select it, Alexa will ask you to select which device to play it on. Select the “Reverb” option and voila! If you don’t have the ability to select the “Reverb” option, make sure you are running Reverb before the Alexa app.


Your phone will now read the book to you. You can’t increase the speed (sadly) but overall it’s a good compromise. Now this method does use your data, however for about 40 minutes of reading, Reverb used only about 25Mb and Alexa used about 13Mb so total, about 1Mb of data per minute of audiobook. Given you can’t speed up books, that’s a bit of an annoyance, so a 6-hour book will cost you a little over a third of a Gb of data. On a 4GB monthly plan that’s only 9%. If you did nothing but listen to audio books, your 4Gb data plan will get you 67 hours of playtime per month! That’s way more than I’d use it for sure.

Of course, you might want to continue listening when you get either home or to the office. If you have an Amazon Echo, Echo dot, Echo Plus, or any other Amazon device (even a new one I’ve never heard of called “Echo Auto” which could be an interesting option as well). When you get to the office or home, simply use the Alexa app on your phone to select the correct device. Different devices may be greyed out if they aren’t available. For instance, in my car my echo dot isn’t available.

If you have a Kindle Unlimited account, you can get even more free books from there selection of over 1 million.

In all, these solutions save me from hearing garbage-radio shows or political news when I’m driving in my car. If you find any other solutions to this, please drop a line in the comments and let me know!

Getting Started with 3D printers (Detailed Guide to Everything You Need to Know to 3d Print Successfully)

image

Learning how to 3d print really is a process of trial and error. I started this page to keep notes on tips and tricks I discovered while learning about 3d printing.

I was given a RepRapGuru 3D printer a couple of years ago. This is a basic prusa i3 clone like the Anet A6, A8, Geetechm and other low cost models you see everywhere for pretty cheap. My first prints were only about 1cm high with  terrible results. I didn’t have time then to fiddle around with the machine, so it wasn’t used. Now due to COVID-19 I’m saving about 10 hours a week since I’m not longer commuting and working from home,  Given I’ve had a little more time, I’ve worked on making my 3d prints better. This page documents the stuff I couldn’t find on other “beginner 3d printing” videos and blog tutorials. When figuring out how to 3D print something, a lot of tutorials only apply when everything goes right. This wasn’t my experience. Is it easy to 3d print? Well, there’s lots of twiddling and tweaking required. I’m hoping my detailed guide will help give you what you need to 3d print successfully.

The Basics of 3D Printing (non noobs can skip this part)

Firstly, understand some basic 3D printer concepts. (Feel free to skip this section if you’re not new to this):

Step 1: 3D files are created in computer aided design (CAD) software. From here you export the files as a format called STL.

Step 2: You will bring these files into a software called a slicer which basically breaks down the 3D design into slices as thin as a piece of paper. Stacking these slices will generate the same shape as your 3D design in the STL file.  The slicer outputs these slices as a format called Gcode. Gcode is what your printer’s controller board understands. Gcode code is the same language that CNC routers and PCB milling machines. Actually a 3D printer is technically a type of CNC machine.

Step 3: You send the Gcode to the printer. Some slicers like Cura can do this process built in. Some other slicers do too. Some software are only Gcode senders (they can’t slice themselves). I like to use Cura because it has the ability to slice and send, as well as a lot of other great features and best of all it’s free! You can actually send the Gcode over a USB cable or put it on a an SD card and have the printer print it by itself.

Step 4: The 3D printer reads the Gcode from the USB cable or the SD card and executes the commands, squirting out the exact right amount of melted plastic at the right places for each slice in the model.

Step 5: You rejoice in your successful 3D print!

Actually I lied. Step 4 is where things go off the rails typically. That’s where you run into problems not discussed in other 3D printer articles. Here’s the real info you need to get started 3D printing…

Understand 3D Printing in More Detail (non noobs can skip this section too):

3D printers have 3 axes, X, Y, and Z. The Z axis always point vertically (up). The X and Y axis can be switched given your machine settings. On mine, my extruder rides on the X axis, and the entire X axis is lifted up and down by the Z axis. My Y axis is a bed that moves front and back. Each axis typically has a little switch on one side which is used to being the printer to a “home” position. When a homing switch on an axis is pressed, that axis knows that the machine is at location 0 for that axis. The home position for the machine is at the coordinates 0,0,0.

The motors are STRONG. If you get your finger or hand caught between the axis and where it is moving to, it will hurt… a lot! You can injure yourself pretty badly in fact. so while it is moving, be careful.

The extruder of a printer takes plastic filament and shoves it through a device called a hot end. The hot end is where the plastic melts. Your slicer software writes the Gcode command to tell the hot end what temperature to be. the temperature depends on what plastic you are using. Different materials will require different melting temperatures. Typically, the lower the temperature a material melts, the fewer ultrafine particles it gives off.  (ultrafine particles are really nasty to breathe in). I use PLA  and it usually has a melting temperature of about 195 degreed Celsius.

The force of the filament being shoved into the hot end will force the melted plastic out of the nozzle at the bottom.  The filament has a diameter of about 1.75mm, but the nozzle only has about a 0.4mm hole in it.  If all goes well, your filament will extrude out of the nozzle the exact amount needed to fully cover an area but not too much that it splurges out everywhere.

Typically you will also have a heated bed on the printer. My heated bed is made of a circuit board PCB material, but they can also be made of silicone. The bed doesn’t heat anywhere near as hot as the extruder head. Typically only to about 50 or 60 degrees Celsius.  Heating the bed is important because it will help the molten plastic to stick. For plastics that have significant shrinkage when it cools (and no, it was not in the pool…). ABS shrinks so much that as the printer moves to higher layers, the bottom of the print can shrink enough to detach from the bed of the printer all together causing failed prints. PLA sticks better with a heated bed as well, though it doesn’t shrink quite as much.

On top of my heated bed, I have a piece of borosilicate glass. When heated, PLA sticks beautifully, but when the prints over and the bed turns off, PLA detaches with very little effort.  This is perfect for stiction and since it is glass it is hard to damage with normal use. Many 3D printers come with a printing surface made of some plastic. I haven’t used them personally, but it seems that over time the surface wears a bit and it might need to be replaced.

Making a print stick well doesn’t just rely on heat. It also depends on the level of the bed. Printer beds usually have a screw and spring assembly at each corner, allowing you to raise or lower them. This helps create a flat surface for the extruder head to travel over. For your print to stick, the first layer is critical. Getting this layer to stick requires some precision. You move the head of the extruder to one corner of the bed, then lower it on the Z axis slowly (0.1mm at a time) until it can barely pinch a piece of paper between the bed and itself.  Once you have done this, move to another corner and do the same. Only adjust one screw at a time.  You can manually adjust the bed and twiddle those screws for a while before getting it just right. There are some bed level prints people have made to help you see if your bed is level. I’ve never had the patience to level the whole thing.   Depending on your printer, sometimes all the corners will be perfect, but there’s a hill or a sag in the center of your build plate. This is where bed leveling comes in. More on how to do this further down the page. Usually a sensor is used to probe the bed at different spots, building a 3D map, then the Z axis values of the Gcode are adjusted as your print something based on these measurements.  There are different sensors for this, but since my printer didn’t have a metal bed, I couldn’t use inductive sensors. I only had to use a touch-based sensor. I explain it in detail below.

Things to buy to make 3D Printing Easier:

There’s a lot of tools that make 3d printing better, so here are some things I’ve purchased along the way. It doesn’t hurt to have some spare parts…. In fact it is essential as things WILL break. Here’s what I ended up getting:

  • Switch and fuse for power supply Instead of unplugging from the wall and causing a spark when the motors are on, this switch and fuse box gives an extra element of safety to the printer.
  • Silicone hot-end covers Help keep the heat where it should be. this helps the hot-end get to temp and stay to temp well. I didn’t think i needed them at first, but this was the cause of a lot of my issues when I had a fan shroud running.
  • Extra hot ends are almost a requirement. At some point, something bad will happen to your hot end so be prepared. Anything form leaks, to accidentally slamming the  print head into the bed and bending the tube, to just failed prints that create a massive gob of plastic that encompasses the hot end that you can’t get off…. I wish I had these on hand when it happened, but now I always keep extra.
  • Extra extruder Again, something bad WILL happen to your extruder eventually so be prepared. I wasn’t and had to wait for this to ship when I broke my extruder. I always try to have 1 extra. They are also handy for different materials. I have one I use for PLA/TPU temperatures, and one I have on hand for ABS or ASA, and one for PETE. I just swap them out as needed instead of dealing with clogs due to different temp plastics burning, etc.
  • You’ll soon be wondering how to clean a 3D printing nozzle. Some folks will say to use chemical solvents, but those are really bad things to be around. The simplest solution is the best. Brass brushes are the best way to clean a 3d printer nozzle. The method is simple. Heat the hot end up to your plastic’s melting temp, then brush it clean with the brass brush. Don’t use other metals as steel can damage the nozzle and of course plastic would generally be a bad idea. Some heat-resistant gloves can help here as well.
  • Left-hand extruder lever If you want to do dual extrusion, having the left-hand extruder lever allows you to place the hot ends as close as possible to each other. This might not seem important, but the closer they are to one another, the more of your bed you can access. If you have the two heads far apart, Cura will show you dark areas it knows the print heads can’t reach, and it won’t allow you to put stuff in those areas.
  • Extra power supply –  I blew up the first one by fiddling with the circuit while it was plugged in. this is dangerous and down-right deadly actually so don’t do it! I was lucky when my screwdriver shorted something I didn’t get shocked. But, this kills the power supply…  So have another one on hand.
  • External heater Module The MOSFET on the RAMPS controller board is kinda puny and can cause you bed to take too long to heat up. Marlin firmware has a safety feature that will turn off power to EVERYTHING if it reads that the temperatures don’t reach their expected values. (This is a safety measure to help you not burn down your house by mistake).  This external heating module can handle plenty of power to your heated bed allowing it to heat up as fast as possible while still being safe.
  • M3 Phillips head variety screw set This has saved me SOOO many trips to the hardware store! It has all the normal length screws that’ll fit the RepRap Guru
  • Extra fans While I eventually took off all the fans, These were essential in the beginning to get good prints. Find a fan mount on thingiverse and you’re set.
  • You’ll need some filament.  I’ve tried a hand full of different brands and types and I’ve liked them all so far. Good quality filament results in good quality prints.
    • I started with Matterhackers PLA since quarantine had basically shut down amazon’s shipping at the time. This was the first stuff I used and my prints came out great.
    • Hatchbox has great filament. Once amazon got more in stock
    • Sainsmart has really great flexible TPU that prints almost the same temp as PLA. I highly recommend getting some of this stuff to play around with once you’ve tuned your PLA prints well. It is a lot of fun. Make a squishy lizard that feels like a real lizard.
    • I was interested in the whole “MasterSpool” concept and ended up getting this 2-pack black and white filament here. It only comes with one masterspool, but you can make or buy another one if you want to use both.
    • If you’re tight on cash but want to have more than one color of filament, there’s nothing better than having white or clear filament and some sharpie markers because you can make a filament color blender that can give some great results. You don’t even need to print anything for this method to work, simply modify a sharpie for great results! There’s a pic further down on the page of the one I used of the one I made.

The tips and tricks below are a cleaned up copy of my running notes as I was setting up and starting with my 3Dprinter. I hope it saves you countless hours and frustration I expreienced:

Thumbnail Previews of STLs in Windows

If you download an STL file from somewhere online like thingiverse or Cults3D, you have no idea what the file actually is until you open it in your slicer.  Windows doesn’t preview STL files like it does pictures.  I’m tired of not knowing what an STL is until after the 5 minutes it takes Cura to load. I found this windows app which will preview the STLs as a thumbnail icons. This makes it easy to see what I’m looking for. You have to make sure you view as medium or large icons.

image

Here’s a similar thumbnail previewer for SVG files which you can see I was using as well.   This is actually how the “test3.svg” and the “fox string art” are being previewed in the screenshot above. (The fox is hard to see because it is red lines on grey background but it’s there…)

Marlin 1.x Firmware Tweaks:

You may need to tweak your firmware a bit to get the results you want. You will definitely have to tweak it to add another extruder or a touch leveling sensor. I’ve done this a few times and I always cringe at having to do it. It is kind of an art. For folks who don’t know how to code, you can always find a youtube maestro who can show you step by step what they did with a similar setup. I’m putting down the basics of what I condensed form multiple tutorials below:

My 3D printer runs on Marlin firmware. To understand how to tweak this, you’ll need to know that pretty much all user-settable changes are made in two files. Configuration.h and Configuration_adv.h These will set up your machine or configure it for multiple extruders, different kinds of Z probes, bed levelling, etc. I put all the version of Marlin I used on my gitHub repo so I can always go back to it.   The machines comes with Marlin 1.x, but I upgraded to 2.x. Both are available on my repository though.

In the original Marlin 1.x version of the firmware the came with the printer. To edit this code, you’ll only ever change things in Configureation.h and Configuration_adv.h.  You can download the code from Marlin’s website and with the older version (1.x) you can edit it using the Arduino IDE. To edit the code, you’re typically going to either comment something out (my putting “//” to the left of the code) or uncomment (removing the “//” from the left of the code) or maybe change a number here or there.   Marlin 2.x is different and I documented that below as well. I made the following tweaks to my Marlin 1.x:

Let’s start with an easy one. I didn’t like the direction the menus updated when I turned the knob. You can change the knob direction on line 1289 by uncommenting

#define REVERSE_ENCODER_DIRECTION

Once you make this change, you can compile and upload the firmware to your printer. After it is done you can see whether or not you like that change. If not, no worries, just go comment that line back and upload the firmware again.

Add EEPROM setting storing in firmware.

This allows certain tweaks and tuned values to be stored in long-term memory on the arduino so you won’ t have to add the values back every time the machine is turned on. line 1025 and line 1027

#define EEPROM_SETTINGS // Enable for M500 and M501 commands
#define EEPROM_CHITCHAT   // Give feedback on EEPROM commands. Disable to save PROGMEM. Then flash this to the arduino.

AutoTune PIDs for the hot end and heated bed

PID is a method of controlling the heat. When the controller is set to 190 degrees Celsius, the PID algorithm makes it heat up tot hat level as fast as possible, and keeps it that temp regardless of external factor such as the filament taking away some of the heat as it extrudes, fans blowing on the hot end or bed, etc. This needs to be tuned to work for every different printer, and even different environments or weather. I have my printer in the garage and these values should be changed on warm days and cold days. Tuning a PID by hand is time consuming and a bit of an art requiring understanding of how it works, and some calculus concepts, but luckily, Marlin can autotune these for us.

Set up PID tuning abilities by uncommenting  the following in configurations.h somewhere near line 367 in Marlin 1.x

#define PIDTEMPBED

Run M503 to get all the current settings:

12:33:41.303 : echo:PID settings:
12:33:41.305 : echo:  M301 P22.20 I1.08 D114.00
12:33:41.305 : echo:  M304 P10.00 I0.02 D305.40
12:21:30.271 : echo:PID settings:
12:21:30.274 : echo:  M301 P22.20 I1.08 D114.00

=================

Then to autotune the hot end you’ll go to the arduino terminal and enter:

M303 E0 S190 C8

Then autotune the heated bed:

M303 E-1 S50 C8

Which will tune the hotbed (extruder-1 here) by ramping up to 50degrees Celsius (S50) 8 times (C8)
Use the resulting values and paste them into the configurations.h file of Marlin and then send this code to the arduino.

Then I ran an autotune on my extruder:

 
M303 E0 S190  C8

/*
* Run M503 to get a read of all the current PID values of the machine.
* it will give you two values, one for hot-end and one for bed:
* 12:33:41.303 : echo:PID settings:
* 12:33:41.305 : echo:  M301 P22.20 I1.08 D114.00
* 12:33:41.305 : echo:  M304 P10.00 I0.02 D305.40
*
* THEN
*  I ran PID autotune with the stock numbers for the bed and got the following result:
*  command I ran in console of repetier host:   M303 E-1 S50 C8
*  12:41:36.525 : PID Autotune finished! Put the last Kp, Ki and Kd constants from below into Configuration.h
*  12:41:36.525 : #define  DEFAULT_bedKp 379.31
*  12:41:36.525 : #define  DEFAULT_bedKi 59.36
*  12:41:36.528 : #define  DEFAULT_bedKd 605.94
*
*  Default values were as follows
*  #define  DEFAULT_bedKp 10.00
*  #define  DEFAULT_bedKi .023
*  #define  DEFAULT_bedKd 305.4
*/

For my extruder here’s the resulting updated values:

13:11:32.964 : PID Autotune finished! Put the last Kp, Ki and Kd constants from below into Configuration.h
13:11:32.968 : #define  DEFAULT_Kp 12.61
13:11:32.968 : #define  DEFAULT_Ki 0.51
13:11:32.968 : #define  DEFAULT_Kd 78.02

I can manually enter these in my slicer something to prepend to all Gcode it creates, but honestly, I’ll uninstall,/reinstall and forget to do this at some point and be super frustrated. I prefer to save these in the Printer’s EEPROM, but you shouldn’t do it using the M-codes for Marlin directly. If you are using octoprint to control yourprinter, there’s plugin to edit the Marlin EEPROM you should use instead.

M301 P12.61 I0.51 D78.02

But the better thing to do is to put these in the arduino code itself.
These belong on lines 339-341 but in my firmware that’s tagged as “ultimaker”  which doesn’t make sense, so I changed the comment there as well.

References:
https://www.youtube.com/watch?v=CJtARpxLlj8
https://www.youtube.com/watch?v=YpWCKNagjuI
https://marlinfw.org/docs/gcode/M301.html

Calibrate and Adjust steps/mm for each axis, including the extruder:

To do this you will need the ability to talk to the serial port on the printer. You can run the Arduino IDE’s serial port. Simply plug your printer to your computer, open Arduino.exe then open the serial terminal. If you have the baud rate correct you’ll be greeted with some legible text. If not, you will be greeted by garbled random characters. I think my baud was 115200.

Next you’ll need to make sure your power supply is turned on since we’ll be moving the motors.

Then we want to move the Z axis height to about the middle of its range. If it isn’t already, then you should measure approximately how far the Xcarriage is from the middle of the Z range in millimeters and enter this into the terminal. If your machine sis at the home position, this is about 100mm.  The G0 command tells the machine to do a linear move, and Z100 tell is how many what axis to move and by how many mm. If the machine starts moving in a way you don’t like or it might break itself, then you can turn off the power supply by unplugging it from the wall outlet. I added a power socket with a fuse and a switch to make this process easier.

G0 Z100

Insert the filament into the extruder head, and send the command to heat up the extruder to PLA temperature (I use about 190 degrees C). You can do this from the Marlin menu on the LCD or by sending the following command:

M104 S190

Once this is hot, press the extruder lever and manually feed the filament into the extruder until you can see it squirt out the bottom of the extruder.

Calibrate the Extruder first. To do this, you’ll use a marker to mark the filament

This allows me to mark my filament at 120mm from the top of my extruder with a marker, then send the command to extrude 100mm. Measure again and use the formula to calculate the true steps/mm of the extruder. Use the G21 command to make machine use mm units, then use the M92 command to set the steps/mm (of course make sure the machine is in mm mode first) https://marlinfw.org/docs/gcode/M092.html

G21
M92 E95.74

The same can be done for each axis in turn by moving them a known value, then tweaking this number. Print this XYZ Cube and measure each dimension with calibers. It should be exactly 20mm x 20mm x 20mm (X, Y, Z) If it isn’t you’ll recalculate the number for “steps per mm” for that particular axis using the formula below:

(Expected size / Measured size) * Step/mm setting = new steps/mm setting.

For example, if I printed the cube and got 19.5mm in the x axis, and I had used 200steps/mm as my setting in the firmware, I would recalculate the X steps/mm to be:

(20mm / 19.8mm) * 200mm = 202.02steps / mm.

Then set this in your controller via serial port:

M92 X202.02


You’re going to tell the machine to move a certain distance, then measure what it actually does. These values will help determine REAL values for your steps/mm setting of your controller. Enter your values below to calculate a new step/mm value.


Current Steps/mm Distance you told it to move (mm) Distance Traveled by machine (mm) New step/mm value


image

You’ll print 20mm calibration cubes and get those dialed in before moving to the benchy here. You can see my progression of calibration cubes at the very top of this page. My first results were horrible and boogery. I was using clear Dremel PLA. The Benchy tests things like overhangs whcih is important to get a feel for as well. It takes about an hour or so to print the benchy with default speeds.  The worse thing you can do is to use clear PLA to test with. Once I changed to blue PLA issues became more obvious. This site was very helpful in troubleshooting different 3d printing issues with pictures showing you what each problem looks like.

One issue that I scanned the interwebs for help with (since reddit’s 3d print community was not responding to my plea for help) was that the weird boogeryness on the front of the benchy was due to too high temp with too little cooling. I reduced temp to 195C and tried printing a fan shroud. I came across a couple different ones to try, but ended up using one, then janking the thing up by attaching a larger fan that was supposed to be on it. I had to  hack something together using a 60mm fan I had on hand (having fried my only 5v 40mm fan plugging 12 v to it like the genius I am…).and since it was designed for a different printer, had to rig something up to make it stay on my extruder…

I got the following half-benchy before the spaghetti monster appeared.

image

image

More Tweaks and Whatnot:

The first thing I fiddled with was the extrusion speed. Default speed in Cura is 60mm/s but I kept hearing my extruder slipping on the PLA, so I backed that off to 50, and ultimately 40mm/s. Benchy now takes 1.5 hours but came out fairly acceptable. Would I like better quality than this?  Of course I would. but I can’t stand this fiddly-tweaky fine tuning.

First useful print once somewhat calibrated

Surely you’re wondering now that you have a printer, what to 3D print. After the calibration prints mentioned above, the very fist things to print should be upgrades to your machine! Your print quality will increase greatly. Even if you have a CR-10, Ender, Anet, or any other 3D printer, you can find great upgrades freely available online at the usual suspects.

Here you can see my upgrades:

Understanding Fans and Heat flow for the Hot end in General:

There are two different areas and reasons to have fans on a 3D printer. to be cheap, lots of places try to combine these and use a single fan, but that’s not very effective.

Firstly, most 3D printers have a fan that cools the PLA before it enters the hot  end to make sure it is strong enough to be shoved into the hot end.  This allows the extruder motor to be able to shove the filament into the hot end without the filament getting soft and floppy like cooked spaghetti. If it is cool, all the force from the motor is linear.

Secondly, in order to get a clean print, you likely need to cool the filament immediately after it has been extruded. At first, I didn’t know what to do about this and I printed probably 5 or 6 fan shrouds. Some used the original fan mentioned above and simply diverted some of the flow to cool the extruded material. These didn’t work well. I added some external fans as well, but had issues with those too. Some fans were so strong that they cooled the bed so much that the printer couldn’t reach the programmed temperature. This causes a “thermal runaway” or “bed heating:” failure.   To fix this, I tried several methods with varying success:

1. Get a small 5150 radial fan and wire it directly to 12volts. This should be on 100% of the time the machine is on.

2. Print a good fan shroud for this.

This fan shroud uses a portion of this airflow to cool the PLA after it has printed. This creates better overhangs and prevents droopiness. I actually printed several version. The best one I found was this one. I had to be careful because adding a second 60mm fan just to cool the PLA was so strong it prevented the bed from reaching the appropriate temp.

Prevent Leakage on the Hot end:

After building a couple hot ends, I kept having an issue where the plastic would seep from the threads on either the nozzle or the heat-break side as shown here. This is really hard to clean up and you get burned a few times. Once I flicked hot PLA into my eye… The fix is to simply build the hot end correctly:

  1. Install the nozzle into the heat block
  2. back it off by about 1 whole thread at least. You don’t want it fully seated.
  3. Install the heat break (tube part) on the other side until it toughed the nozzle
  4. wrench down on the nozzle to tighten it the rest of the way.  This compresses the teflon tube inside the heat-break and prevents leaks.

image

Bed Leveling:

  1. Home the X and Y so you’ll be at one corner of the bed.
  2. I made sure that all the screws adjusting the bed level were about halfway screwed down. This gave me maximum play in up or down when tweaking. This may need to be adjusted iteratively.
  3. Make sure that if you home the Z you’ll be above the bed. Use a piece of paper (I used 2 or 3 post-it notes) and home the Z axis. Put post-its under the Z and manually adjust the Z homing screw until you feel a little pressure on the post-its but can still pull them out from under the the Z axis without depressing the bed springs.
  4. Raise Z and move to the opposite Y corner, home the Z at this corner. Adjust bed screw until same pressure on post-its is felt.
  5. Move to opposite X axis, do the same, only adjusting bed screw
  6. Move to opposite Y axis (last corner) and do the same.

I print a series of tests as well to make sure the adhesion is good on different parts of the bed. Here’s a great video describing how to as well as the files to print. The video shows examples of the prints showing when the bed being too high, too low, and perfect.

What to 3D print (continued):

Some of my favorite services are listed below:

  • Yeggi.com searches multiple sites for your keywords. It is pretty good to get an overview, but there are better specific sites to use.
  • Cults3D is my favorite 3D printing community. The quality of the ideas are great. Also, you can sell your own design
  • The best way to search Thingiverse is this custom google search for thingiverse some guy posted on reddit. It’s1000 times better than the built-in search. I bookmarked it and always use this.

Sites I avoid:

  • STLfinder… It is an aggregator like Yeggi, but every time I want to open the link to the project, it instead opens the image file from the search. I avoid it like the plague.
  • GrabCAD has files from CAD software or video games, Neither are things I personally want to print

You can make your own 3D designs in CAD software. I’ve played with a bunch… Here’s what I recommend to start with:

  1. TinkerCAD.com is a free browser-based 3d modeling tool designed for children. It is great to start with.
  2. I haven’t found a good next step that doesn’t breed bad CAD habits. I think the closest next step is Sketchup which has a free version you can use. It is really intuitive and quick to learn, but it is best if you skip it and move to a real CAD paradigm.
  3. Autodesk Fusion 360 (free for personal use) is a full CAD software you can do everything in from concept, 2D, 3D cad, molding parts almost like clay, sheet metal design, stress calculations, realistic photo quality rendering, to actual machining or 3D printing. It’s a one-stop shop for all parts and assemblies.
  4. Blender is a free 3D software used for anything from 3d CAD to video game design, to making movies. Check out my mans Joe to learn how to set it up and use it for 3D printing.
  5. Solidworks, CREO, Inventor, etc. These are professional CAD software packages used by engineers. You can take an online (or preferably a local community college class) to learn these.  The issues are they don’t have great licenses for personal use.

How to use the Flexible Filament:

I was surprised that I was able to print TPU flexible filament using the stock RepRapGuru without any hardware modifications. I ended up getting Sainsmart TPU which is pretty great stuff. It’s melting temp is really close to my PLA which works out well if I want to use them both on the same project. I’ve added my Cura material profiles, Printing settings, and my printer setup screenshots in my github repository.

On these new cheap geeetech extruders, I had to add an extension to the hot end tube so it didn’t give the filament a change to bunch up or bend. You can see it sticking up under the gear on the right hot-end in the pic below. It is made of a broken hot-end “heat break” that I cut shorter and screwed in from the top.

I also tested a method of coloring white filament with sharpies as seen on the left extruder.

I also just ordered a 3dTouch which I can add to the carriage to get really accurate height measurements. I will have to tweak firmware for it to work and I haven’t gotten that far yet.  The next big step is designing and printing a new carriage to accommodate this and better fit the dual extruders.

image

Marlin 2.0 Firmware update Jan-2021:

I printed a new carriage and things were working well for a couple of months. Also, to better level my bed, I printed this indicator holder and this flexure gauge.  I even had good success with TPU (Flexible ) Filament.  I had found some Cura material profiles for sainsmart TPU online and tweaked them until it worked very well at 30mm/s speed. I have a cura profile for it that I found online somewhere that works good.

It’s been printing fine for a while, however I really want a dual extrusion printer. Since I have the RAMPS 1.4 board, that already had an extra stepper driver installed I didn’t have to buy another one.  I bought an additional geeetech MK8 extruder. I also bought several new hot ends and the left-hand version of the extruder lever portion.

I printed this dual carriage to hold both extruders. Luckily I had the correct screws from the original carriage.

While I’m at it, I might as well upgrade the firmware right?

I downloaded the Marlin 2.x firmware.  This does not compile in Arduino anymore, so I had to install vscode and then the Platform.io plugin.  This messed up my VScode IDE for other languages I was using such as javascript and python projects. Installing python libraries using PIP now installs them into platform.io’s settings folder which breaks things so as soon as I was done with this firmware upgrade, I uninstalled it. I’ll find a fix to allow them to coexist later.

I also downloaded the “Infitary 508” sample configuration since this seemed to look close to the RepRapGuru.  I assume a Geeetech or Anet A8 model would work as well.

I tried to go through my old firmware and note the changes made to the configuration.h and configuration_advance.h files. I even copied the PID values.  I’ll recalculate these later.

In the Marlin code, I had to change my MOTHERBOARD to ramps EEB instead of EFB to allow the second extruder to be connected correctly.

I also had to change a couple of lines with regards to the extruder.  It was actually MUCH easier that I expected. This video had a few details.

NUMBER OF EXTRUDERS becomes 2

Temp Sensor Type I left default I believe….

MAX TEMP

Next I had to create a new custom printer profile in Cura to handle both extruders. This was easy using their wizard.  I measured the distance between then two extruder tips and entered this as a rough starting value for the X offset in Cura. I will calibrate it better later on, I just needed to get it printing first. Now, you *can* enter this offset into the Marlin firmware, but I prefer to do it in cura as sometimes it changes a bit and I like to be able to quickly make corrections without having to upgrade the firmware.

In Cura, it is very easy to use both extruders. Right click the object and select the extruder you want. You can set the different materials as well using the tabs provided at the top.  The output options now also has a tabbed interface, one for each extruder.  Be sure to update the options in both tabs!

I then had to recalibrate each axis again, including the extruders. The formula is a ratio of the distance you told the motor to travel, and the distance it actually traveled multiplied by the steps it was told to move in the Marlin memory. You see what Marlin already has by opening the Arduino Serial terminal (because the baud rate is like 250000 which is kind of weird… and Arduino seems to connect it) and entering “M92

New M92 value = Desired movement / Actual movement * Current M92 value

To set a value you’ll reissue the M92 command buy with the axis and the new value eg.

M92 X82.57

To calibrate the extruders I marked the filament at 120mm form the extruder’s top and told them to extrude 100mm using the LCD screen then measured the result. Using the same formula, I calculated the steps and set these with the M92 command. To get the X, Y and Z calibration I printed the standard 20mm cube with each individual extruder.

To store the new steps/mm in memory, you must issue the M500 command.

It is too hard to calibrate the heights of the extruders perfectly without a flat bar or plate to align the hot ends, so I have ordered a few things to help with this and will update when I make progress.

I ordered some pieces to help align the extruders, but though they looked like the same gold anodized aluminum as my extruders, the hole pattern was quite different. I ended up drilling my own holes and using it anyway. The extruders are closer now than my 3dprinted dual extruder holder. Luckily I have the OpenSCAD file for it and can edit it.

To adjust the heights, I’m trying to screw the hot ends in the same height, but it is never perfect so I’m using folded pieces of aluminum foil to shim the two stepper assemblies until they are even.

X and Y Offsets

There’s two methods of setting up the offsets for dual extruders. One is to do it in the firmware, so Marlin would be edited to know the distances in X and Y pf the two print heads. The advantage  here is that any slider you use will work with minimal setup.  The disadvantage is that if these values change for any reason (you mad e a different Xcarriage mount for instance), you have to reflash the firmware… which is a pain.

The second method is to set up the offset between the two extruders in the slicer software. Advantages are that you have less firmware editing. Disadvantages are that you’ll need enter the offset numbers into each slicer you use. If you loose your printer profile in Cura for some reason, you have to make sure to re-enter these values so keep them written down somewhere.. like a blog no one reads 🙂 In the picture below, my #1 extruder is on the left, so that’s being treated like it’s the 0,0.  My right-side extruder is extruder 2 (because it matched the tab layout in Cura this way) and had the offsets of (-34.17, -0.07). I have since used a sharpie to write the extruder #1 or #2 on the physical extruders so I can glance and see which is which. Oddly, These are labeled “T0 and T1 respectively in Octoprint’s settings.

Octoprint will ask for these numbers too for some reason. I haven’t figured out what to do about that just yet. Also, you must update your Octoprint printer profile to have 2 extruders, or it will throw and error and only print stuff with extruder #1…

Adding Automatic Bed levelling with a 3Dtouch or BLtouch

I added the 3D touch to the design. The only place I could mount it was the back of the X carriage. I made a custom mount in openScad and you can find it here if you are interested.

I updated to Marlin 2.0 and have it set up with dual extrusion and am now using a 3Dtouch for my z axis. On my github repo, I have the 2.x firmware with the dual extruders turned on. You can turn this off by going into Configuratin.h and changing the line

#define EXTRUDERS 2

to

#define EXTRUDERS 1

Additionally, I have the 3dtouch firmware added as well in its own folder.

I’m not really happy with the results of the 3Dtouch being mounted where it is. Not sure how I’m going to fit it yet. You can use a program such as Meld to compare the changes in the Configuration.h and Configuration_adv.h files of the two versions of Marlin I posted on github.

Tips for Mounting Stock Material for CNCing

Holding a workpiece is always an annoyance. You want to flatten a sheet of plywood so there’s no part of it bowing upward because that will throw off your cut depths. Nothing is worse than thinking you have a tab holding a part in place only to find out that the tab was too thin or nonexistent when the interior piece starts getting all chewed up and flopping around, breaking stuff. On close inspection you can see that on your final couple of passes, the tab was cut too thin or clean through because the wood was bowed upwards. Without a vacuum table, there’s only so much you can do, but I’ve found a few ways that seems to work great. Screwing or clamping the wood to the spoilboard is OK, but it makes certain areas no-go zones for your bit. My methods will help you use up every square millimeter of the wood if you’d like.

Dealing with the Wood Itself:

The wood itself is always as straight as I could find, but it’s never perfect. I lay it on my machine such that the cupped edges stick up in the air. Then I mount down the edges.  There shouldn’t be a bubble in the middle because the curve was originally downward to begin with and since I affix the edges (where all the stress to move upward is) it lays pretty well.

image

Traditional Method using screws:

Sally from Shopbot showed me a nifty trick. If you do use screws to secure your stock to the machine you want to make sure your toolpaths will never touch the screws (lest you break your bit or mill your screw head off). Sally’s trick is to add these screw holes to your design.

  1. Lay your stock on the machine and center it but don’t mount it.
  2. Open your cutfile and add small circles (1/8th – 1/4th inch diameter) about 1/16th inch deep to the design. These are the locations of your screws. Make sure they won’t interfere with any cutpaths and that they will be in a good position to secure the stock.
  3. Export just these circles as a cut path and cut them.
  4. When finished, add screws in these locations (The black circles in the image below)
    image
  5. Delete these added circles from the design
  6. Cut your design file as normal.

This method works great, however if the stock is bowed or there are small clearances in the cutpath of your design, or if you aren’t using tabs to support interior pieces this method might not work for you so try the other ones listed below.

Masking Tape and Cyanoacrylate (CA) Glue (Super Glue):

I stole idea this from a few places. Machining metal parts you can straight-up super glue them into place on your vice. Make sure the faces are clean of oil and debris first of course. When finished, you can simply dissolve the glue with a heat gun to remove your part.

The problem with wood is that if you superglue it, it can make it all nasty looking for the next few steps of the project. And what if you wanted a nice natural finish? The solution is to use masking tape. You’ll lay down a piece of wide masking tape to the spoilboard, then apply another to the stock material. Lay down a line of CA glue on the piece on the spoilboard and spray the piece on your stick with CA activator. As soon as you touch the two that piece is going to stay in place pretty well.

This method works best with smaller material that isn’t very tall. It also allows you to cut pieces on top of the tape without the need for tabs.

Masking Tape and Hot Glue:

For larger pieces of stock I’ve found the use of wide masking tape and hot glue to hold large sheets fairly well. You might think hot glue isn’t a good choice, but I’ve used hot glue to hold down guitar body blanks on my large planing jig while I router-planed them to thickness without any issue. These were solid poplar about 1 and 3/4 inch thick. I simply use a high temp glue gun and a harder (rather than flexible) glue.  I’ve also used it to mount 1/4” plywood on my CNC machine for tons of engravings and through cuts to great success.

On the CNC machine, I used masking tape to lay down on the spoilboard since I was doing a bunch of cuts. After a few pieces of plywood were cut the glue makes it hard to get a flat surface so you can just pull it up and put down new tape to glue to. The masking tape sticks to my spoilboard on my machine making an outline of where the wood will go with a bit of overlap so that the wood lays on top of about 1/2 the wide of the tape. Align the tape with the router head, not the machine itself. Move the router 10 inches at a time and make sure the middle of the tape is right under the bit. Here you can see the 1.5-2inch wide masking tape just under the wood:

image

The Endmill (the Bit):

An additional tip for keeping the material flat is to always use Down Cut endmills or compression bits on pretty much all plywood cuts. These endmills have the spirals cut backwards such that the normal spinning of the bit puts pressure in a downward motion as opposed to upward. Compression bits actually have regular flutes on the top, but reverse flutes the rest of the way up to give a nice finish on the both sides of the cut. This isn’t a great thing to use for deep narrow pockets, but for plywood stuff it works very well for making sure the material doesn’t raise up when you are cutting.

Can you think of any other tips or tricks I haven’t listed here? Leave a comment and let me know about it!