The goal is to generate wood grain patterns for laser cutting/CNC of plywood. Mainly, I wanted to have something similar to spalted maple laser etched onto the plain birch veneered plywood. The thing that inspired this project was this post of speaker boxes on imgur I came across. The design looked really cool, and while spalted maple is expensive, birch plywood is relatively cheap.
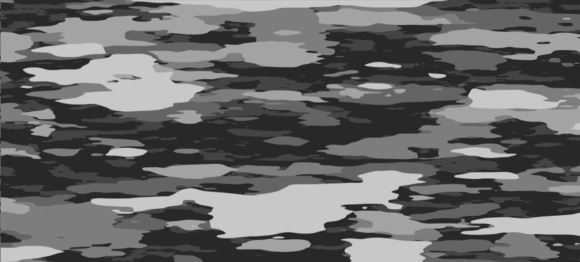
My first step was to procedurally create a random pattern. Similar to the imgur post, I looked at creating camouflage. I found a great example code on openprocessing by ThingOnItsOwn that used perlin noise to create a camouflage pattern. I tweaked the values a bit experimentally, then stretched the entire design to make the final design look more like woodgrain.
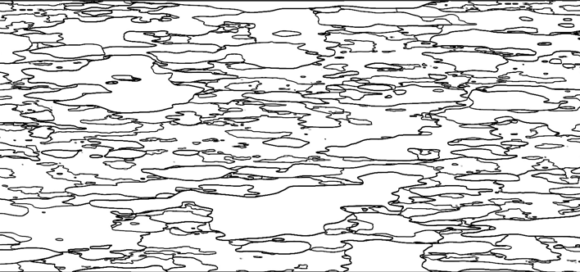
The next step was to just capture the edges of these blob shapes from the first pattern. I came across this example from Richard Bourne It is forked from this example from R. Luke DuBois. Honestly I was being lazy because I had written edge detection code in college as it is standard image processing, but I knew someone else had it already in processing. Instead of using for loops, this version manually calculates out the kernel.
This leaves me with a result that looks pretty realistic.
Camo:
Spalting:
This creates a PNG filetype which can be used to add texture to a 3D print in the slicer. The slicer will adjust the print to incorporate the texture in 3D giving it a woodgrain-like effect. You technically could use this as-is on a laser cutter to create spalting like my inspiration, however being raster data, it would take the laser a long time. It’d have to scan the laser (the thickness of a human hair) across the entire area of the panel you are applying the texture on. To make this faster, you can vectorize the PNG in inkscape or other software to outline the dark areas of the PNG. This will cut fast as it is a vector (the laser would just have to draw the lines the same way your hand would. That would save a lot of time.
If anyone wants to add vectorizing to my code, please do! You can clone my github and put it on P5.js. I was going to add it, but I got lazy again. I even asked ChatGPT3 to help combine this code with something like potrace or imagetracerjs but it produced code that looked great, some even compiled after a few tweaks, but never worked.
This post is a not on a lot of techniques for using different types of machines and processes for making stuff. I’ve had this for years but decided to finally publish it. I’ll add to it periodically, but I figured others might find it useful as well. RIGHT-CLICK to open in new windows.
Understand the basics of program flow before learning code. Flowgorithm is a tool that is really helpful for learning that. Tinkercad Circuits is great as it has MakeBlock (or something like it) built into it.
Get a nice silkscreen on the top of your boards by simply using the toner transfer method of the board’s silkscreen layer.
Using a vinyl cutter, you can cut a soldermask from kapton tape . This method is great because it’s temperature stable for soldering and see-though so you can follow traces during debugging. You might be able to use a laser for cutting the tape, but the vinyl cutter is preferred
Interactive continuous fabrication. This uses tracking of a designers hand and a robot arm and a blow moulding technique to fabricate objects out of sheet material. (Interesting research)
CurveBoards, breadboards built into 3D printed objects. (Interesting research)
Photo-Chromatic inks used to “repaint” objects with different designs using light (Interesting research)
In the past, My milled PCBs corroded quickly. I began coating them with nail polish. I liked this method because I could be precise and not paint the soldered components in case I had to fix or hack the boards later. Spray on conformal coating is what Neil from FabAcademy recommended and he’s right that Nail Polish isn’t designed for circuits. But the overall results are fine, colors are abundant, and it’s like $1 a bottle rather than $20 a can of conformal coating.
While I see lots of folks online using UV curable liquid soldermask, or dry soldermask film, however the liquid is made of some pretty interesting chemicals. I also don’t want to figure out a way to UV cure the dry film such that I can get the pads uncovered on the PCB.
I found one guy who came up with a technique that was quick, easy, and cheap. Colored lacquer is cheap and readily available at hobby stores for less than $10. It also protects the traces from corrosion and comes in a variety of colors. With a quick spray (like conformal coating) I can paint the entire PCB. The benefit here is the second step. Instead of trying to figure out how to UV cure a dry film and then remove material from the pads, I simply throw the design into the old CO2 laser and burn off the lacquer on the pad areas. To get the files for this I went into EagleCAD’s layers and used the old technique of exporting bitmaps of the dimension+top and separately the dimensions + modified tStop. (This is my AtTiny412 General purpose Blinky board if you are curious. Detailed info about building and using it here).
I changed the fill style to solid by clicking on the tStop layer, then the Change button.
Along with the Top+Dimensions layers the design is complete.
You can tweak the colors in good old Gimp Like we “used-t’do” and throw it on the laser. At this point I handed the files over to Tom Dubick of Charlotte Latin School FabLab fame and he cut out a jig to hold the PCB in place and etched the layer of lacquer away.
I found the Lacquer quite soft and for smaller boards it might be just as quick to scrape it off the pad areas with a razor knife. Scraping actually was a more complete methods of removal as well. In the future maybe a milling step would work for this.
The lacquer will still melt when enough head is applied with the soldering iron (and you do NOT want to breathe that in…) but it does somewhat act like a solder resist when dealing with the tiny pins on the boards we make in the FabLab.
I think the better idea is to slap some kapton tape on the PCB, then laser it off. Kapton seems to be commonlyused with lasers even in industry and is made of essentially Carbon, Oxygen, Nitrogen, and Hydrogen (ignoring the adhesive) and according to this MSDS “At temperatures above 400 degrees C the major off-gasses are carbon dioxide and carbon monoxide”. It should be safe to do.
UPDATE 2017: I canceled my order for the Glowforge as life happens and I couldn’t afford to let them earn interest on my money anymore. I just had to get my money back for life reasons. I do still recommend you get one if you can. I’ve seen them in use in person at Charlotte Latin FabLab and it is really awesome!
Original article below:
So for the last 7 years or so, Jess and I have considered purchasing a laser cutter. My personal goal is to have my own FabLab. I’m partially there with Jess’s KNK Zing vinyl cutter and my Shapeoko/Xcarve CNC machine. The two main missing components are a 3D printer and a laser cutter. Being a FabAcademy alum and running a FabLab at work, I am intimately aware that lasers are the most used (and arguably useful) machine. They are definitely the most fun to play with. They are also the easiest to make money with (It’s always easiest for me to justify big purchases with the expression “hobbies that pay”). For the past several decades, laser cutters or laser engravers have been used in trophy shops and all sorts of companies. You can use a laser cutter to make products to sell on Etsy (as many people do), make the most amazing personalized birthday and holiday gifts, prototypes of ideas you have, or just make cool stuff for yourself.
I recently saw a new laser cutter on the market and I held back for a while before making the decision to buy it. That may have been a mistake. The GlowForge is shaping up to be a great machine. I’ve followed it since September, when they were offering 50% discounts on all models. At the time of this article, they have raised the price to 40% off retail price. And, if you use this referral code, both you and I will get $100 off our orders! (In full discretion, I have had no contact with Glowforge, nor have I actually use the machine myself yet. I’m just really stoked with this machine and its potential. I do have a PhD in Computer/Electrical engineering with Computer Science background and I run an official node of the FabLab network that was started at MIT, so hopefully I’m not off base here… )
There are lots of cheap ( <$15k ) 40-watt laser cutters on the market such as some cheap Chinese ones from Alibaba, or Full Spectrum. So why go in on a Glowforge? Well quite simply, it is the best designed laser cutter for FabLab/Makerspace/Hackerspace use. Unlike others in the price range, you don’t need a 5 gallon bucket of distilled water and a fish pump to cool the laser tube (yes that’s a real thing some other models at these prices require and it is ridiculous). It breaks the paradigm of how users interact with a laser cutter. It is following some of the latest research on user interface and user experience in the field of computer science. Honestly, those are project I wish I could implement myself but didn’t have the time. It brings together lots of great solutions from these projects and crams it all into a single package.
Paradigm shift #1: Unlike traditional laser cutters, where you print to the machine like a printer on a network or connected to your computer, Glowforge can be printed from practically any location in the world. This is because the software is cloud-based. I used to be wary of this kinds of thing, but since Glowforge also promises to make a version of the software open source, you can implement it yourself if you want.
Paradigm shift #2: Glowforge allows you to easily position your designs on your material using a live camera view of the material. This is a godsend for those who are familiar with the waste of laser cutters. To be able to make sure a design will fit on a scrap piece of material, you have to do some measurements, hold your tongue just write when pushing the cut button, and hope you remembered to reset the origin (0,0 point) on the laser before cutting. Sometimes this can be very hard depending on what was originally cut out of the scrap you are using, you might have a weird shaped area and it can be very hard to find out if you can use it to cut a new part. There are some ideas being researched to handle this kind of situation and other tools you can purchase that are very expensive, but Glowforge has it built in. Being able to literally move my design on top of a video camera image of the material allows me to use as much material as possible without the risk of mis-cutting and having to toss that piece of material and grab a new one.
Another great feature is to simply draw on the material you want with a pen. The cameras will read your design, vectorize it, then the laser will frickin’ cut it exactly as you’ve drawn it. This is worthy of some type of award because it will save a lot of time for people. I constantly have students who would benefit from simply being able to draw their designs by hand and quickly cut a part out. Again, this feature somewhat comes from newer research into user interface design of laser cutters I’ve been keeping my eye on for some time now.
Paradigm shift 3: Glowforge uses dual cameras inside the cabinet to not only allow you to place your design on the material, but it can conform and auto focus even on non-level materials. The example on their web video mentions etching a design on a macbook, but this is sooo much more powerful and useful than just that. Many materials you want to laser, such as a 1/8″ piece of plywood, have a warp to them. If you focus your laser on the low part of the warp, then keep that measurement to cut the whole part, you can end up with edges that aren’t exactly as you had designed them, or edges that are weak due to the wood not ablating and instead burning. This is bad for a couple of reasons. One it can start small fires, but more commonly your edge is brittle and ashy. This changes the workable dimensions of your parts and sometimes makes them unusable.
Also, the cameras can detect materials you put in the machine. There are barcodes on the materials you buy from Glowforge, but you can make them yourself, which tell the machine what settings to use for engraving or cutting the material. Settings are different for plastics versus wood, etc. Even different densities of wood matter, so this is a great solution to the problem of figuring out what power and speed settings to set the laser to use.
And finally on this point, it seems there’s also some image recognition. Put your laptop in there and you it’ll detect it’s a macbook and know what settings to use to best etch it. It can even bring up possible designed others have submitted online for you to use if you want.
Paradigm shift 4: The firmware as well as a simplified version of the cloud software will be made open source. This is great because I can hack on it (as I would have done anyway, but at least now I have a much better starting point) . I’m certain a community of hackers/makers will be adding features, which is exciting since this machine is already starting with an impressive set of features.
Paradigm shift 4: On the Pro version of the machine, you can open the front and back to be able to cut material that is 20″wide, but infinitely long. This comes from two places, the vinyl cutting machines that are in the market (which can cut a certain width, but practically an infinite length of material from a spool), the Shaper and the awesome Shopbot Handibot (Shoutout to our friends and fellow Carolinian’s; thanks again for the help this past summer in Pittsburgh Salley!), which can do large designs piece-wise. The cameras on the Glowforge can help align the previously lasered portion with your design and make adjustments as needed. This is incredibly helpful for making sure the finished product comes out correctly.
Glowforge will also host a libray of other peoples’ designs you can choose from if you aren’t the artistic type. This is similar to Makerbot’sThingiverse or Ultimaker’sYouMagine for 3D parts and Inventables’s project section for CNC projects and file, which can be imported into Easel (Inventables’s cloud-based CNC CAD/CAM software for their line of Shapeoko, Carvey, or X-carve machines).
Words of Negativity: For the specs of the machine, the 20″ wide cutting area is slightly awkward and a 24″ width seems more practical. Also, since the Glowforge isn’t out yet, I have to wait. I have to wait to see if it lives up to these expectations, and also wait to play with it myself.
All that being said, the Glowforge sale at this point is a presale. I won’t receive my machine until summer 2016 or later, but you have until the time it ships to cancel your order and get a full refund. I expect any bugs in the system will be worked out before I get mine and if not, then I’ll have a good excuse to play with it in more depth.
Disclaimer: The only affiliate link in this post is for the Glowforge. All other links supplied in this post are to simplify your internet browsing adventure.