Copying Outlook OST and PST files to Gmail

What: How to import any outlook file (OST and PST) into Gmail for free.

How: Using Mozilla Thunderbird as the only software you need to install.

Why: My work was hit with a massive ransomware attack and we lost pretty much everything (we did not pay ransom). For years we had to use Microsoft Outlook for email which I hated. Student accounts used gmail but all employees were stuck with Outlook. This meant that we had to export or archive our email every so often if we wanted to save old emails.  I’m a bit of a data hoarder so I’ve always saved everything.  Once the hack happened, Employees moved to gmail as well. I wanted to figure out a way to import all my emails (archived as well as the ones I could still access in outlook) in a single place so that all that data would finally be searchable in an easy way. I figured it out.

When the attack happened, it cut off my outlook app from the Exchange server, however I could still open it up to access my old emails. These were basically all the emails from Fall 2020 to Feb 2021. I hadn’t archived these yet, so I was hoping not to lose them.

The tool I’m using is Mozilla Thunderbird. This is a great email client that I used years ago before my current job and am glad to use it again to get the result I want.

Step 1: Find the emails from Outlook: I could no longer access the exchange server at work to get new emails, but I still could read my old emails in my outlook. It will pop up a login screen every minute or two, but you can ignore it, or just click “cancel” and it’ll go away. That doesn’t affect this process at all.

Outlook stores these in a file with an extension of .OST.  You can see this file for yourself if you open outlook, go to file–>Account Settings–>Account Settings (again) then click the “Data Files” tab. You’ll see the filepath for your email address. Something like “C:\Users\Username\AppData\Local\Microsoft\Outlook\your.email@yourWork.com”

If you load any archived outlook files, you’ll see their paths as well. These have a .PST file extension.

Load Archived emails into Outlook You likely won’t need your password or anything to work to import old archived files into Outlook.  Simply go to File–>Open Outlook Data File (.pst) and select the archived file. Once you import the emails, they might show up as “Archive” in the left column. You can rename this by right-clicking that name –> Data File Propertied and clicking the “Advanced” button and changing the name there. Once you exit these windows the new name show appear in the left column. I named mine based on the dates of the emails they contain. This name will follow the data into Thunderbird and then into Gmail so make it descriptive.

Test that the archives folders update with the correct name by clicking into that archive and making sure the emails are visible in there. Sometimes these files get corrupted. Sadly, you can’t just right-click that archive and see how many total emails it has because Outlook is stupid (for many reasons) and Outlook will only show you the number of emails in a specific folder you click, not and sub-folders. Look at the subfolders individually to make sure you have everything you need there. You’ll need to do this to each archive you plan to import.

Side note: this is one of the many reason I dislike Outlook. By default when you search emails in outlook it will only search the folder you are currently in, not any subfolders, or any archives… only the folder you are in…  which is pretty useless.

Step 2: Setup Thunderbird to sync with the gmail account.

You have to setup gmail to allow IMAP. Here’s the instructions from google: https://support.google.com/mail/answer/7126229?visit_id=637540132586664480-1609380434&hl=en&rd=1

Next open Thunderbird and when you are setting up your account profile enter the correct data. For gmail, Authentication method is OAuth2 and the other details are in the link above.

This will sync your new gmails to thunderbird.  Critically, though, this is the link to allow OLD emails to be imported into Gmail as well. We’ll set that up next:

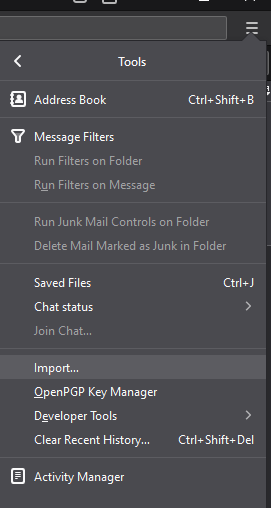
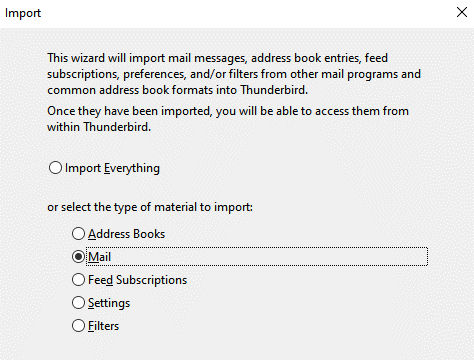
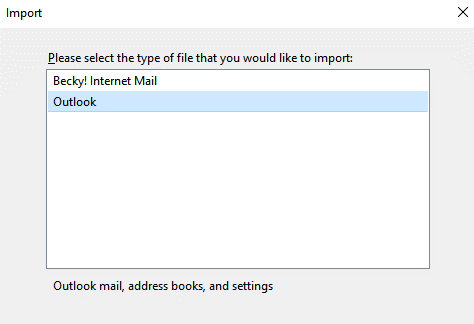
Step 3: Import your Outlook account into Thunderbird Once you setup Thunderbird, click the hamburger icon at the top left of the mozilla window and select Tools–>Import. On the next window select to only import mail and finally on the next window click Select Outlook


Then give your computer a long time to do this Sync. I had about 6GB of emails which is quite a few.  I don’ t recall how long it was, but I suggest doing it overnight.


Step 4: From Thunderbird to Gmail

Once everything is synched, go to the left pane of Thunderbird and simply drag the folder from your “Local Folders” into your gmail folder As shown.

This will then sync those emails with your gmail account. It might not look like it is doing anything, but trust me that it is uploading all those emails to your gmail account. You can even check by visiting your gmail account.

Every now and then Thunderbird wouldn’t move the folder with a drag and drop. To fix this I added a new subfolder to my gmail in Thunderbird by right-clicking and selecting “Add new subfolder” then named it whatever I liked. I then went down and clicked on the local folder that I had trouble copying. This loads all the individual emails in the top right pane of thunderbird. Go up there and click one of the emails and then Ctrl+a to select all. Now I can drag all the emails directly into the new gmail folder I created before on the left pane.

Step 5: Enjoy searching every email you’ve ever gotten using Gmail’s awesome search feature! Just login to your gmail account and all your new folders should appear there. You can click through them to make sure, but in general I find it much easier just to search. It is easier to remember what an email was about and search for it than trying to search dozens of individual archives and folders in outlook.

How to Listen to Free “Audiobooks” in your Car

Imagine this: Instead of wasting time in traffic to and from work listening to 50% ads, why not “read” books and learn stuff? ( I despise ads with a passion and if you advertise to me , I’ll go out of my way to NOT purchase your product…)

I recently got fed up with my car’s incredibly sub-par infotainment system after 5 years. I bought my car just before they made Android Auto stock on all the models. I had played with Android Auto when I bought it, but it was pretty much useless at that time. It has improved since and Jess was tired of hearing me complain about it, so she installed it again on my phone to see if it had gotten any better. Luckily it had! I connect it up to my car’s bluetooth and things are (somewhat) working.

Of course, everyone knows about Audible.com, However if you are willing to make some sacrifices, there are several free options for audiobooks you can check out.

The most straightforward way to listen to free audiobooks is to get audiobooks from your local library. If you don’t like visiting the library, you can use Overdrive.com which allows you to get audiobooks for free from your library and listen to them on your phone or computer. Now the Overdrive.com site has terrible navigation, so I use the North Carolina portal for Overdrive which is much better.

You can download the Overdrive app, or better yet, their new app named “Libby.” You can search and request audiobooks through the apps or through the overdrive website, then play them on your phone. Android Auto treats these apps as if they were music players and all will work seamlessly.

If the book you want isn’t available on Overdrive and you’re an Amazon Prime member (click here for a free 30-day trial here if you want to check it out), you can try to look at Amazon Prime Reading’s list of about 1,000 free books. They don’t have to be audiobooks either, I’ve got a workaround for any eBook.

Any ebook from that list should work. In fact, any eBook that kindle can load should work as long as the text is selectable (not a PDF with images of text). The trick with this is that we’ll get Amazon’s Alexa to read the kindle books for us. Since you won’t have WiFi in your car, however, an actual Alexa device isn’t the best solution. Instead, we’ll use the Alexa App on your phone and the Reverb for Alexa App. The Alexa app will let you send kindle eBooks to your Alexa device so she can read them to you, and the Reverb app will allow you to host an Alexa on your phone itself.

First open the Reverb app. Then open the Alexa app. You can click on “play” and select eBook of your choice from your kindle library. When you select it, Alexa will ask you to select which device to play it on. Select the “Reverb” option and voila! If you don’t have the ability to select the “Reverb” option, make sure you are running Reverb before the Alexa app.


Your phone will now read the book to you. You can’t increase the speed (sadly) but overall it’s a good compromise. Now this method does use your data, however for about 40 minutes of reading, Reverb used only about 25Mb and Alexa used about 13Mb so total, about 1Mb of data per minute of audiobook. Given you can’t speed up books, that’s a bit of an annoyance, so a 6-hour book will cost you a little over a third of a Gb of data. On a 4GB monthly plan that’s only 9%. If you did nothing but listen to audio books, your 4Gb data plan will get you 67 hours of playtime per month! That’s way more than I’d use it for sure.

Of course, you might want to continue listening when you get either home or to the office. If you have an Amazon Echo, Echo dot, Echo Plus, or any other Amazon device (even a new one I’ve never heard of called “Echo Auto” which could be an interesting option as well). When you get to the office or home, simply use the Alexa app on your phone to select the correct device. Different devices may be greyed out if they aren’t available. For instance, in my car my echo dot isn’t available.

If you have a Kindle Unlimited account, you can get even more free books from there selection of over 1 million.

In all, these solutions save me from hearing garbage-radio shows or political news when I’m driving in my car. If you find any other solutions to this, please drop a line in the comments and let me know!

Making Guitar Body Blanks for Cheap

I’ve wanted to use my CNC machine to build some guitars, but I didn’t want to spend a fortune on body blanks to ruin while learning and perfecting the process. I decided the cheapest option was to make a bunch myself. (Video at the end)

I went to Wurth wood in Charlotte. I had decided on poplar as a species due to its cost. Wurth has rough-cut wood which comes in various lengths, widths, and an odd way of measuring thickness. I wanted my body blanks to be about 1.75” thick, about 20 inches tall and about 15 inches wide.  I knew I’d have to glue two pieces together to get the width I wanted.  When I say that the wood from a saw mill comes in various widths, I mean it. There’s no standard width. Any random width they could cut from a tree is what you get.

They also count thicknesses funny. Everything is measures as 1/4 in increments. This is normal for 1/4”, 1/2”, and 3/4” but gets weird beyond that. A 1 inch thick board is called 4/4 for instance. I knew I’d have to plane the wood down to get the desired thickness of 1.75” so I went with a couple 8/4 boards.

They price the wood by the “board foot” which is a volume measurement. For instance, if you have a 1-inch thick panel of 1ft x 1ft, then you have 1 board-feet of wood there. The formula for board-feet is

(width in inches x Length in inches x thickness in inches) / 144 = board-feet

With the wood I got, it was just over 7 inches wide, 8/4 thick and in all was 160-ish inches long. For this I spent about $65. I calculated that I could make 6 guitar body blanks from this. That’s a bit more than $10 each which is FAR cheaper than anything I found online anywhere!

The next step (after getting the wood home of course) was to cut and flatten it. I cross-cut the wood with my circular saw to about 20″ in tall pieces. To make them flat and smooth I had to plane them, but I don’t own (nor can I afford) a planer. The solution is simple. Build a sled and use a router to face off the surface of the wood. The process is simple. Starting with the leftmost picture, you can see the rough wood is warped and cupped a bit. I’ll use my router to flatten the top (2nd pic from the left). Then I’ll flip it so the flat side is down, and use my router to again plane it flat on the other side (rightmost pic). You can’t do this just by eye though. I needed to build a jig to hold the wood and a planing sled to hold my router.

image

To build the sled, I used some scrap pieces of stuff I had laying around. It was just big enough to fit the wood into it. I used a 2ft by 2ft-ish piece of 1/2 inch plywood and four straight and flat pieces of 1×2. I used wood glue and tacked the 1x2s into place with brads to make two walls. The walls height needed to be higher than the wood was planing.

Next I had a piece of scrap 1/2” MDF. I drilled a hole in the middle a bit bigger than my planing bit on my router, and 3 mounting holes in the pattern that matched my router base. The size of this piece of MDF isn’t terribly important except that it needs to be long enough that the router can be all the way on one side of the jig and the MDF still spans the entire jig. Here’s what I mean:

image

Here you can see the rough wood blank height (which is about 2 and 1/8th inches thick) is just smaller than the right-side wall of the jig (which I made  2 and 1/4 inches tall).  You can see that the bottom edge of the rough wood is hot glued to the jig so it won’t move. I did this with the two shortest edges and that was all I needed.

image

I found that going vertical allowed me to see the depth of cut.  I took about 1/16th to 1/8th of an inch depth cut per complete pass, lowering the router in its base each successive pass if needed.  Once I planed down one side, I used a chisel to remove the hot glue holding the board to the jig.

image

Once I finished one side, I left the router at its current height and sat it to the side while flipping the board. This kept the router at the correct height to start on the other side. I then used a chisel to carefully release the hot glue holding the piece down and flipped it. This method will flatten any board on both sides. You can also rout the edges of the board using this jig to get 90 degree angles on 3 side before flipping the piece. Here’s  video describing the process:

I actually used the scariest router bit in the world on my router table to get the edges straight though.

image

Once the edges are straight, I slathered on some wood glue and clamped them together. I had to use tie-down straps as clamps. To keep the straps from getting glued to the wood I put paper towel between the strap and the wood where the seam was.

image

The next step was to rout the guitar body shape on the CNC machine about 1/4 inch deep, and then rout the cavities for the neck pocket and the electronics. I’d then use my bandsaw to cut the path of the body blank and use the scariest router bit in the world to clean the edges up. I actually hadn’t do this yet. In fact, I made these blanks in 2017 and they have sat in the garage since.

Things that stopped me are:

  1. My bandsaw is garbage and can’t cut a straight vertical line to save its life, regardless of how tight the blade is or how slow I go.
  2. I’m scared of the router bit. Routers are a lot like honey badgers in that they don’t give a ….  well you know the rest. They’ll cut chunks out of you much faster than you can imagine and with the giant  2.5″ bit I had, it could easily be deadly.
  3. You have to build the guitar based on a neck and I’ve never bought a neck to design it around
  4. I sold the CNC machine… But that’s no real excuse, I could use the Shopbot at Charlotte Latin if needed, or just do it by hand. HOnestly, doing it by hand is how most folks do it and it is a lot faster than me figuring out how to CNC it. I’m terrible with CAD…
  5. I’m lazy and this was so much work that I don’t want to screw up all 6 of them then have to do all this again. I simply don’t have the time to.

Best OS to Make an Old Chromebook Useful Again

I have this old HP Chromebook 14 which has only 2GB of RAM.  It’s so old that google stopped supporting it (which is ridiculous as it just makes people either A. use an insecure device or B. throw it away.  It is incredibly irresponsible and wasteful for google to create “disposable” computers like this…  Anyway I had to get some further use out of this thing to feel better about the situation.

After first attempting to use Crouton to turn an old and no longer supported chromebook into a dedicated octoprint server and laser cutter machine, I gave up and decided to go a different route. Crouton allows you to run linux AND chromeOS which is a safer option and easily reversible if something goes wrong. The issue is that my chromebook was so old that google no longer supported it anymore.  Due to the limitations of not being able to access the camera for octoprint, and Beam Studio (for my FLUX Beamo laser cutter) didn’t want to connect to my laser I moved on. I’ll instead wipe the machine and give it to someone who can use it.

After trying different versions of smaller linux distros like xubuntu, Lubuntu and even minimumOS of ubuntu (only 64MB!) I had issues installing all of them. All the *buntu flavors were too big for my 2GB RAM so it didn’t even boot up.  The minimumOS was going to be a lot of work if it worked to setup and install everything I’d want if it worked, but I had issues using a bad iso burning software that caused issues with this one. Luckily I kept looking and found the absolute best chromeOS replacement available.

I completely wiped ChromeOS and installed GalliumOS on the HP14 Chromebook (white chromebook) using this step-by-step guide. I have to say that it is by far the best solution and I wish I had done so much earlier. First download and burn the ISO to a USB drive. The only change I’d recommend is to use Balena etcher to burn the ISO to the USB flash drive.

Now, every time you boot up, it gives you an OS verification error (Yellow icon). At this point you must hit “Ctrl+1”  within 5 seconds otherwise it’ll give you a red icon error  and you’ll just need to restart again.

Default Launcher bar:

While I typically don’t mind this bar, the person I was giving this to would prefer it to be gone. It doesn’t stack multiple windows into one icon like modern OS bars do. Since I can’t remove it, I moved it to the top. It is hard to find the settings for this. You must click the “start” icon (which is called the “whisker” menu) and select the “Settings” icon at the top next to the power button (NOT the settings button in the right menu…). Then you can find the main settings for everything.

Right click this bar and go to properties to edit some stuff too if you want.

I wanted to setup the whiskerbar to autohide and be at the top of the screen (like on a mac). So from the settings app, I chose “Panel” and unlocked the bar. I then dragged it to the top and locked it again. Keep this settings window open as we’ll use it again in a sec…

New Mac-like Launcher Dock:

I installed Plank to build a mac-like dock.

sudo apt-get install plank

To add the trash can to this new dock, you need to ctrl+click the plank bar to access its options then drag the trashcan to the bar.  If you add a “docklet” like the trash can or taskmanager and want to remove them later, simply drag it off the bar onto the desktop and it’ll disappear.

When I first ran this, clicking the trash can opened the audio player for some dumb reason. The fix was so stupid simple I would have never thought to do it… In the regular start menu (now at the top bar) go to settings > Preferred Applications > Utilities.  In file manager “Thunar” is selected but you should select “other” and then type “thunar”.  This does the trick.

Now go back in your settings menu of GalliumOS and select “Sessions and startup” then select the “Applications and startup” tab. You can then add “plank” as the command and it’ll autostart the plank docker bar on startup.

Login screen:

Be default it was using xscreensaver with a terrible interface.

Image via ubuntuBuzz

I installed light-dm instead which has a nicer and themable interface.This leads to a much more modern and sleep looking design.

Icons:

I installed numix icons, then you can set the icons by going to Whisker start menu–>the settings icon next to the log-out  and power icons. Select “Appearance”and select the “icons” task.


sudo apt-get install light-dm-gtk-greeter-settings

sudo apt-get remove xscreensaver

sudo apt-get install gnome-screensaver


Chrome Keyring constantly pops up error:

Each time I logged in and opened chrome, it’d pop up asking me to login to the keyring. That’s pretty annoying. So I found in multiple places online the suggestion to delete the keyring to reset it. This worked great!

Rm ~/.local/share/keyrings/login.keyring


Restart and it’ll ask you once, then never again.

Here’s an additional set of tips for what to do if you want to add more functionality.

RGB565 to RGB888 Color Conversion

While working with Charlotte Latin FabLab students this year, we came across an issue. Alex was using a camera module for her Arduino project (ArduCam) that gave RGB565 formatted pixel data but she needed to convert it to RGB888. Though there are tons of posts on stackExchange about how to do it, I couldn’t find a simplified broken-down explanation of how it works to point her to, so I decided to write one.

RGB565 means there are 5-bits of data for the Red component of the pixel, 6-bits for green and 5-bits for the blue.  It looks like this:
pixel value =
RED= R4, R3, R2, R1, R0,
GREEN= G5, G4, G3, G2, G1, G0,  
BLUE= B4, B3, B2, B1, B0

But Remember RGB565 is stored as two separate values (VL and VH from the example code for the camera we used), with the low value on the left and high value on the right.
VL = G2, G1, G0, B4, B3, B2, B1, B0     VH = R4, R3, R2, R1, R0, G5, G4, G3

Some clever bitmasking can strip out each component color and place them into individual variables. We’ll AND the bits of the values we want from VL and VH with ‘1’ or ‘0’ depending on which we want at a given time.

Of course this has to be done for each and every pixel, and she had 320 x 240 in her original image.

This is a simple nested for loop that already used in the example code to read the data from the camera

for (int i=0; i<240; i++){

  
   for (int j=0; j<320; j++){
  
    //Convert the RGB 565 to RGB 888 of the pixel in the bitmap and store it as PIXEL data type in the new larger array.

  
    //Step A convert to the new PIXELS format

  
    ///Step B scale from 565 to 888

  
    }//end for j

  
 }//end for i

STEP A: Convert the color to a new pixel format.

Based on some example code, it’s best to create a structure to contain the R, G and B values:

typedef struct { 
unsigned char blue; 
unsigned char green; 
unsigned char red; 
} PIXELS; 

Then we need a large array to store the pixels of the new image:

PIXELS bigPIXELS [12] [12]; //the resulting RGB888 picture pixels are stored here

Then you can convert each pixel by using logic operations and bit shifting.

/*Blue is the easiest to see how this works so we'll do it first.
  
 The values for Blue is stored in VL So for example if VL = 1011  0101( blue = 21 in decimal) 
 to get the blue values all alone, we can AND them with 1s and AND the green bits with 0s 
 leaving you with an 8-bit number with only the blue data in the right spot. The result 
 is: 0001  0101  or 21 in decimal. 
*/
  bigPIXELS [i][j].blue =    ( VL & 0b00011111 ) ; //0x1F


/*Red is only slightly more complicated. We first get bits for red alone, then shift them 
 to the decimal point The 0b11111000 gives you only red data as before, but the digits 
 aren't in the right place. 
 
 There are place-holding 0s that make the value of red too big: 
 For example is VH = 1101  0110  The value of red is 26 in decimal here. ANDing as before
 would give you only 1101  0000, but if we convert this number to decimal, it =208, which 
 isn't right at all. Shifting to the right by 3 (>>3) moves the red value down to the 
 decimal point and gives you 0001  1010 = 26 in decimal in 8-bits
*/
  
bigPIXELS [i][j].red =   ((VH & 0b11111000) >> 3); //0xF8
 

/*Green is the most complicated as it has components in each VL and VH so we'll AND the 
 bits with 1s and then shift them to the right places, then we need to OR them to the correct spot
  
 VL = G2, G1, G0, B4, B3, B2, B1, B0  so to get only green values
 */ 

// since we don't use this variable for anything else, we can just dump the result of this operation back into VL
 VL&= 0b11100000 ;  // 0xE0  

 // VH = R4, R3, R2, R1, R0, G5, G4, G3  so to get only green values  
 VH &= 0b00000111; //0x07
  
 //Now shift the bits to the right places and OR them together to glue them into one number
bigPIXELS [i][j].green =  (uint8_t(VL) >> 5) | (VH << 3); //Shift lower 3 bits in VL to the decimal point, and shift the upper 3-bits in VH to their correct positions.

Great! Now we have our RGB values by themselves, now let’s let them stretch their arms to take up the full 8-bits that’s now available to them.

Step B: Converting from one colorspace to another is simply a function of scaling. You’ve already done this a lot actually. Any time you’ve read an analog input, then used that to control an analog output on arduino you’ve done it. Imagine a knob on the Arduino’s analog input. Analog inputs can read values from 0-1023 (10-bits) where 100% is = 1023. Imagine a single red pixel as an LED on an analog output. It can only take values between 0 and 255 (8-bits) where 255 is 100% brightness of the LED.

You can do the same thing here. In a 5-bit number system, 100% is when all bits are 1’s so it is 11111. This needs to be converted to an 8-bit system where 100% is = 1111  1111.

You use Arduino’s map() function to map the values from one scale(0-1023) to the other (the LED’s 0-255), however this is very inefficient and slow.

Since you know what the numbers are going to be for the scaling calculation, and they won’t ever change you can pre-calculate them for your code. You’re scaling from 5-bits to 8-bits for red and blue which is 0xFF / 0x1F = 255 / 31 = 8. For green you start with 6-bits and convert to 8 which is 0xFF / 0x03 = 255 / 63 = 4.  You could multiply these hardcoded numbers to scale red *= 8; green *=4; blue*=8; however since these are powers of 2, there’s a trick to make this code faster. Simply bit shift left. For each bit you shift, it is equal to a power of two so the code would be red and blue << 3 and green << by 2.

//If you want to see the RGB 565 values print them here, or comment out if you don't need them
Serial.print(" RGB565 =");
Serial.write(bigPIXELS [i][j].red);
Serial.write(bigPIXELS [i][j].green);
Serial.write(bigPIXELS [i][j].blue);

bigPIXELS[i][j].blue = bigPIXELS[i][j].blue << 3;//blue and red were 5-bits

bigPIXELS[i][j].red=  bigPIXELS[i][j].red<<3;

bigPIXELS[i][j].green =  bigPIXELS[i][j].green <<2;//Remember that green has 6 pixels to begin with so it only shifts 2 places

Now you can do with these as you please. Add a BMP header and print them to the serial port to be able to view this BMP image on your computer.

Serial.print(" RGB888 R= ");
Serial.write(bigPIXELS [i][j].red);
Serial.write(bigPIXELS [i][j].green);
Serial.write(bigPIXELS [i][j].blue);