How to add a Pedal Control to Your Blackstar ID10 Guitar Amplifier

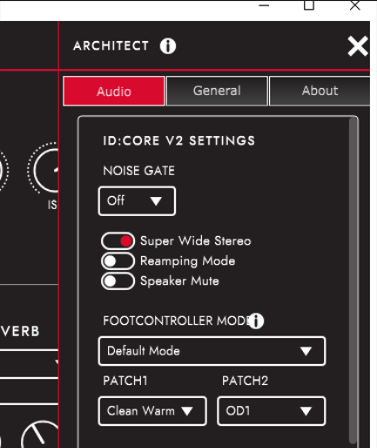
I recently got a 10 watt Blackstar IDcore guitar amplifier (I had to get a power supply separately). It has a lot of really great built-in effects.  Unlike the larger versions of this amp (the 20watt and 40watt versions) it does not have a footswitch to control these settings. You just have to turn a knob with your hand to change the settings. You can plug this amp into your computer via USB and tweak the controls with the Blackstar Architect app. In the settings for this app, I noticed that there are indeed footswitch options a user has access to, but there’s no footswitch plug on the amp. It is set up for a 2-button footswitch. There are apparently two modes a footswitch can work with the amp.  One mode is called “Default” which allows you to assign each footswitch button to a particular setting (such as “Clean warm” and “Overdrive 1”).  The other option is called “Alternative mode” where you can use one button to increment through the presets, and the other button decrements through the them. I did a bit of googling and found that this hack has been around for a number of years so I got to fiddling…


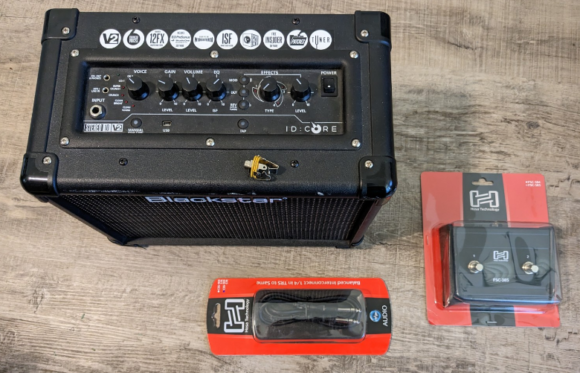
You can see the parts below. All you have to do is solder up a stereo 1/4″ female jack, drill out the hole in the faceplate, and get a pedal to connect to it. Luckily I ordered 2 of these jacks because the pedal I bought had a janky plastic jack that was broken in the package. You’ll also need a stereo 1/4″ TRS cable like this. The cable must be stereo for this to work correctly. TRS stands for “Tip, Ring, Sleeve”.


Opening the amp you can clearly see the plastic plug on the faceplate (bottom middle circle). This faceplate is reused on the larger versions of the amp. Right next to it are some unpopulated holes on the circuit board.  Sure enough, carefully connecting wires to the right holes here gets the footswitch functions to work! Below you can see the holes labeled (top to bottom) W5, W6, W7, and W8.


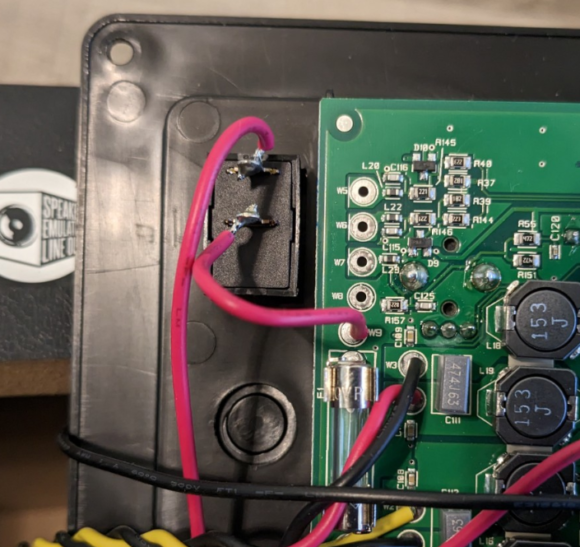
I used the biggest drill I had on hand which was 3/8″, then I used an exactly to carefully widen the hole for the jack. Next I soldered up the jack itself. It is important to note that the lower solder plug is actually connected to the tip and the highest one is connected to the ground (sleeve).  Leave the wires 4-5 inches long so they will reach the holes on the circuit board. The way to connect them is as follows:

  • W5 connects to Tip.
  • W6 connects to the middle or Ring
  • W7 is NOT CONNECTED
  • W8 connects to the Sleeve (which is the base part connected to Ground)
  • You can see an additional red wire here that connects to the switch in the image below. You don’t touch that.


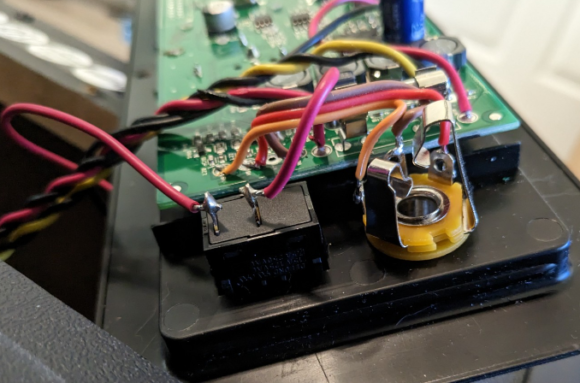
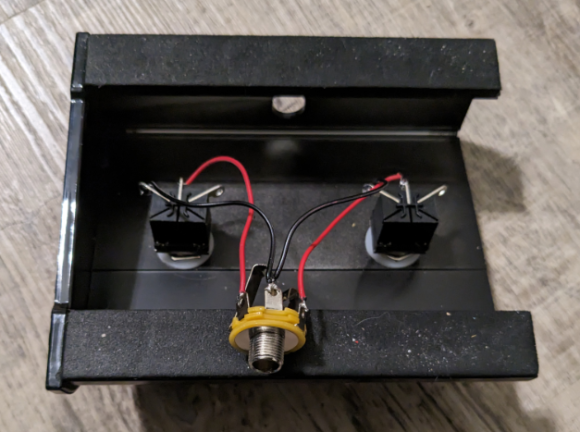
Once I had this soldered up , I was excited to use my footswitch. Sadly, when I opened my hosa footswitch, the 1/4 inch jack was loose because the plastic retainer nut was split.   I went ahead and used my other female 1/4″ jack to replace the broken plastic garbage making sure to keep the TRS connections correct.

That’s it! Enjoy your footswitch controlled Blackstar amp!


Ukulele Repair

imageA few months ago, Jess accidently stepped on one of the ukuleles neck and broke the neck in two. Here you can see the break. It broke at the splice that was already in the neck. The fretboard came off at that spot as well.  We had recently build a ukulele from a kit, so we knew what to do.

The first step was to glue the two pieces of the neck back together.  I cleaned up any badly-fitting sprigs of wood and mated the two pieces together dry to find the correct length. If it isn’t the correct length, then the fretboard won’t fit back correctly and the scale will be off.


image

Once I got the placement correct, I used Titebond II mixed with a little water to thin it out and used a paintbrush to apply a thin layer of glue to both sides of the break.  I clamped it with a mini cam clamp and left it for 24 hours to dry.

image

Once this was done, I attached the fretboard piece. Due to the way it broke, I had to file down a couple places before it would fit correctly. I used the same mix of glue and water as before to attach it.  I clamped it with two large 24” bar clamps. I used these because the large foot applied even pressure on the face of the fretboard. Again, I left it to dry for 24 hours.

Finally, there was one loose fret and a couple of places where the fretboard didn’t seat fully, so I used water-thin super glue to wick into those gaps and used the bar clamps again to apply even pressure.

With the exception of the fret I replaced being a bit too low, and the chunk missing from the back of the neck, it is as good as new! There is only a very slight buzz on one string due to the fret I replaced being too low and I’ve since been too lazy to fix it. Otherwise the uke plays as good as it did before the accident.  I think the key is patience with this type of project. We learned that with the uke kit we built previously. You absolutely can’t rush things else you will ruin them.

Making Guitar Body Blanks for Cheap

I’ve wanted to use my CNC machine to build some guitars, but I didn’t want to spend a fortune on body blanks to ruin while learning and perfecting the process. I decided the cheapest option was to make a bunch myself. (Video at the end)

I went to Wurth wood in Charlotte. I had decided on poplar as a species due to its cost. Wurth has rough-cut wood which comes in various lengths, widths, and an odd way of measuring thickness. I wanted my body blanks to be about 1.75” thick, about 20 inches tall and about 15 inches wide.  I knew I’d have to glue two pieces together to get the width I wanted.  When I say that the wood from a saw mill comes in various widths, I mean it. There’s no standard width. Any random width they could cut from a tree is what you get.

They also count thicknesses funny. Everything is measures as 1/4 in increments. This is normal for 1/4”, 1/2”, and 3/4” but gets weird beyond that. A 1 inch thick board is called 4/4 for instance. I knew I’d have to plane the wood down to get the desired thickness of 1.75” so I went with a couple 8/4 boards.

They price the wood by the “board foot” which is a volume measurement. For instance, if you have a 1-inch thick panel of 1ft x 1ft, then you have 1 board-feet of wood there. The formula for board-feet is

(width in inches x Length in inches x thickness in inches) / 144 = board-feet

With the wood I got, it was just over 7 inches wide, 8/4 thick and in all was 160-ish inches long. For this I spent about $65. I calculated that I could make 6 guitar body blanks from this. That’s a bit more than $10 each which is FAR cheaper than anything I found online anywhere!

The next step (after getting the wood home of course) was to cut and flatten it. I cross-cut the wood with my circular saw to about 20″ in tall pieces. To make them flat and smooth I had to plane them, but I don’t own (nor can I afford) a planer. The solution is simple. Build a sled and use a router to face off the surface of the wood. The process is simple. Starting with the leftmost picture, you can see the rough wood is warped and cupped a bit. I’ll use my router to flatten the top (2nd pic from the left). Then I’ll flip it so the flat side is down, and use my router to again plane it flat on the other side (rightmost pic). You can’t do this just by eye though. I needed to build a jig to hold the wood and a planing sled to hold my router.

image

To build the sled, I used some scrap pieces of stuff I had laying around. It was just big enough to fit the wood into it. I used a 2ft by 2ft-ish piece of 1/2 inch plywood and four straight and flat pieces of 1×2. I used wood glue and tacked the 1x2s into place with brads to make two walls. The walls height needed to be higher than the wood was planing.

Next I had a piece of scrap 1/2” MDF. I drilled a hole in the middle a bit bigger than my planing bit on my router, and 3 mounting holes in the pattern that matched my router base. The size of this piece of MDF isn’t terribly important except that it needs to be long enough that the router can be all the way on one side of the jig and the MDF still spans the entire jig. Here’s what I mean:

image

Here you can see the rough wood blank height (which is about 2 and 1/8th inches thick) is just smaller than the right-side wall of the jig (which I made  2 and 1/4 inches tall).  You can see that the bottom edge of the rough wood is hot glued to the jig so it won’t move. I did this with the two shortest edges and that was all I needed.

image

I found that going vertical allowed me to see the depth of cut.  I took about 1/16th to 1/8th of an inch depth cut per complete pass, lowering the router in its base each successive pass if needed.  Once I planed down one side, I used a chisel to remove the hot glue holding the board to the jig.

image

Once I finished one side, I left the router at its current height and sat it to the side while flipping the board. This kept the router at the correct height to start on the other side. I then used a chisel to carefully release the hot glue holding the piece down and flipped it. This method will flatten any board on both sides. You can also rout the edges of the board using this jig to get 90 degree angles on 3 side before flipping the piece. Here’s  video describing the process:

I actually used the scariest router bit in the world on my router table to get the edges straight though.

image

Once the edges are straight, I slathered on some wood glue and clamped them together. I had to use tie-down straps as clamps. To keep the straps from getting glued to the wood I put paper towel between the strap and the wood where the seam was.

image

The next step was to rout the guitar body shape on the CNC machine about 1/4 inch deep, and then rout the cavities for the neck pocket and the electronics. I’d then use my bandsaw to cut the path of the body blank and use the scariest router bit in the world to clean the edges up. I actually hadn’t do this yet. In fact, I made these blanks in 2017 and they have sat in the garage since.

Things that stopped me are:

  1. My bandsaw is garbage and can’t cut a straight vertical line to save its life, regardless of how tight the blade is or how slow I go.
  2. I’m scared of the router bit. Routers are a lot like honey badgers in that they don’t give a ….  well you know the rest. They’ll cut chunks out of you much faster than you can imagine and with the giant  2.5″ bit I had, it could easily be deadly.
  3. You have to build the guitar based on a neck and I’ve never bought a neck to design it around
  4. I sold the CNC machine… But that’s no real excuse, I could use the Shopbot at Charlotte Latin if needed, or just do it by hand. HOnestly, doing it by hand is how most folks do it and it is a lot faster than me figuring out how to CNC it. I’m terrible with CAD…
  5. I’m lazy and this was so much work that I don’t want to screw up all 6 of them then have to do all this again. I simply don’t have the time to.

Installing and using Guitar Rig 5 Player in Reaper and Actually Recording Great-Sounding Music

Some time ago, I got interested in modeling different amps and effects when recording guitar. I already used Reaper for recording for the last 10+ years, so I finally paid for the full license (only like $60). Reaper’s free version doesn’t have limitation in functionality, but does have a nag screen that pops up for 10 seconds when you start and you can’t use it commercially. Reaper is a full-featured DAW (Digital Audio Workspace) complete with pitch correction, MIDI and tons of other great features and plugins. On its own, you can record some nice quality music. The issue is external equipment… When you are cheap or broke, you likely don’t have one of every amp or pedal ever made to use when recording guitar. That’s where VST plugins come into play.

There are a lot of good VST plugins that allow you to make your guitar sound like it is going through any amp head, cabinet, effects pedal, etc. TH3 is one I played with for a while that I likes a lot, however the one I settled on that fit my needs best was Guitar Rig 5 Player. There’s a pro version as well, but the PLayer version is free. You could set it up on your computer as a stand-alone application, or as a VST plugin inside Reaper, Audacity, Ableton, etc. to record with. It is kind of complicated if you are unfamiliar with VST plugins or just getting started, so I made a how-to video to show step-by-step how to install and actually use Guitar Rig 5 player.


While it comes with a lot of patches to make you sound like different artists, or different songs, or even different styles, you can also google around and find patches online to download that other people have made for free. Note that if someone has the paid version of Guitar Rig 5 Pro, you might not be able to use their patch if it utilized amp and pedal models not available in the free version.

Plugging your guitar into the computer can be a bit of a challenge. You need some kind of interface. I’ve used a lot of things over the years. Up until recently, I used a lot of cheaper Behringer mixers and USB interfaces. I stopped because the drivers became an issue for my Windows 10 setup and Reaper. A friend of mine really like his Yamaha MG10XU mixer that has built-in effects. I’ve switched to what I see a lot of recording folks on youtube using, the Focusrite Scarlet 2i2. Its drivers play nice with everything (except OBS for some reason as you can see in the video above. This is not actually Focusrite’s fault, it’s all OBS’s fault since they don’t support ASIO audio drivers without a plugin and couple of workarounds). These options allow you to connect multiple channels at once so you can get mics and instruments at the same time.

Another option is to get a guitar pedal with a USB interface built in. There’s more on this option below.

Guitar Rig 5 Pro used to be sold with an awesome little MIDI pedal with multiple buttons and an expression pedal you could use to trigger different effects chains in the software or plugin, however it seems hard to find nowadays. Literally any MIDI controller would work, even something you can build yourself for cheap like the Mini UNTZtrument. If you build your own, I recommend forgoing the keypad and instead opt for some actual pedal pushbuttons, and maybe hack an old broken expression pedal from ebay or reverb nation as one of the pots. I’ll have another custom designed post within the next year or so from a project I’ve been working on (or rather which has been sitting on my desk) for a year or so now that is a guitar direct input/pedal/looper using a Teensy microcontroller. I’ve seen a lot of people using the SoftStep 2 and I nearly bought one of these myself (and still might actually…)

Eventually I wanted a bit more… A friend of mine had a Fractal AX8 which has a lot of this functionality built directly into a pedal (including a USB interface). Fractal makes really quality equipment.
A Perfect Circle and lots of other bands tour with Fractal modelers exclusively, then just run their audio out the venue’s monitors.

I can’t afford one of those. I looked for a lower cost solution. I wanted to be able to play without having to bring my laptop everywhere. I opted for a POD HD500x. The HD500X is a bit older, but it has a lot of these same capabilities built into a pedal form. In fact, in comparing to the AX8, there are a (very) few things in which the HD500x sounds a little better.

You can setup your own custom amp, pedal, and effect chains you want (within reason) using Line 6’s HD Pro software. Lots of other peoples’ patches are available for free download on Line 6’s website, but there are lots of people on youtube and online forums either sells or give away patches. This guy’s channel shows you how to set the patches up directly on the pedal itself.Check out the video below showing how that works. It looks quite similar to Guitar Rig Player 5 to some extent which made the switch to using it easy. You can also edit these presets and create new ones directly on the pedal itself if you want to. It is a ridiculously flexible piece of kit! It has a built-in tuner and even a 40 second looper which I love! You can run it as a pedal into an amp like normal (for live shows), or as a USB audio interface to just record awesome riffs, or as a pedal into another audio interface (this is what I typically do), or as a MIDI controller. You can use this as a complete replacement for the Focusrite Scarlet I mentioned above because it has a separate Mic input as well by using this patch. The only difference is that the HD500x doesn’t supply Phantom Power, so you’ll need a driver for that if you use a condenser mic, which is why I have the Scarlet. TIP: Don’t update the firmware to 2.6.2 because it’ll make a lot of the older patches sound horrible. Flash Firmware 2.6.1 is where it’s at. Luckily if you are dumb and updated it like I did, the Line6 Monkey program allows you to rollback the firmware.

I hope this article was helpful for you. Please comment to ask about other things in this area. I haven’t posted much about my music ever even though I’ve been playing and singing for like 20+ years at this point. I’ve only recently gotten more into recording more and digital tools.

A Word About USB Audio Hardware

I have had some issues dealing with “experts” at local music stores and even reviews of products online; in particular dealing with USB condenser microphones used for music recording. I though that since I could see how so many people claim to be experts, yet give misleading information, I should do my part is dispelling some myths about USB audio hardware using a particular example.

Even some “experts” at the music store will have no clue what they are talking about, so let me enlighten you something so you won’t fall prey to their stupidity.

I like to record music from time to time on my computer.  Nothing special, a riff here or there on the guitar, or a cover song or something. I wanted to have the simplest method for recording so when I chose to, I can focus on recording music instead of setting things up.   I found the MXL USB.006 Condenser Microphone to be perfect for my application, however everyone and their brother advised me against it. Even the guy who sold it to me at “Guitar Place” said it wasn’t as good as running a standard condenser mic through a mixer and using a USB sound card. The one he recommended was the Behringer UCA202.  So I bought them both to see the differences.

Read moreA Word About USB Audio Hardware