
 Adam sent me a stumble of a DIY vinyl wall art project on Instructables by Britsteiner. Immediately I was inspired by her project and went to work. Her Instructables project used contact paper and after a quick trip to Lowe’s and the local dollar store I decided contact paper would not work for my project. I wanted specific colors – brown and green – that I could not find as contact paper. I wanted to make a tree.
In scouring the internet for a contact paper alternative I found several wall decal sites like this one. It was here that I had the epiphany that wall decal businesses had to buy their wall vinyl from somewhere. That is when I found H&H Sign Supply. They offer a product called “Oracal Removable Wall Vinyl” by the yard. So, now that I had my supply source, I needed my inspiration.
I tried sketching an original tree design, but I wasn’t in love with my creation.
I finally found my inspiration at a wonderful wall art Etsy store called Décor Designs. They offer several tree designs and I fell immediately in love with a two tone design.

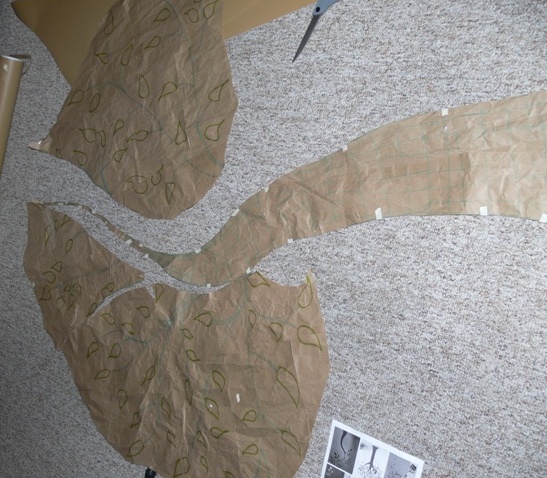
I sketched out my version of the tree on recycled brown craft paper. (The paper actually came as shipping filler in an item I recently ordered.) My sketched looked amateur on my paper (maybe it was my random color choice); I am surprised that Adam continued to encourage my project.

I didn’t intend on creating a life size sketch of my tree, but it came in handy.
Now that I had my set design, I ordered my supplies.
- 1 yard of 24″ Celedon Oracal 631 Removable Wall Vinyl ($4.00)
- 1 yard of 24″ Olive Oracal 631 Removable Wall Vinyl ($4.00)
- 3 yards of 24″ Light Brown Oracal 631 Removable Wall Vinyl ($12.00)
Because I already owned scissors and masking tape, the additional cost for creating this project ended up being $29.50. After the project was completed, I measured that I used 29 inches of olive wall vinyl (1 yard = $4), 12 inches of celadon wall vinyl (1 yard = $4), and 81 inches of light brown wall vinyl (3 Yards = $12). On checkout, I selected “Other Shipping Options” to choose the cheapest shipping method $9.95 Flat Ground Rate. $4+ $4+ $12+ $9.95 yields my grand total of $29.50. If I lived near Sturgis, Kentucky, I could have picked up the vinyl for free.

As soon as I received my shipment, I went to work. First I strategically used my life size sketch to create templates to cut out my vinyl. I cut out the base of the trunk first. I used masking tape to adhere my template to the vinyl.

At this point I was excited, so I attached the trunk to my wall right away. This piece was the most difficult to attach because it was the largest single piece I used. Adam helped attach it to the wall; teamwork rocks!

I used old gift cards as squeegees to apply the wall vinyl sticker to the wall evenly. Any air bubbles that appeared (there were very few!) were easily squeegeed away.

I continued to cut out my tree sketch to create templates for the main branches. This is where things started to look messy, but the process was smooth.

With the branches, my tree started to look like, well – a tree!

For the smaller branches I stopped using my template. I cut out branches freehand and used masking tape to position them on the wall temporarily. Once I found the positioning I liked, I peeled off the vinyl backing and stuck the branch in place.

I used masking tape so much for this project that I found it easier to have pieces ready to go.

At this point in my design I also stopped using the gift card “squeegee”. I was able to smooth the vinyl onto the wall with my fingers. Throughout the project, I found this wall vinyl material to be easy to use.

With all my branches in place, I was now ready to start adding leaves. I first cut out small squares of wall vinyl.

Using a leaf template I printed, I systematically cut out my leaves. I placed 4 pieces of the pre-cut wall vinyl squares in a stack and cut out 4 leaves at a time. A great hint – put two square pieces with the green facing up and two green facing down before you cut. This creates leaves that point in different directions!

Once again I used masking tape to place items before adhering permanently (Well, semi-permanently – wall vinyl peels off!) I used a LOT of masking tape, about two pieces for every leaf.

My design ended up being just over seven feet tall, so I need a stool to work comfortably on the tall parts. My masking tape obsession continued, as I had small pieces stuck everywhere.

Just like my inspiration tree, I decided to end every branch in the same color leaf, which in my case was an olive colored leaf. The celadon green leaves served as filler for the in-between spaces on the branches.

To create a whimsical look, several of the celadon colored leaves where placed away from branches – as if the wind had blown them off. Since I was still using my fingers as the “squeegee”, they were beginning to feel a little raw; it was time for reinforcements. Adam helped here with the placement and attachment of the celadon colored leaves.

I like how using two colored leaves created a fuller look. I was worried about the visual disturbance the corner would potentially create for my design, but in end I do not find it to be distracting. Even better, the vinyl smoothed into and around the corner seamlessly. It didn’t impede my project whatsoever.

The resulting tree I created is 92 inches tall. On the wall with the trunk, the tree spans 46 inches wide. On the adjacent wall, the tree spans an additional 28 inches. On the two walls combined, my tree is 74 inches wide.

I am extremely satisfied with my resulting tree wall vinyl mural. Every time I enter my living room, I stare at it in proud happiness. To sum up this project, I spent:
- $29.50 in supplies
- 2 days of work cutting out and attaching the vinyl pieces
And as an homage to the old visa commercials, the cost of the feeling I got from doing it my self – PRICELESS!
Very nice job! Thanks for the tutorial.
Here is the 2nd time we have come across your blog in the last few weeks. Appears like I should notice it.
ahhhhh thank you so much for posting this! It will help me so much! I am trying to make a tree kinda like yours! I have been looking for vinyl but can not find any and there are so many different types to choose from!l I will have to look at that website! thanks!
WOW! I have to admit that you really got your money’s worth. A tree like that could retail for well over $60 bucks and you did it at half the cost. The best part of it all is that you didn’t have to settle for some design from some site, you made the design that you thought would suit you best. Keep up the great work. Really a learning experience….
Thank you! I recently moved and obviously couldn’t take the tree with me. Because I rented I was saddened I would have to take it done, but thankfully the new tenant liked the tree so the landlord let me keep it up. Now that I have a new house that is mine (heart!); I am looking forward to a new creation for my new space. It is a fun process!
Wonderful creation….
Thank you! ( I removed your links because I do not want advertising in comments, even though your products look great!)
Wow! I’ve never seen anybody do something of that size by hand. Very nice job!
Girl, I am so proud of you!
You’ve got to be kidding me – You said you were surprised hubby continued to encourage your efforts here; You installed a security system yourself/ves for crying out loud!!! Just see what you people are made of.
Awesome tutorial! I’ve been looking for tree decals for the nursery but they were either expensive or too short. Thanks again!
Wow man you have done a nice work and the designs nicely merge with the color of the room
Thanks!
May be a long shot asking, but do you have any idea where you found the leaf template online?
We just did it freehand with scissors.